OPERATION
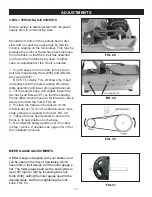
FIG. 22
FIG. 23
15
CHANGING THE SANDING BELT
1. Remove the plastic Cover (#74) from the
frame by unscrewing the two knobs (#75).
2. Tilt the sanding belt table forward to 45° so
that there is ample space between the platen and
rear of the table to remove the belt.
3. Press down on the tracking knob (FIG. 21) to
compress the spring tension, and then be able to
slide the sanding belt off the three pulleys.
4. Install a new sanding belt by compressing the
tracking knob and sliding the new belt onto the
three drive wheels.
NOTE:
Follow the directional arrows that are
printed on the back of the sanding belt. The belt
is to rotate down towards the sanding table.
See FIG. 22.
5. Re-attach the safety cover onto the frame with
the two knobs.
6. Check the belt tracking to ensure that the belt
is riding on the center of the drive wheels. See
page 14 for the belt tracking procedures.
Always ensure the sander is
unplugged prior to attempting any assembly,
installation or changing of parts and accessories.
CHANGING THE SANDING DISC
1. Remove and set aside the miter gauge.
2. Remove the sanding disc table.
3. Peel the used abrasive disc from the metal
sanding disc plate. FIG. 23.
4. Make sure that the disc plate is clean of any
residue.
5. Peel the protective backing from the new PSA
8” abrasive sanding disc.
6. Center and press the new 8” PSA sanding disc
firmly onto the disc plate.
7. Replace the sanding table and handle that
were removed in step 2.
SANDING
BELT
DIRECTION
NOTE:
Hook & Loop sanding discs cannot
be used with this sander! Only 8” sand
-
ing discs with pressure sensitive adhesive
(PSA) backing can be used.
See page 21 for information on replace
-
ment sanding belts and discs.

