background image

PARTS LIST

23

RIKON P

ART NO.

Wire Retainer Ring Flat Key    5x50 Ball Bearing  6202 2RS Flat Key    5x25 Drive Shaft Flange Plate Ball Bearing    6002 2RS Phillips Screw    M4x12 Spring W

asher    D4

Short Guide Wheel Shaft Hex Socket Cap Screw     M10x40 Flat W

asher    D10

Rotation Spring Spacer Bushing Compressed Spring Belt 

Adjusting Knob

Guide Roller Support

Guide Wheel Shaft Belt Frame Casting Special Nut    M10 Roll Pin          3x20 Belt Backstop Platen

Hex Nut    M6

Hexagon Set Screw    M6x45 Driving Wheel Hexagon Set Screw    M5x16

Guide Roller Wheel

C-Clip W

asher    D15

Sanding Belt Cover Rotary Knob Sanding Belt    1” x 42”

Hex Bolt    M8x15

Table Support Bracket Sanding Belt 

Table

Hexagon Set Screw    M5x20 Flat W

asher

Spring W

asher    D6

Hex Socket Cap Screw    M6x10 Power Cord Hex W

rench    8mm

Hex W

rench    2.5mm

Drive Pulley Holder for Miter Gauge Phillips Screw    M4x7 Holder for W

rench

P50-144-46 P50-144-47 P50-144-48 P50-144-49 P50-144-50 P50-144-51 P50-144-52 P50-144-53 P50-144-54 P50-144-55 P50-144-56 P50-144-57 P50-144-58 P50-144-59 P50-144-60 P50-144-61 P50-144-62 P50-144-63 P50-144-64 P50-144-65 P50-144-66 P50-144-67 P50-144-68 P50-144-69 P50-144-70 P50-144-71 P50-144-72 P50-144-73 P50-144-74 P50-144-75 P50-144-76 P50-144-77 P50-144-78 P50-144-79 P50-144-80 P50-144-81 P50-144-82 P50-144-83 P50-144-84 P50-144-85 P50-144-86 P50-144-87 P50-144-88 P50-144-89 P50-144-90

RIKON P

ART NO.

DESCRIPTION      

KEY

 NO.

46 47 48 49 50 51 52 53 54 55 56 57 58 59 60 61 62 63 64 65 66 67 68 69 70 71 72 73 74 75 76 77 78 79 80 81 82 83 84 85 86 87 88 89 90

P50-144-1 P50-144-2 P50-144-3 P50-144-4 P50-144-5 P50-144-6 P50-144-7 P50-144-8 P50-144-9 P50-144-10 P50-144-1

1

P50-144-12 P50-144-13 P50-144-14 P50-144-15 P50-144-16 P50-144-17 P50-144-18 P50-144-19 P50-144-20 P50-144-21 P50-144-22 P50-144-23 P50-144-24 P50-144-25 P50-144-26 P50-144-27 P50-144-28 P50-144-29 P50-144-30 P50-144-31 P50-144-32 P50-144-33 P50-144-34 P50-144-35 P50-144-36 P50-144-37 P50-144-38 P50-144-39 P50-144-40 P50-144-41 P50-144-42 P50-144-43 P50-144-44 P50-144-45

Carriage Bolt    M10x20 Flat W

asher    D10

Spring W

asher    D10

Hex Nut    M10

Base Carriage Bolt    M10x25 Hex Socket Cap Screw    M10x20

Hex Nut      M8

Flat W

asher    D8

Rubber Foot

Spring W

asher    D8

Hexagon Bolt   M8x20

Cord Clip

Phillips Screw    M4x10 Sanding Disc Casting Indicator 

Arrow

Flat W

asher       D6

Phillips Screw    M6x15 Dust Collector Fitting Guide Block Cylindrical Pin Sanding Disc 

Table

Angle Scale Plate Rivet    2x5 Adjustable Lever Handle Big Flat W

asher    D10

Miter Gauge Bar Miter Gauge Dial Plastic W

asher    D6

Small Rotary Lock Knob Sanding Disc Lower Safety Plate Sandpaper 8” PSA Sand Disc Plate Hexagon Set Screw    M5x5 Flat W

asher    D4

Phillips Screw    M4x45 Drive Belt Cover

V-Belt

Rear Safety Plate Hex Nut with Flange    M4 Hexagon Set Screw     M5x6 Belt Pulley

Motor

Switch w/Safety 

Tab    HY7

Switch Cover

DESCRIPTION      

KEY

 NO.

1 2 3 4 5 6 7 8 9 10 11 12 13 14 15 16 17 18 19 20 21 22 23 24 25 26 27 28 29 30 31 32 33 34 35 36 37 38 39 40 41 42 43 44 45

Summary of Contents for 50-144

Page 1: ...hase in your manual for future reference Serial Number _________________________ Date of purchase _________________________ For technical support or parts questions email techsupport rikontools com or...

Page 2: ...Troubleshooting 19 20 Notes 20 Accessories 21 Warranty 21 Parts Diagram 22 Parts List 23 This owner s manual is not a teaching aid and is intended to show assembly adjustments and general use NOTE Th...

Page 3: ...trical receptacle The 3rd prong is used to ground the tool and provide protection against accidental electric shock DO NOT remove the 3rd prong See Grounding Instructions on the following pages 4 AVOI...

Page 4: ...er cord An undersized cord will cause a drop in line voltage resulting in a loss of power and overheating USE ONLY A 3 WIRE EXTENSION CORD THAT HAS A 3 PRONG GROUNDING PLUG AND A 3 POLE RECEPTACLE THA...

Page 5: ...he grounding instructions or if you are not sure the tool is properly grounded when installing or replacing a plug USE ONLY A 3 WIRE EXTENSION CORD THAT HAS THE PROPER TYPE OF A 3 PRONG GROUNDING PLUG...

Page 6: ...all of the following instructions 2 Do not attempt to operate this machine until it is completely assembled 3 Do not turn ON this machine if any pieces are damaged or missing 4 If you are not familia...

Page 7: ...Assembly H V Belt Rear Cover I Dust Port 2 J Disc Dust Cover K Miter Gauge L Table Lock Handles M Hardware Pack with Wrench Miter Gauge Holders N Hex Wrench 2 5MM O Hex Wrench 8MM P Manual Warranty Ca...

Page 8: ...ully remove all contents from the shipping carton Compare the contents with the list of contents to make sure that all of the items are accounted for before discarding any packing material Place parts...

Page 9: ...l tighten at this point INSTALL THE V BELT 5 The large Belt Pulley 42 is on the motor arbor and the smaller Pulley 87 is on the arbor that extends from the frame to drive the sanding belt Slip the V B...

Page 10: ...6 Install the sanding disc onto the motor arbor Line up the disc s keyway to the motor s shaft key and slide the disc in place Align the disc up with the disc guard so it is slightly proud of the cove...

Page 11: ...after the table is set to 90 see page 16 The disc table will tilt from 45 to 90 FIG 12 INSTALL THE BELT SANDING TABLE 24 An adjustable Handle and Washer 25 26 are supplied to hold the Sanding Belt Tab...

Page 12: ...kbench 3 There are two options for mounting the sander to the workbench Use the two extra holes in the base located by the front right foot and rear left foot when looking at the sanding belt table Us...

Page 13: ...l help prevent resin or debris from building up on one area of the disc and also helps to prevent burning of the sanded surface from excessive abrasive action heat build up FIG 16 FIG 17 FIG 18 OPERAT...

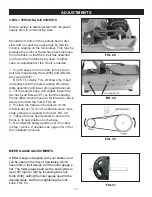
Page 14: ...nd ing abrasives time to do their work 5 Move your work piece slightly left and right on the belt This will help prevent resin or debris from building up on one area of the belt and also helps to prev...

Page 15: ...6 Check the belt tracking to ensure that the belt is riding on the center of the drive wheels See page 14 for the belt tracking procedures Always ensure the sander is unplugged prior to attempting any...

Page 16: ...work For most sanding operations the table will likely remain at a 90 angle to the belt A positive stop is provided with your sander to ensure fast positioning of the table at 90 degrees to the belt...

Page 17: ...der back and slightly loosen the two hex head Screws 7 so that the sanding Frame 64 can be moved a bit forward or back wards to tension the V belt FIG 29 3 Position the frame so the tension on the V b...

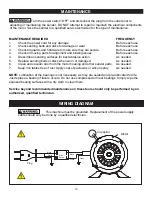
Page 18: ...ng parts for alignment and binding issues Before each use 4 Dress Clean sanding surfaces for best abrasive action As needed 5 Replace sanding belts or discs when worn or damaged As needed 6 Clean and...

Page 19: ...e Motor stalls or runs slow resulting in blown fuses or tripped circuit 1 Motor is overloaded 2 Short circuit in the motor or loose connections 3 Low line voltage 4 Incorrect fuses or circuit break er...

Page 20: ...k piece moving while sanding Sanding surface clogs quickly 1 Too much pressure against the belt or disc 2 Sanding softwood or highly resinous woods 1 Reduce pressure on work piece while sanding 2 Use...

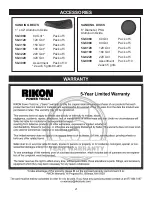
Page 21: ...80 180 Grit Pack of 5 50 8220 220 Grit Pack of 5 50 8999 Assortment Pack of 10 2 each 5 grits SANDING BELTS 1 x 42 Aluminum Oxide 50 3080 80 Grit Pack of 5 50 3120 120 Grit Pack of 5 50 3150 150 Grit...

Page 22: ...5 27 21 28 29 30 14 31 32 26 34 14 33 48 72 38 39 40 41 42 14 44 45 37 47 9 51 49 50 79 53 52 54 41 55 56 57 58 59 60 61 62 63 64 77 7 3 2 67 68 69 70 71 48 72 73 74 89 PARTS DIAGRAM NOTE Please refer...

Page 23: ...TION KEY NO 46 47 48 49 50 51 52 53 54 55 56 57 58 59 60 61 62 63 64 65 66 67 68 69 70 71 72 73 74 75 76 77 78 79 80 81 82 83 84 85 86 87 88 89 90 P50 144 1 P50 144 2 P50 144 3 P50 144 4 P50 144 5 P50...

Page 24: ...www rikontools com 50 144M1 50 144 For more information 16 Progress Road Billerica MA 01821 877 884 5167 978 528 5380 techsupport rikontools com...

Reviews: