background image

SAFETY INSTRUCTIONS


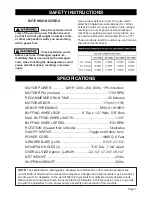
SPECIFIC SAFETY 

INSTRUCTIONS FOR BUFFERS

Basic precautions should always be followed 

when using your buffing machine. To reduce the 

risk of injury, electrical shock, or fire, comply with 

the safety rules listed below:

1.  

ALWAYS WEAR EYE PROTECTION.


Everyday eyeglasses are 

NOT

 safety glasses. 

ALWAYS

 wear Safety Goggles (that comply with 

ANSI standard Z87.1) when operating power 

tools. The operation of any buffer or power tool 

can result in debris being thrown into your eyes, 

which can result in severe and permanent eye 

damage.

2.  

ALWAYS WEAR RESPIRATORY PROTEC-

TION. 

Exposure to fine dust and buffing debris 

particles can be hazardous to your health. Al

-

ways wear a NIOSH-approved respirator or dust 

mask to reduce your risk of respiratory damage.

3.  

SECURE THE BUFFER 

to a stand or work

-

bench to prevent sliding or tipping during use. 

See page 10.

4.  

WEAR TIGHT FITTING GLOVES 

when buff-

ing as the work pieces can get hot or have sharp 

edges. Gloves should be tight so they will not get 

caught in the buffing wheel. Leather gloves are 

recommended. 

5.  

INSPECT THE WORK PIECE

 before buffing 

to insure that there are no loose parts, knots, 

splinters or sharp and potentially dangerous 

shaped areas that may catch and thrown at the 

operator.

6. 

 NEVER BUFF SMALL WORK PIECES 

with-

out them being properly held by pliers or clamps, 

or they will be ripped out of your hands and 

possibly cause harm to you or damage the item.

7.  

NEVER PUT FINGERS INSIDE WORK 

PIECES 

to hold them when buffing. Should the 

object being buffed be caught and thrown by the 

wheel, damage to your fingers may result.

8.  

DO NOT STAND IN FRONT OF THE BUF-

FER WHEN STARTING IT. 

Stand to one side of 

the Buffing and turn it “ON”. Wait at the side for 

one minute until the machine comes up to full 

speed. There is always a possibility that debris 

from a glazed or damaged buffing wheel may be 

discharged towards the operator.

9.  

ALLOW THE BUFFER TO ATTAIN FULL 

SPEED BEFORE BEGINNING WORK. 

Hold the 

work piece securely, and slowly ease the work into 

the buffing wheel. Be careful of any sharp edges  

or corners that may catch on the wheel and be 

torn from your hands.

10.  

DO NOT

 buff using the sides or the rear of 

the buffing wheels. Buff only on the wheel slightly 

below the wheel center.

11.  

NEVER STOP THE BUFFER BY FORCING 

MATERIAL INTO THE WHEEL.

 Let the buffer 

stop rotating on its own.

12.  

RESURFACE / DRESS THE BUFFING 

WHEEL OFTEN. 

This will keep the wheel surface 

free of residue and glaze. Use a metal rake or stiff 

wire brush.

13.  

THE DIAMETER OF THE BUFFING 

WHEELS WILL DECREASE WITH USE. 

Replace 

the buffing wheels when they become too small 

for effective buffing, to avoid any damage should 

the sewn or bonded material break apart.

14.  

REPLACE A DAMAGED BUFFING WHEEL 

IMMEDIATELY.

 A damaged wheel can discharge 

debris at a high velocity towards the operator. 

Tighten the spindle nut just enough to hold the 

buffing wheel firmly on the arbor. 

DO NOT 

over-

tighten the nut. Only use the wheel flanges provid

-

ed with the grinder. When selecting a replacement 

buffing wheel, use only properly sized wheels, and 

verify that the wheel has a higher R.P.M. rating 

than the maximum R.P.M. of the Buffer.

15.  

FREQUENTLY

 clean buffing debris and dust 

from beneath and around the machine. Keep the 

work area clean.

Page 5

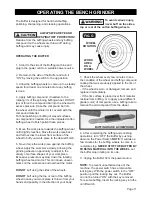
Summary of Contents for 81-608

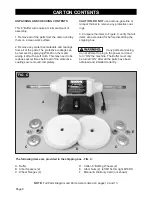
Page 1: ...nual Record the serial number and date of purchase in your manual for future reference Serial Number ______________________ Date of purchase ______________________ For technical support or parts quest...

Page 2: ...ngle most important consideration in the operation of this equipment The following instructions must be followed at all times Failure to follow all instructions listed below may result in electric sho...

Page 3: ...is used to ground the tool and provide protection against accidental electric shock DO NOT remove the 3rd prong See Grounding Instructions on page 6 4 AVOID A DANGEROUS WORKING ENVIRONMENT DO NOT use...

Page 4: ...s 24 STAY ALERT WATCH WHAT YOU ARE DOING AND USE COMMON SENSE WHEN OPERATING A POWER TOOL A moment of inattention while operating power tools may result in serious personal injury 25 ALWAYS WEAR A DUS...

Page 5: ...and thrown by the wheel damage to your fingers may result 8 DO NOT STAND IN FRONT OF THE BUF FER WHEN STARTING IT Stand to one side of the Buffing and turn it ON Wait at the side for one minute until...

Page 6: ...HIBITED IN CANADA 16 ADDITIONAL INFORMATION regarding the safe and proper operation of this product is avail able from Power Tool Institute 1300 Summer Avenue Cleveland OH 44115 2851 www powertoolinst...

Page 7: ...TOR POWER 1 2HP 120V 2 5A 60Hz 1Ph Induction MOTOR RPM no load 1750 RPM RECOMMENDED RUN TIME 30 Minutes MOTOR ARBOR 17mm 11 16 ARBOR THREADING M16LH M16RH BUFFING WHEEL SIZE 8 Dia x 1 2 Wide 5 8 Bore...

Page 8: ...T use acetone gasoline or lacquer thinner to remove any protective coat ings 3 Compare the items to Figure C verify that all items are accounted for before discarding the shipping box If any parts are...

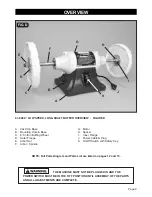
Page 9: ...nge J Power Cable Plug K On Off Switch with Safety Key 81 608 8 LOW SPEED LONG SHAFT BUFFER OVERVIEW FIGURE D Page 9 NOTE Full Parts Diagram and Parts List are listed on pages 12 and 13 THE MACHINE MU...

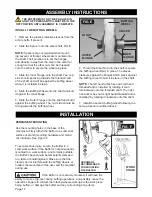
Page 10: ...d by rotating it coun terclockwise onto the threaded shaft The right hand arbor hex nut is right hand threaded and is linstalled by rotating it clockwise onto the shaft 7 Install the second buffing wh...

Page 11: ...y of surface shapes of your work piece Excessive pressure may slow down the rotating buffing wheel and motor This can cause uneven marks on the work piece and overheat the motor DO NOT buff using the...

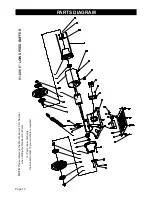
Page 12: ...TS DIAGRAM 81 608 8 LOW SPEED BUFFER Page 12 NOTE Please reference the Manufacturer s Part Number when calling for Replacement Parts For Parts under Warranty the Serial Number of your machine is requi...

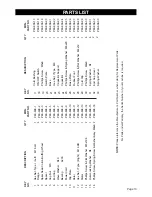
Page 13: ...608 15 P80 608 16 1 1 4 1 1 1 1 1 2 1 4 4 1 6 6 2 2 17 18 19 20 21 22 23 24 25 26 27 28 29 30 31 32 33 Cord Bushing ON OFF Switch Phillips Screw M5x8 Switch Plate Base Hex Nut I Type M8 Capacitor Sup...

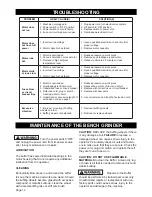
Page 14: ...plugged in 2 Power switch in OFF position 3 Power switch or cord is faulty 4 Fuse or circuit breaker are open 1 Plug power cord into electrical receptacle 2 Lift switch to ON position 3 Replace switch...

Page 15: ...anty card that was included with your order and send it to RIKON Warranty 16 Progress Road Billerica MA 01821 The card must be entirely completed in order for it to be valid If you have any questions...

Page 16: ...www rikontools com 81 608M1 81 608 For more information 16 Progress Road Billerica MA 01821 877 884 5167 978 528 5380 techsupport rikontools com...

Reviews: