background image

14 

INSTALLATION INSTRUCTION 

The machine is equipped with power voltage compensation device. When the power voltage fluctuates 
between±15% of rated voltage, it still can work normally.   

When the machine is used with long cables, in order to prevent voltage form going down, bigger section 
cable  is  suggested.  If  the  cable  is  too  long,  it  may  have  great  affluence  on  the  arc-striking  or  other 
performance  of  cutting  system,  e.g.  the  HF  arc-striking  performance  get  weak  or  the  system  work 
abnormally. So cables of configured length are suggested. 

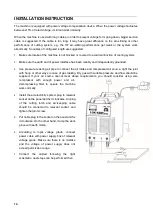
1. 

Make sure intake of the machine is not blocked or covered to avoid malfunction of cooling system. 

2. 

Make sure the earth end of power interface has been reliably and independently grounded. 

3. 

Use pressure-resisting air pipe to connect the air intake and compressed air source, tight the joint 
with hoop or other ways in case of gas leaking. Dry gas with suitable pressure and flow should be 
supplied.  If  your  air  source  cannot  meet  above  requirements,  you  should  consider  using  sole 
compressor  with  enough  power  and  air-
decompressing  filter  to  ensure  the  machine 
work normally. 

4. 

Install the air-electricity system plug to relevant 
socket on the panel and fix it clockwise. Air plug 
of  the  cutting  torch  and  arc-keeping  cable 
should  be  connected  to  relevant  socket,  and 
tighten the joint screw. 

5. 

Put cable plug to the socket on the panel and fix 
it clockwise. On the other hand, clamp the work 
piece with earth clamp. 

6. 

According  to  input  voltage  grade,  connect 
power cable with power supply box of relevant 
voltage  grade.  Make  sure  there  is  no  mistake 
and  the  voltage  of  power  supply  does  not 
exceed permission range.   

7. 

Connect  the  cabled  following  the  right 
schematic, next steps can be performed then. 


Air compressor 

Installation Instruction 

Power supply 

Out  In 

Air regulator 

Workpiece 

Earth clamp 

Cutting torch 


Summary of Contents for LGK 100IJ

Page 1: ...3 LGK 100IJ CUTTING MACHINE USER MANUAL...

Page 2: ...rt or property lose if it is not followed The words after this sign means there is potential risk which may cause equipment fault or break if it is not followed Version Version YF TAE 0099 A0 Released...

Page 3: ...L PARAMETERS TABLE 12 PANELFUNCTION INSTRUCTION 13 INSTALLATION INSTRUCTION 14 INSTALLATION INSTRUCTION 15 NOTES OR PREVENTIVE MEASURES 16 QUESTIONS TO BE RUN INTO DURING CUTTING 17 MAINTENANCE 18 NOT...

Page 4: ...cause choke Spark and hot workpiece after cutting may cause fire Bad connected cable may cause fire Incompletion connection of workpiece side circuit may cause fire Never cut on the case of tinder st...

Page 5: ...s below to avoid electric shock Keep away from any electric parts Earth the machine and workpiece by professional personnel Cut off the power before installation or checking and restart 5 minutes late...

Page 6: ...en operating on trunks boilers cabins etc Please accept the supervisor s inspection when operating in narrow space Air the room and wear breathe preventive facilities Never operate in degrease washing...

Page 7: ...checking the wire feeding is normal or not or the shooting wire may stab your eyes and face Keep your eyes face or other naked parts away from the end of torch when feeding the wire manually or pressi...

Page 8: ...cemaker or audiphone f Equipments for adjustment and measurement g Anti disturb capability of other used equipments Users should ensure these equipments and the environment are compatible which may ne...

Page 9: ...rm strong plasma arc It has the functions of arc initiation current arc stop current cutting current basic value current current ascending time current descending time gas delay time continuous adjust...

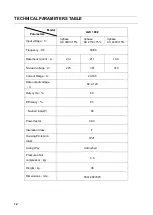
Page 10: ...Hz 50 60 Rate input current A 23 1 21 1 19 9 No load voltage V 276 301 319 Current Range A 23 100 Rate output voltage V 89 2 120 Duty cycle 60 Efficiency 85 No load loss W 80 Power factor 0 93 Insula...

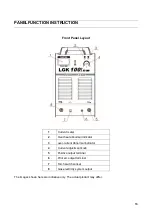
Page 11: ...er heat abnormal indicator 3 over current Abnormal indicator 4 Current adjustment knob 5 Positive output terminal 6 Pilot arc output terminal 7 Torch switch socket 8 Gas electricity system output The...

Page 12: ...e joint with hoop or other ways in case of gas leaking Dry gas with suitable pressure and flow should be supplied If your air source cannot meet above requirements you should consider using sole compr...

Page 13: ...lve turn up the pressure adjusting knob Turn the pressure to rated value meter inside shows Kgf cm2 and then put down the knob means increasing pressure _ means decreasing pressure 6 Scale of the mete...

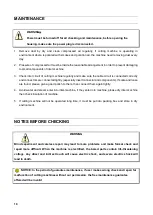
Page 14: ...is adequately ventilated It is important for the performance and the longevity of the machine 2 Do not over load The operator should remember to watch the max duty current Response to the selected du...

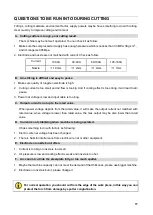
Page 15: ...d input cable is too long C Output current is not up to the rated value When power voltage departs from the rated value it will make the output current not matched with rated value when voltage is low...

Page 16: ...If scale and loose are found please give a good polish to them then connect them again tightly 4 Avoid water and steam enter into inter machine if they enter into machine please dry inter machine the...

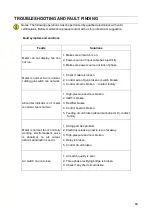
Page 17: ...ontrol wire of gun broken or switch broken 3 Control circuit is broken Contact factory Abnormal indicator is lit meter is normal fan is normal 1 High pressure device is broken 2 IGBT is broken 3 Recti...

Reviews: