background image

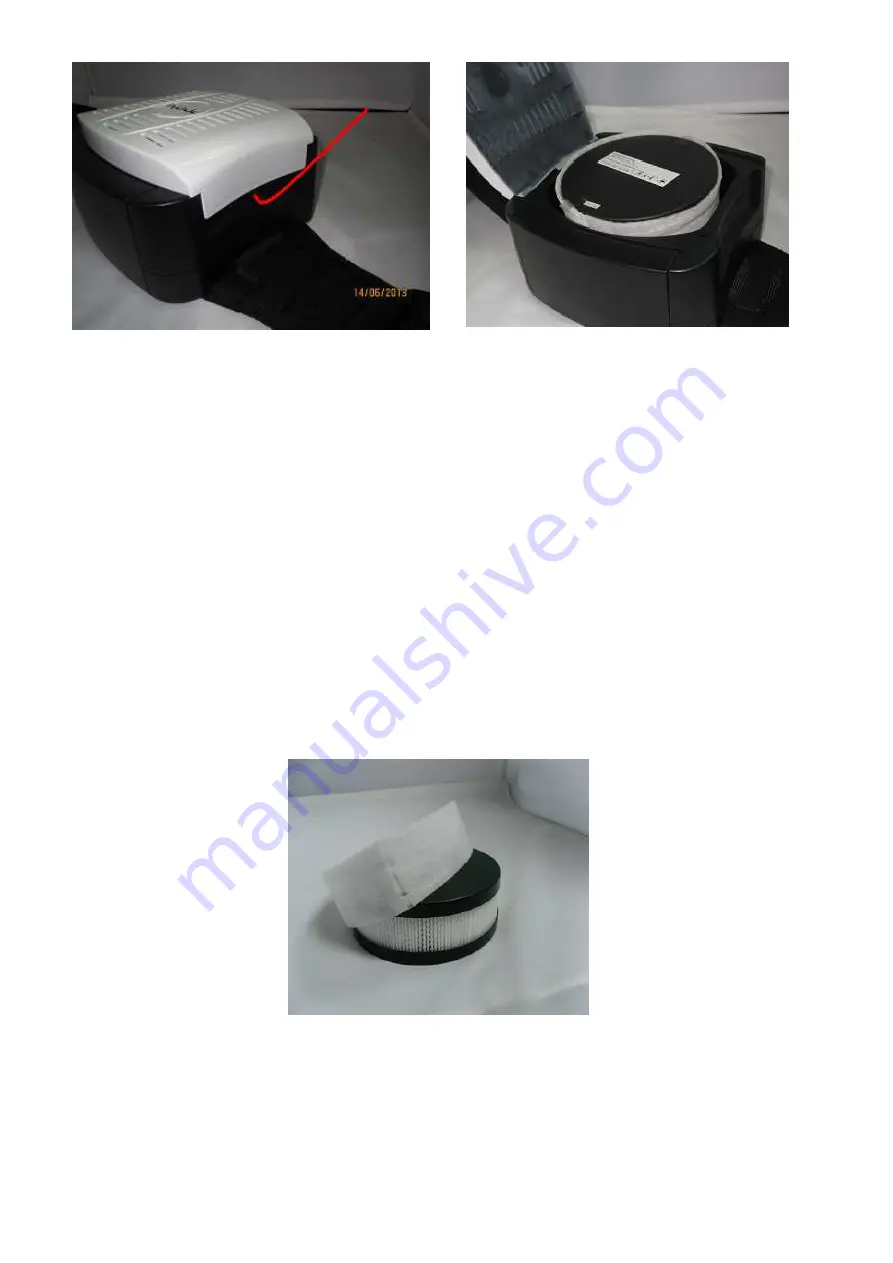
5.2.4. Fitting a new Filter:
Inserting a new filter: Put the filter back into position using the same rotating motion and gently
push until it fits well on the body of the unit. 

Re fitting the Cover; follow the alignment as per the pictures. Ensure the filter clips enter the
Blower body, then rotate Clockwise until closed. Do not attempt to use the blower unit without
the cover fitted correctly.

5.2.5. Changing the Pre Filter
The pre filter is a sleeve which is fitted over the main filter. To remove / replace simply pull off
the old filter and stretch the new one into position. It's important to ensure that the filter media of
the main filter is completely covered by the pre filter

5.2.6. Attaching the Hose to the Blower Unit:
Align the pins of the Hose Bayonet connector with the slots in the air outlet of the blower. Push
the Bayonet connector into the blower until it reaches the bottom of the hole and then twist in a
clockwise direction until the locating pins clips into place.

Fitting the hose to the hoods is the same procedure.

Summary of Contents for CR-2B01/2013

Page 1: ...CR 2B01 2013 Powered Air Purifying Respirator Item number 605813 User Instruction Manual 2 2...

Page 2: ...his leaflet Contents 1 Introduction 2 Approvals 3 Preconditions for use 4 System Overview 5 Unpacking Assembly Usage 6 Before Use 7 Maintenance Cleaning 8 Fault finding 9 Storage and transportation 10...

Page 3: ...switched off little or no respiratory protection is to be expected When the blower unit is switched off a rapid build up of carbon dioxide and depletion of oxygen within the head unit may occur and s...

Page 4: ...unit and seek medical advice 4 System Overview The CR 2B01 2013 unit is a belt mounted powered respirator with a replaceable disposable high efficiency particle filter system The system is certified w...

Page 5: ...6 User Instructions 5 2 Assembly Attach the respiratory unit onto the belt Pass the inner strap through the back of the blower loops The pass through the 3 belt loops and then through the buckle Fit...

Page 6: ...Pre Filter As soon as the warning alarm sounds the pre filter should be exchanged or checked In very dusty area s this can be necessary on a frequent basis The filters must be regularly checked see Ai...

Page 7: ...ilter The pre filter is a sleeve which is fitted over the main filter To remove replace simply pull off the old filter and stretch the new one into position It s important to ensure that the filter me...

Page 8: ...5 3 Usage Switch on the unit by pressing the ON OFF button on the control panel The airflow can be either the low speed 180 l min or the high speed 220 l min The speed denoted buy the lit LED and the...

Page 9: ...r additional suggestions 6 Before use 6 1 Inspection before use Each time before starting work check that all components are in good condition with no visible damage like holes tears etc Replace any d...

Page 10: ...regime and keeps the battery fully charged The charging time is 6 to 8 hours 6 3 1 Battery charging 1 Check that the voltage of the electrical power supply is correct 2 Plug the charger into the sock...

Page 11: ...the CR 2B01 2013 system it is necessary to check the following That all parts of the air supply system are assembled properly The battery and its connector Whether the charger is not faulty or malfun...

Page 12: ...s items Do not store outside the temperature range of 0 C to 40 C or with humidity above 75 RH 10 List of Parts and Assembly Drawing ITEM NUMBER DESCRIPTION PART NUMBER 1 Face seal for GT 2B01 2013 60...

Page 13: ...rate below 170L min Actual Protection Factor APF 20 Noise level 65dBA Operating time greater than 8 hours on minimum flow rate with a new filter and fully charged battery in a clean environment 5 hou...

Page 14: ...This guarantee is subject to The CR 2B01 2013 unit has been used solely for the purpose for which it is intended The CR 2B01 2013 unit has not been subject to misuse accident modification or repair N...

Reviews: