background image

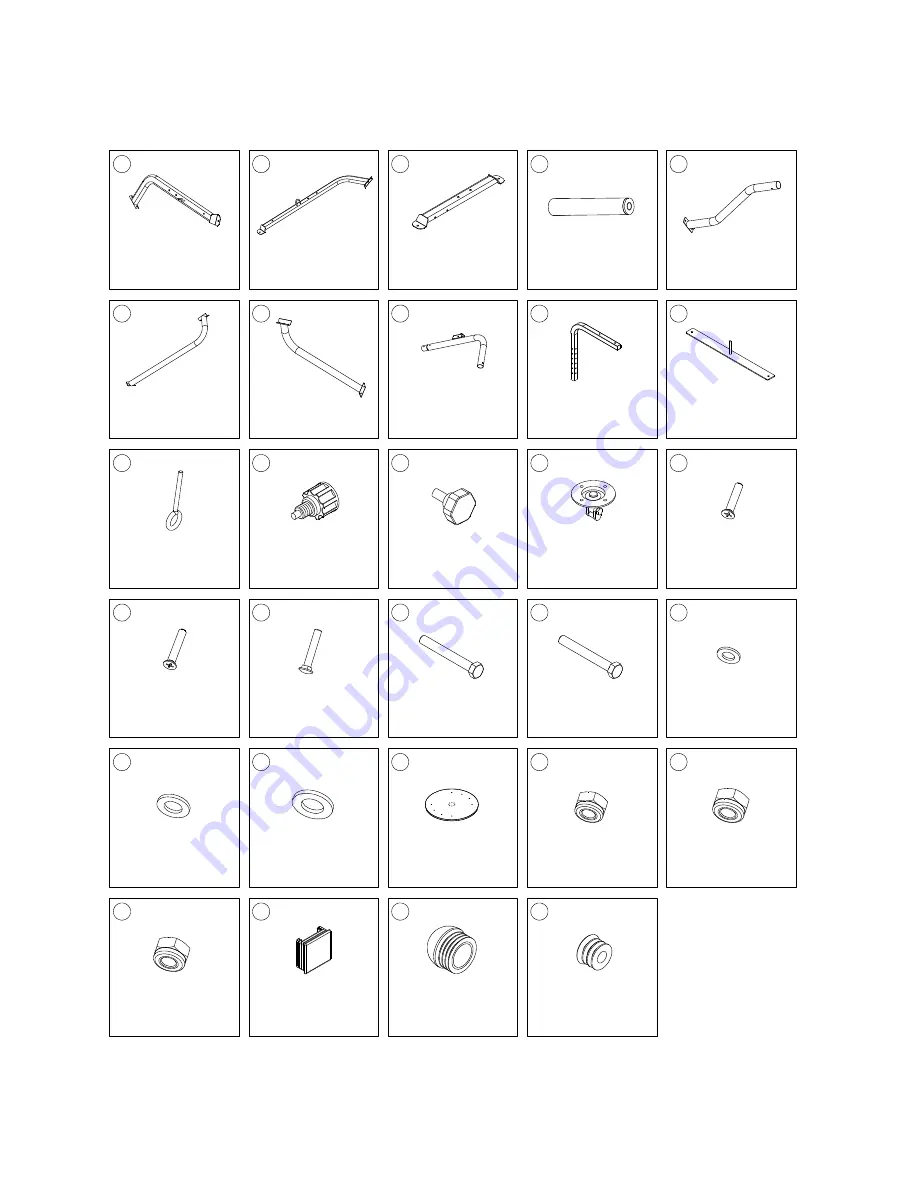
PARTS LIST 

Platform Support
Code:
Qty:2

Punchbag Hook
Code:
Qty:1

M10*80 Bolt
Code:
Qty: 2

M10*90 Bolt
Code:

Qty: 2

26

27

28

29

45*45 Tube Plug

Code:
Qty:2

? 60 Round Tube Plug
Code:
Qty:1

M10 Lock Nut
Code:
Qty:11

? 25 Round Tube Plug
Code:
Qty:2

1

Right Base
Code:

Qty:1

2

Left Base
Code:
Qty:1

3

Main Base
Code:

Qty:1

4

Plate Bar
Code:

Qty:2

5

Main Vertical Support
Code:

Qty:1

6

Right Support

Code:
Qty:1

7

Left Support
Code:

Qty:1

8

9

Punchbag Support
Code:

Qty:1

10

Platform Adjustment
Code:

Qty:1

11

12

13

M16 Popper Pin
Code:

Qty:1

14

? 10*20 Pin
Code:
Qty:2

16

M5*40 Cross Head Bolt
Code:
Qty:4

17

18

19

M10*45 Carrige Bolt
Code:

Qty:8

20

21

22

23

15

Swivel
Code:
Qty:1

M5 Washer
Code:
Qty:4

24

25

M8 Washer
Code:
Qty:6

M5 Lock Nut
Code:
Qty:4

Speed Bag Platform
Code:
Qty:1

M8*40 Cross Head Bolt
Code:

Qty:4

M10 Washer
Code:
Qty:15

M8 Lock Nut
Code:
Qty:6


Summary of Contents for Ringside trainer 700

Page 1: ...RINGMASTER RINGSIDE TRAINER 700 FRMRT700 FRMRT7000 OWNER S MANUAL ...

Page 2: ...entate each piece before attaching Do not allow children and pets to be unsupervised around the assembly or usage of this equipment Ensure all parts are in full working order before use Only one person should use the machine at any one time Do not use the equipment outdoors or around water Keep hair fingers or clothing away from moving parts Only use attachments recommended by the manufacturer Nev...

Page 3: ...ar Code Qty 2 5 Main Vertical Support Code Qty 1 6 Right Support Code Qty 1 7 Left Support Code Qty 1 8 9 Punchbag Support Code Qty 1 10 Platform Adjustment Code Qty 1 11 12 13 M16 Popper Pin Code Qty 1 14 10 20 Pin Code Qty 2 16 M5 40 Cross Head Bolt Code Qty 4 17 18 19 M10 45 Carrige Bolt Code Qty 8 20 21 22 23 15 Swivel Code Qty 1 M5 Washer Code Qty 4 24 25 M8 Washer Code Qty 6 M5 Lock Nut Code...

Page 4: ...o Main Base 3 with two M10 90 Bolts 19 four M10 Washers 22 and two M10 Lock Nuts 26 B Attach Main Vertical Support 5 to Main Base 3 with two M10 45 Carrige Bolts 17 two M10 Washers 22 and two M10 Lock Nuts 26 C Attach Plate Bar 4 to Left and Right Base 1 2 with M10 45 Bolt 17 ...

Page 5: ...Right Base 1 2 with four M10 45 Carrige Bolts 17 four M10 Washers 22 and four M10 Lock Nuts 26 C Attach Left and Right Support 7 6 to Main Vertical Support 5 and Punchbag Support 8 with two M10 80 Bolts 18 four M10 Washers 22 and two M10 Lock Nuts 26 D Attach Punchbag Hook 11 to Punchbag Support 8 with M10 Washer 22 and M10 Lock Nut 26 E Insert ø60 Round Tube Plug 28 into Punchbag Support 8 ...

Page 6: ...to Speed bag Platform 23 with four M5 40 Bolts 15 four M5 Washers 20 and four M5 Lock Nuts 24 C Attach Speed ball Platform 23 to Platform Support 10 with four M8 40 Bolts 16 four M8 Washers 21 and four M8 Lock Nuts 25 D Slide the Platform Adjustment 9 into the square tube on the Punchbag Support 8 aligning the hole and secure with M16 Popper Pin 12 and two M10 20 Pin 13 ...

Page 7: ...MADE IN CHINA FOR WWW RINGMASTERFITNESS COM AU ...

Reviews: