background image

35

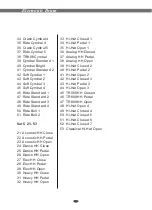
34  Crash Cymbal 4
35  Ride Cymbal 4
36  Crash Cymbal 5
37  Ride Cymbal 5
38  TR808 Cymbal
39  Cymbal Standard 1
40  Cymbal Bright
41  Cymbal Standard 2
42  Soft Cymbal 1
43  Soft Cymbal 2
44  Soft Cymbal 3
45  Soft Cymbal 4
46  Ride Standard 1
47  Ride Standard 2
48  Ride Standard 3
49  Ride Standard 4
50  Ride Bell 1
51  Ride Bell 2

Var 5  21-53

21  Acoustic HH Close 
22  Acoustic HH Pedal 
23  Acoustic HH Open
24  Dance HH Close
25  Dance HH Pedal
26  Dance HH Open
27  Elec HH Close
28  Elec HH Pedal
29  Elec HH Open
30  Heavy HH Close
31  Heavy HH Pedal
32  Heavy HH Open


33  Hi-Hat Closed 1
34  Hi-Hat Pedal 1
35  Hi-Hat Open 1
36  Analog HH Closed 
37  Analog HH  Pedal 
38  Analog HH Open 
39  Hi-Hat Closed 2
40  Hi-Hat Pedal 2
41  Hi-Hat Open 2
42  Hi-Hat Closed 3
43  Hi-Hat Pedal 3
44  Hi-Hat Open 3
45  TR808 HH Closed
46  TR808 HH Pedal
47  TR808 HH Open
48  Hi-Hat Open 4
49  Hi-Hat Closed 4
50  Hi-Hat Closed 5
51  Hi-Hat Closed 6
52  Hi-Hat Closed 7
53  Classical Hi-Hat Open 

Electronic Drum

Summary of Contents for TD90

Page 1: ...TD90 User s Manual Electronic Drum ...

Page 2: ......

Page 3: ...eat registers stoves or other apparatus including amplifiers that produce heat 9 Do not defeat the safety purpose of the polarized or grounding type plug A polarizedplug hase two blades with one wider than the other Agrounding type plug has two blades and a third grounding prong The wide blade or the third prong are provided for your safety if the provided plug does not fit into your outlet consul...

Page 4: ...Volume 12 3 Enter and Return 12 4 Tempo 12 5 Select Drum Kits 13 6 Kit 14 7 Effect 23 8 Pad 23 9 Click 24 10 Song 25 11 Drum On Off 26 12 Start Stop 26 13 Rec Play 27 29 Content of LED Display 31 Drum Kits List 32 Voice List Start to Play the Drum 14 Factory Set 33 Song List 36 MIDI Implementation Chart 37 Specifications 38 ...

Page 5: ...A FUNCTION TO FACTORY DEFAULT VALUES PRESS AND WHILE PRESSING THE DESIRED FUNCTION KEY FUNCTIONS THAT CAN BE RESET ARE KIT PAD EFFECT CLICK AND REC PLAY TO RESET A FUNCTION TO FACTORY DEFAULT VALUES PRESS AND WHILE PRESSING THE DESIRED FUNCTION KEY FUNCTIONS THAT CAN BE RESET ARE KIT PAD EFFECT CLICK AND REC PLAY CHOOSE M01 M02 M03 CHOOSE M01 M02 M03 KIT KIT CHOOSE PAD EFFECT COPY KIT TRIGGER CHOO...

Page 6: ...utton 12 SONG button DRUM ON OFF button REC PLAY button START STOP button Indicator Lamp 13 HH CTRL 14 HI HAT 15 BD KICK 16 SNARE 17 TOM1 TOM2 TOM3 18 CRASH 19 RIDE Rear Panel 20 HH CTRL jack 21 HI HAT jack 22 BD KICK jack 23 SNARE jack 24 TOM1 jack TOM2 jack TOM3 jack 25 CRASH jack 26 RIDE jack 27 AUX IN jack 28 MASTER OUT jack 29 MIDI IN jack MIDI OUT jack 30 DC 9V 31 POWER ON OFF 32 PHONES jack...

Page 7: ...t support into the base rack clamp tighten the set screw 2 Set up the knighthead tighten the set screw 1 Insert the mid tube into left and right support rack clamps Tighten the set screw with your tuning key 2 Set up the knighthead Tighten the set screw with your tuning key Drum Stand Assembly Assembly Instruction 1 2 1 2 1 2 2 Electronic Drum ...

Page 8: ...Assembly 1 1 Insert the rod into the pad hole set to a fine position and tighten the screw 2 Insert the pad rod into rack clamp set to a fine position and tighten the T screw Cymbal and Hi hat Assembly Insert the cymbal stand longer into the rack clamp and tighten the T screw 1 Electronic Drum ...

Page 9: ...t the wing nut and felt washer 2 Place the cymbal over the tilter peg put the felt washer and wing nut onto the cymbal Tilt the cymbal to your preference 1 1 Insert the module into the rack clamp 2 Tighten the T screw Module Assembly 6 felt washer wing nut Hi Hat Cymbal Crash Cymbal Electronic Drum ...

Page 10: ...Assembly 1 Place the snare onto the plate 1 tighten the screw 2 Set up plate 2 and tighten the screw 1 1 2 3 Set up plate 4 on the plate 3 tighten the screw with your screw driver 7 Screw Electronic Drum 3 4 ...

Page 11: ...4 on the plate 1 tighten the screw with your screw driver 5 Attach drum pedal to the batter side hoop with hoop holder clamp and tighten the T screw 1 2 3 4 6 Insert the beater shaft into the beater link and tighten the key bolt 8 Electronic Drum 1 2 3 4 ...

Page 12: ...k and damage to the devices make sure the power is switched OFF on the drum and all related device before making any connection Connecting the Pads and Pedals Using the provided cables connect each Trigger input jack on the rear panel of the module and make sure each pad is connected to its corresponding Trigger input jack TO CRASH TO RIDE TO HI HAT TO TOM1 TO TOM2 TO TOM3 TO SNARE TO HH CTRL TO B...

Page 13: ... OUT jack on the external MIDI device Connecting a CD Player etc AUX IN jack The audio output from a CD player connected to the AUX IN jack on the rear panel can be mixed with the sound of the drum brain This function is convenient when you want to play along with a favourite song Use the AUX IN volume knob to adjust the volume of the external signal Connection MIDI IN MIDI OUT MIDI IN MIDI DATA M...

Page 14: ...eadphone can be connected to the electronic drum The headphone jack is located on the front of the module Use the PHONE VOLUME knob to adjust the headphone volume Connecting the Power Supply Use the POWER switch located on the side of the module to turn off the electronic drum then connect the power adaptor to the DC IN 9V 350mA jack on the rear panel MASTER MASTER OUT OUT PHONES JACK AMPLIFIER DC...

Page 15: ...NTROLS MASTER MASTER PHONES PHONES AUX IN AUX IN 12 4 Tempo Press the TEMPO or TEMPO buttons display shows the current tempo value Press the TEMPO or TEMPO buttons to increase or decrease the tempo Range 020 240 the tempo Press TEMPO and TEMPO buttons at the same time to reset the tempo to default value You also can turn the data dial to change 3 Enter and Return Enter Press ENTER button enter the...

Page 16: ...he tempo that you want to get Tap on the pad 4 times Only the last two beats will be detected and set as your desired speed ENTER ENTER KIT KIT PAD PAD EFFECT EFFECT CLICK CLICK You can use the data dial or and buttons to select the kits which you want The unit comes with 25 NO 001 025 preset drum kits and 5 NO 026 030 user kits Press KIT button the current kit number appears 13 5 Select Drum Kits...

Page 17: ... 6 1 and Set Pad In kit mode press ENTER buttons LED shows Then press ENTER again to go into pad setting page Use data dial or buttons to select the pad you want to set You also can assign the pad by taping it hardly ENTER ENTER ENTER ENTER Hi Press ENTER button Use data dial or button to select Hat Control and ENTER ENTER 6 1 1 Hi Hat Control Electronic Drum The hi hat tone changes smoothly from ...

Page 18: ...Range 000 032 To confirm this selection press ENTER again and the content of LED display will return to the mode and and Hi Hat Press ENTER button ENTER ENTER 15 6 1 1 1 Select Voice 6 1 1 2 Hi Hat Control Level 6 1 2 Hi Hat Voice kit var 1 var 6 Voice number Reference voice list In voice select mode when you hit the pad the voice will change Hit the pad until you reach the voice you desired Press...

Page 19: ...tton use data dial or buttons to select close Hi Hat To confirm this selection press ENTER again and the content of LED display will return to the mode and Level Press ENTER button use data dial or buttons to set level value Range 000 032 To confirm this selection press ENTER again and the content of LED display will return to the mode and 16 6 1 2 1 Open Hi Hat 6 1 2 2 Close Hi Hat 6 1 2 3 Hi Hat...

Page 20: ... the force struck on the pad is above a determined force level velocity This can be used to prevent a pad from sounding because of vibrations from other pads and and Threshold ENTER ENTER When this value is too high no sound is produced when the pad is struck lightly Velocity Press ENTER button use data dial or buttons to select 4 velocity curves normal easy dynamic fixed To confirm this selection...

Page 21: ...nd the content of LED display will return to the mode and and ENTER ENTER ENTER ENTER Press ENTER button use data dial or buttons to set level value Range 000 032 To confirm this selection press ENTER again and the content of LED display will return to the mode Level and ENTER ENTER 18 6 1 3 BD Kick 6 1 3 1 Select Voice 6 1 3 2 BD Kick Level Reference 6 1 1 1 Select voice Electronic Drum ...

Page 22: ... and Velocity Press ENTER button use data dial or buttons to select 4 velocity curves normal easy dynamic fixed Reference 6 1 2 6 Pad Velocity Curve Curve and 19 6 1 3 3 BD Kick Sensitivity 6 1 3 4 BD Kick Threshold 6 1 3 5 BD Kick Velocity Curve ENTER ENTER ENTER ENTER ENTER ENTER Note Snare High Tom Mid Tom Low Tom Crash Cymbal and Ride Cymbal to set Level Sensitivity Threshold please see the de...

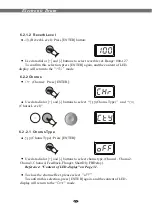
Page 23: ...to select Reverb Type and Reverb Level Reverb Type Press ENTER button Use data dial or buttons to select reverb type Room1 Room2 Room3 Hall1 Hall2 Plate Delay PanDelay Reference Content of LED display on Page 31 To confirm this selection press ENTER again and the content of LED display will return to the mode To close the reverb effect please select and press ENTER to confirm and and ENTER ENTER E...

Page 24: ...ED display will return to the mode and ENTER ENTER Chorus Type Press ENTER Use data dial or buttons to select chorus type Chorus1 Chorus2 Chorus3 Chorus4 Feedback Flanger ShortDly FBDelay Reference Content of LED display on Page 31 To close the chorus effect please select To confirm this selection press ENTER again and the content of LED display will return to the mode and ENTER ENTER 21 6 2 1 2 R...

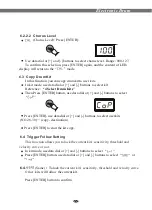
Page 25: ...R use data dial or buttons to select user kits NO 26 30 copy destination Press ENTER to start the kit copy and and and and ENTER ENTER ENTER ENTER 22 6 2 2 2 Chorus Level 6 3 Copy Drum Kit In kit mode use data dial or buttons to select Press ENTER button use data dial or buttons to select or 6 Same To lock kits will follow the current kit Press ENTER button to confirm and and 4 1 the current kit s...

Page 26: ... settings Other kits will not follow the current kit Press ENTER button to confirm Press PAD button use data dial or buttons to select Press ENTER to confirm use data dial or buttons to set parameters Reference 6 1 Set Pad and and KIT KIT PAD PAD EFFECT EFFECT CLICK CLICK 23 7 Effect In this function you can set reverb and chorus effect for drum kit 8 Pad In this function you can change pad voices...

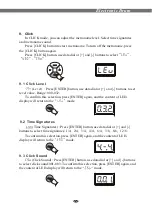
Page 27: ...y will return to the mode and and Level ENTER ENTER Time Signatures Press ENTER button use data dial or buttons to select time signatures 1 4 2 4 3 4 4 4 6 4 3 8 6 8 12 8 To confirm this selection press ENTER again and the content of LED display will return to the mode Click Sound Press ENTER button use data dial or buttons to select click sound 001 003 To confirm this selection press ENTER again ...

Page 28: ...o adjust the song volume Use data dial or buttons to set it Range 000 032 and and SONG SONG REC PLAY REC PLAY DRUM ON OFF DRUM ON OFF START STOP START STOP 10 2 Start Stop Playing the Song Press START STOP button to start playing the song Press START STOP button again to stop playing SONG SONG REC PLAY REC PLAY DRUM ON OFF DRUM ON OFF START STOP START STOP 10 3 Change the Song s Tempo To change th...

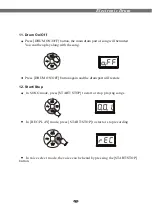
Page 29: ... START STOP START STOP In SONG mode press START STOP to start or stop playing songs In REC PLAY mode press START STOP to start or stop recording SONG SONG REC PLAY REC PLAY DRUM ON OFF DRUM ON OFF START STOP START STOP 26 SONG SONG REC PLAY REC PLAY DRUM ON OFF DRUM ON OFF START STOP START STOP 12 Start Stop 11 Drum On Off In voice select mode the voice can be heard by pressing the START STOP butt...

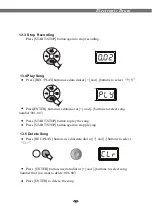
Page 30: ...mpo SONG SONG REC PLAY REC PLAY DRUM ON OFF DRUM ON OFF START STOP START STOP 27 ENTER ENTER 13 1 Record Record Press ENTER Use data dial or buttons to select song number 001 003 Note You have to select time signatures and tempo before recording Reference 9 2 and 4Tempo and Time Signatures 13 Rec Play TD90 allows you to record and playback your performance on the drum The recording can contain 3 s...

Page 31: ... the song Press START STOP button again to stop playing and and SONG SONG REC PLAY REC PLAY DRUM ON OFF DRUM ON OFF START STOP START STOP SONG SONG REC PLAY REC PLAY DRUM ON OFF DRUM ON OFF START STOP START STOP Press REC PLAY button use dial data dial or buttons to select Press ENTER button use data dial or buttons to select song number that you want to delete 001 003 Press ENTER to delete the so...

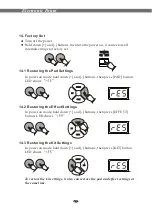
Page 32: ...hows and KIT KIT PAD PAD EFFECT EFFECT CLICK CLICK 14 2 Restoring the Effect Settings In power on mode hold down buttons then press EFFECT button LED shows and KIT KIT PAD PAD EFFECT EFFECT CLICK CLICK 14 3 Restoring the Kit Settings In power on mode hold down buttons then press KIT button LED shows and KIT KIT PAD PAD EFFECT EFFECT CLICK CLICK To restore the kit settings it also can restore the p...

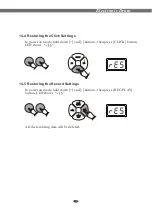
Page 33: ...D shows and KIT KIT PAD PAD EFFECT EFFECT CLICK CLICK 14 5 Restoring the Record Settings In power on mode hold down buttons then press REC PLAY button LED shows and SONG SONG REC PLAY REC PLAY DRUM ON OFF DRUM ON OFF START STOP START STOP All the recording data will be deleted 30 Electronic Drum ...

Page 34: ...natures Click Sound Record Play Clear Room 1 Room 2 Room 3 Hall 1 Hall 2 Plate Delay Pan Delay Chorus 1 Chorus 2 Chorus 3 Chorus 4 Feedback Flanger Short Delay Fb Delay Bass Drum Snare High tom Mid tom Low tom Ride Crash Hi Hat Hat Control Normal Dynamic Easy Fixed Reset Same Individual Demo 1 Demo 2 Hi Content of LED Display Display Interpret Display Interpret Electronic Drum ...

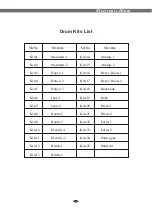
Page 35: ... 1 Dance 2 Dance 3 Jazz 1 Jazz 2 Room 1 Room 2 Electric 1 Electric 2 Brush 1 Brush 2 Kits14 Kits15 Kits16 Kits17 Kits18 Kits19 Kits20 Kits21 Kits22 Kits23 Kits24 Kits25 Analog 1 Analog 2 Heavy Rock 1 Heavy Rock 2 Rockbank Rock Disco 1 Disco 2 Latin 1 Latin 2 Popreggae Shortcut Kits No Kits name Kits No Kits name Electronic Drum ...

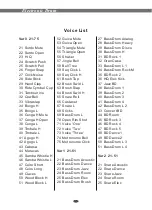
Page 36: ...h Swirl L 63 Brush Slap 64 Brush Swirl H 65 Snare Roll 66 Castanet 67 Snare L 68 Sticks 69 Bass Drum L 70 Open Rim Shot 71 Voice One 72 Voice Two 73 Voice Three 74 Metronome Bell 75 Metronome Click Var 1 21 51 21 Bass Drum Acoustic 22 Bass Drum Dance 23 Bass Drum Jazz 24 Bass Drum Room 25 Bass Drum Elec 26 Bass Drum Brush 27 Bass Drum Analog 28 Bass Drum Heavy 29 Bass Drum Disco 30 Bass Drum H 31 ...

Page 37: ...m 3 39 Floor Tom H 40 Mid Tom H 41 High Tom 2 42 Room Tom var 1 43 Room Tom var 2 44 Room Tom var 3 45 Room Tom var 4 46 Room Tom var 5 47 Room Tom var 6 48 Rock Tom var 1 49 Rock Tom var 2 50 Rock Tom var 3 51 Rock Tom var 4 52 Rock Tom var 5 53 Rock Tom var 6 54 Natural Tom 1 55 Natural Tom 2 56 Natural Tom 3 57 HQ Low Floor Tom 58 HQ High Floor Tom 59 HQ Low Tom 60 HQ Low Mid Tom 61 HQ Hi Mid T...

Page 38: ... Acoustic HH Open 24 Dance HH Close 25 Dance HH Pedal 26 Dance HH Open 27 Elec HH Close 28 Elec HH Pedal 29 Elec HH Open 30 Heavy HH Close 31 Heavy HH Pedal 32 Heavy HH Open 33 Hi Hat Closed 1 34 Hi Hat Pedal 1 35 Hi Hat Open 1 36 Analog HH Closed 37 Analog HH Pedal 38 Analog HH Open 39 Hi Hat Closed 2 40 Hi Hat Pedal 2 41 Hi Hat Open 2 42 Hi Hat Closed 3 43 Hi Hat Pedal 3 44 Hi Hat Open 3 45 TR80...

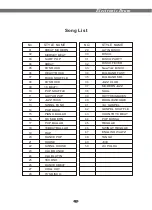
Page 39: ...S ROCK 16 BEAT1 POP SHUFFLE GUITAR POP JAZZ ROCK SWING FUNK POP ROCK PIANO BALLAD 6 8 MODERN POP BALLAD 16BEAT BALLAD RAP DANCE POP HOUSE SWING HOUSE CLUB DANCE CLUB LATIN TECHNO DANCE 8BEAT CHILL OUT 70 S DISCO LATIN DISCO DISCO DISCO PARTY DISCO FEVER NewYork DISCO BIG BAND FAST BIG BAND MID JAZZ CLUB MODERN JAZZ SOUL RHYTHM BLUES BOOGIEWOOGIE 3 4 GOSPEL GOSPEL SHUFFLE COUNTRY 8 BEAT POP BOSSA R...

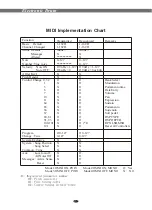
Page 40: ...e Sense Reset Transmitted 1 16CH 1 16CH Mode 3 X 0 127 O 9nH v 1 127 O 8nH v 0 X X O X X O O X X X X X X O O X X O 0 127 0 127 X X X X X O X X Recognized 1 16CH 1 16CH Mode 3 X X 0 127 0 127 O 9nH v 1 127 O 9nH v 0 or 8nh X O O O O O O O O O O O O O O O 1 O O 0 127 0 127 X X X X O O O O Remarks Bank Select Modulation Portamento time Data Entry Volume Pan Expression Sustain Portamento Sostenuto Sof...

Page 41: ...t Songs and 2 Demos Effect Reverb Chorus Controls Power Switch Start Stop Effect Rec Play Drum On Off Click Song Pad Kit Tempo Enter Return Display LED Display Connections Master Out AUX In DC In MIDI In MIDI Out HH Ctrl Hi Hat Crash Ride Snare Tom 1 Tom 2 Tom 3 BD Kick Power Supply DC 9V 350mA 38 Electronic Drum Specifications ...

Page 42: ...10505409 V4 0 ...

Page 43: ......

Page 44: ......

Reviews:

Related manuals for TD90