background image

- 17 - 


DELUXE TEMPERATURE CONTROLLERS 


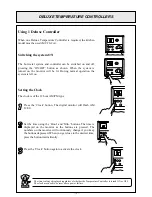
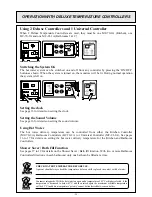
Using 1 Deluxe Controller 

When one Deluxe Temperature Controller is required, the kitchen 
model must be used (MC-70-2A). 

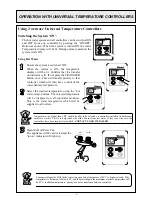
Switching the system ON 


The hot water system and controller can be switched on and off 
pressing the ‘ON/OFF’ button as shown. When the system is 
turned on, the monitor will be lit. During normal operation the 
system is left on. 

Setting the Clock 

The clock is of the 12 hour AM/PM type. 

Press the ‘Clock’ button. The digital monitor will flash AM 
12:00. 


Set the time using the ‘Hour’ and ‘Min.’ buttons. The time is 
displayed on the monitor as the buttons are pressed. The 
numbers on the monitor will continuously change if you keep 
the buttons depressed. When you get close to the desired time, 
press the button intermittently. 


Press the ‘Clock’ button again to activate the clock. 


Clock

Hour

Min.

Vol.

C

AM

Hot water 

temp.

0 0

00

ON/OFF

MC -70 -1A

Transfer

Sound

Cooler

Hotter


Clock

Hour

Min.

Vol.

C

AM

Hot water 

temp.

0 0

00

ON/OFF

MC -70 -1A

Transfer

Sound

Cooler

Hotter

Clock

Hour

Min.

Vol.

C

AM

0 0

00

ON/OFF

Sound

Clock

Hour

Min.

Vol.

C

AM

0 0

00

ON/OFF

Sound


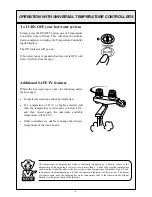
The time is always displayed regardless of whether the Temperature Controller is turned ON or OFF. 
The clock may need to be reset after a power failure. 

NOTE

Clock

Hour

Min.

Vol.

C

AM

0 0

00

ON/OFF

Sound


13

 - 

Summary of Contents for BC 70 2A

Page 1: ...Rinnai Rinnai Installation and User Manual for for Controllers Controllers BC 70 2A BC 70 2A MC 70 2A MC 70 2A MC 91 1A MC 91 1A ...

Page 2: ...ing regulations current edition for location requirements in shower and bath areas The cables to the temperature controller carry only 12VDC extra low voltage Cables should run back to the Infinity Infinity from the temperature controller or cables should run between the controllers then back to the heater Parallel connection The installation in every application will vary therefore the temperatur...

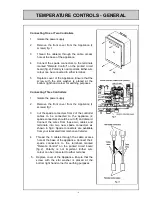
Page 3: ...power supply 2 Remove the front cover from the Appliance 4 screws fig 1 3 Cut the spade connectors from 2 of the controller cables to be connected to the appliance 4 spade connectors should be cut off and discard Connect the wires from these two cables and terminate into two new spade connectors as shown in fig 3 Spade connectors are available from your local electrical component retailer 4 Thread...

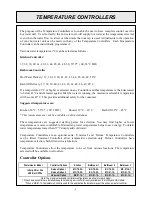
Page 4: ...mperature may not be available on all installations These temperatures are suggested starting points for selection You may find higher or lower temperatures are more comfortable Maintaining lower temperatures helps to save energy To obtain water temperatures lower than 37 C simply add cold water Temperature Controllers are an optional extra Universal and Deluxe Temperature Controllers can be fitte...

Page 5: ...rature Controller MC 91 1A Temperature Controllers are not required to operate the appliance they are a feature that provides control of water temperature Rinnai Infinity and HD water heaters can be operated with 1 2 3 4 or no Temperature Controllers 4 ...

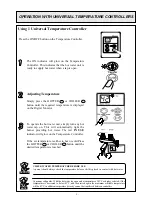
Page 6: ...p on This will automatically light the burner providing hot water The red IN USE indicator will glow on the Temperature Controller If the set temperature is either to hot or cold Press the HOTTER or COOLER button until the desired temperature is reached CHECK WATER TEMPERATURE BEFORE USE A parent should always check the temperature before a child is placed in contact with hot water CAUTION Consume...

Page 7: ...e Select the desired temperature using the hot water temp buttons The selected temperature will be displayed on all controller monitors This is the water temperature which will be supplied to all outlets Open the Hot Water Tap The appliance will be activated and the in use indicator will light up Temperatures no higher than 50ºC should be able to be selected on controllers installed in bathrooms e...

Page 8: ...wo dashes see fig 1 in the display repeat STEP 1 This completes the activation procedure for this configuration If No You have three or less controllers You will need to program the primary controller to enable the selection of temperatures higher than 50ºC STEP 1 For the Primary controller only press and hold the Transfer and On Off buttons simultaneously see fig 2 until a beep is heard approx 5 ...

Page 9: ...r higher selected and then the temperature is decreased to below 43ºC and then raised again the maximum available temperature will be 43 C Other controllers are unable to change the delivery temperature of the water heater The temperature of outgoing hot water is constantly monitored by a built in sensor If the temperature of the outgoing hot water rises to more than 3 C above the selected tempera...

Page 10: ...eluxe Kitchen Temperature Controller MC 70 2A This temperature controller is installed in the kitchen Each button confirms its operation with a beep and or voice Be careful not to get water in the speaker as it may cause damage CAUTION 9 ...

Page 11: ...ton is pressed a beep will sound The beep sound and the bath fill complete buzzer can be muted by pressing the Temperature Controller Up and Down buttons simultaneously for more than 3 seconds This can be done for each Temperature Controller To return to original settings repeat this step NOTE 10 ...

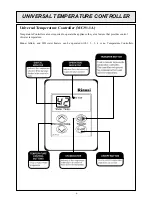
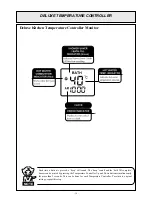
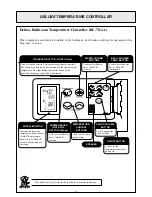
Page 12: ... temperature controllers on and off DIGITAL MONITOR Indicates the hot water temperature Shower Saver Bath Fill temperature Shower Saver Bath Fill volume and the mode of operation SHOWER SAVER BATH FILL BUTTON Orange Used to select Shower Saver Bath Fill function TEMPERATURE CONTROL BUTTONS Used to select water temperature SOUND VOLUME BUTTON Used to change the voice volume TRANSFER BUTTON LIGHT Gr...

Page 13: ...tton is pressed a beep will sound The beep sound and the bath fill complete buzzer can be muted by pressing the Temperature Controller Up and Down buttons simultaneously for more than 3 seconds This can be done for each Temperature Controller To return to original settings repeat this step NOTE 12 ...

Page 14: ...The time is displayed on the monitor as the buttons are pressed The numbers on the monitor will continuously change if you keep the buttons depressed When you get close to the desired time press the button intermittently Press the Clock button again to activate the clock Clock Hour Min Vol C AM Hot water temp 00 00 ON OFF MC 70 1A Transfer Sound Cooler Hotter Clock Hour Min Vol C AM Hot water temp...

Page 15: ...splayed on the controller monitor Open the hot water tap The hot water unit will activate and the red combustion symbol will light up on the monitor Clock Hour Min Vol C AM Hot water temp 00 00 ON OFF MC 70 1A Transfer Sound Cooler Hotter C AM Transfer C AM HOT COLD CHECK WATER TEMPERATURE BEFORE USE A parent should always check the temperature before a child is placed in contact with hot water CA...

Page 16: ...e is displayed on the monitor as the buttons are pressed The numbers on the monitor will continuously change if you keep the buttons depressed When you get close to the desired time press the button intermittently Press the Clock button again to activate the clock Clock Hour Min Vol C AM Hot water temp 00 00 ON OFF M C 7 0 1 A Transfer Sound Cooler Hotter Clock Hour Min Vol C AM 00 00 ON OFF Sound...

Page 17: ...ired temperature using the Hot water temp buttons The selected temperature will be displayed on both the Kitchen and Bathroom Controllers at the top of each monitor Open the hot water tap The hot water unit will activate and the red combustion symbol will light on both the kitchen and bathroom monitors CHECK WATER TEMPERATURE BEFORE USE A parent should always check the temperature before a child i...

Page 18: ... prompts Step 1 Programming the bath volume and temperature When the controllers are first turned on the default shower bath fill temperature is 40o C and the shower bath volume is 100 litres indicated by the first level marker at the bottom of the monitor The shower bath volume can then be changed up to a maximum of 400 litres These settings are displayed at the bottom of the Bathroom Controller ...

Page 19: ...the lowest bath fill volume of 30 litres is used During subsequent bath fills this can be increased depending on the volume of your bath and the desired level The relationship between shower bath volume in litres and the position of the long bar against the level markers is as follows Eg 120 litres denoted numerically and by the second level marker from the bottom of the monitor as shown below d A...

Page 20: ...aver Bath fill button on the Bathroom Controller s and the Bath indicator on the Kitchen Controller monitor will flash The buzzer will sound The voice will say Bath fill is complete Turn off the bath hot water tap and push the Bath fill button e IMPORTANT When filling a bath close the hot water tap for the bath when the bath is full This is very important to prevent over filling of the bath f Pres...

Page 21: ...e hot water delivery temperature can be controlled from either the Kitchen Controller MC 70 2A Bathroom Controllers BC 70 2A or Universal Controller MC 91 1A See pages 16 to 17 for details on setting the hot water delivery temperature for the Kitchen and Bathroom Controllers Shower Saver Bath Fill Function See pages 17 to 19 for details on the Shower Saver Bath fill function With two or more Bathr...

Page 22: ...d volume Using Hot Water The hot water delivery temperature can be controlled from either the Kitchen Controller MC 70 2A or Bathroom Controllers BC 70 2A See pages 16 to 17 for details on setting the hot water delivery temperature for the Kitchen and Bathroom Controllers Shower Saver Bath Fill Function See pages 17 to 19 for details on the Shower Saver Bath fill function With two or more Bathroom...

Page 23: ... Water The hot water delivery temperature can be controlled from the Kitchen Controller MC 70 2A Bathroom Controller BC 70 2A or Universal Controller MC 91 1A See pages 16 to 17 for details on setting the hot water delivery temperature for the Kitchen and Bathroom Controllers Shower Saver Bath Fill Function The Shower saver Bath fill function can only be used on Temperature Controller BC 70 2A See...

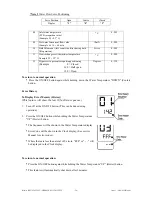
Page 24: ... button to activate the maintenance monitor Press the ON OFF button a second time to set the controller in the ON mode This feature can now be used with the appliance in operation 17 The maintenance number will be shown in the Water Temperature display 18 Data will be shown in the Clock display 19 To select the required maintenance number press the Water Temperature UP and DOWN buttons Display Mon...

Page 25: ...le 6 x 10 60 mA 10 mA 0 999 10 Bath fill amount this counts the litres during bath fill operation Litres 0 999 11 Heat exchanger exit thermistor temperature Example 55 55 C C 0 999 12 Bypass servo present recognition positioning Example 0 Closed 160 Half open 320 Open Degrees 0 320 Error History To Display Error Memory History This feature will show the last 10 faults in sequence 1 Turn off at the...

Reviews: