background image

55 

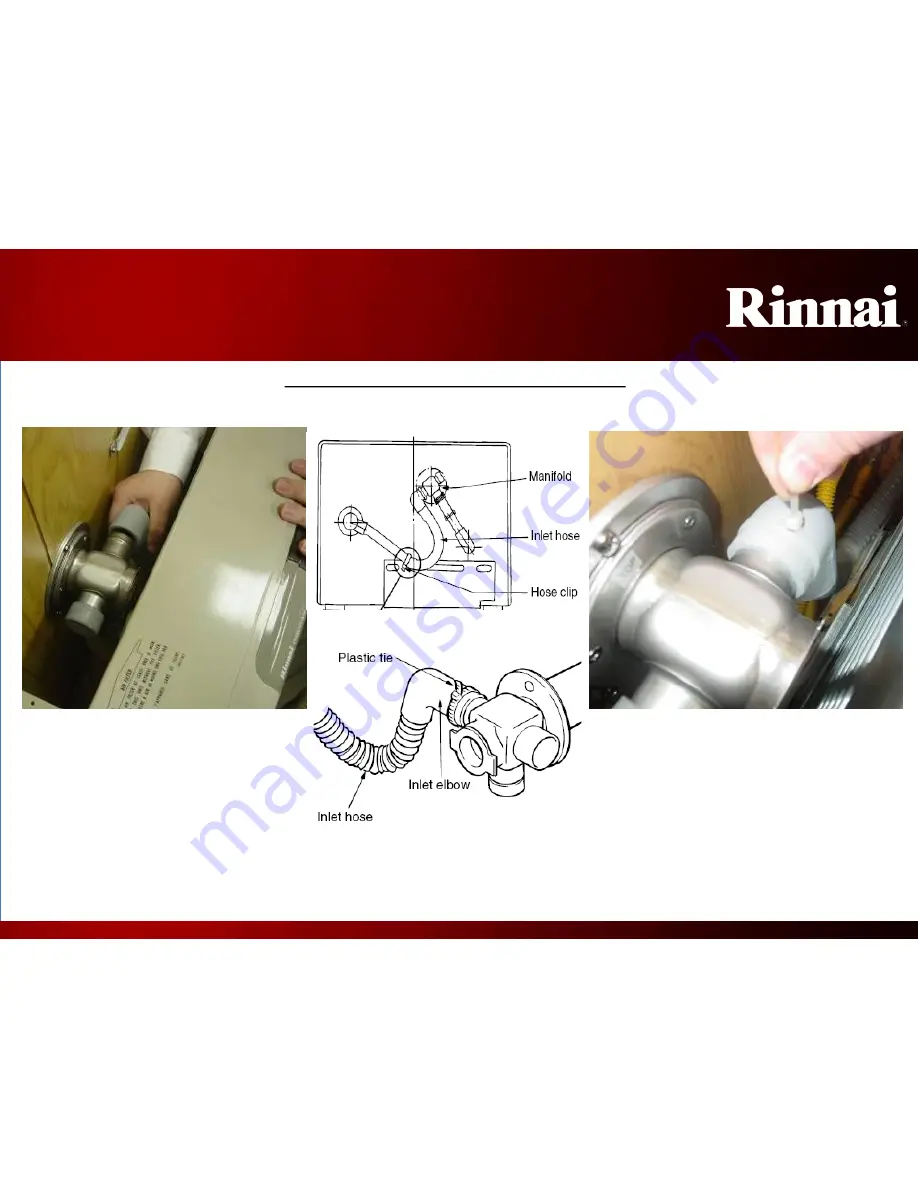
Connecting the Air Intake 

CONNECTING THE AIR INTAKE 

The following components can be connected by reaching behind the appliance as it is positioned against the wall: 

1. Connect the air intake hose to 

the side of the termination. 


NOTE: NEVER cut the gray 
air intake hose. It is sized to 
length for a standard 
termination. 

2.

Using the zip tie provided, 
fasten the air intake to the 
termination. 

Summary of Contents for Energysaver ES38

Page 1: ...Rinnai ENERGYSAVER Direct Vent Wall Furnace Installation Fundamentals ...

Page 2: ...als The following course is approved for NATE continuing education hours CEH s This course will earn the following CEH s Warm Air Heating Gas Installer 2 hours Warm Air Heating Gas Service 2 hours If you require credit for NATE please notify the instructor at this time ...

Page 3: ... m to 8 p m EST Monday Friday Parts and Warranty Department Fielding parts orders and warranty issues Available in office from 8 a m to 5 p m EST Monday Friday Technical Support Department Fielding technical issues related to the function of all Rinnai Products Available in office from 8 a m to 8 p m EST Monday Friday AND 24 7 365 on call support for technicians who are at the service location Eng...

Page 4: ...17C ES17 RHFE 431 FAIII EX17 RHFE 431 WTA 111 3 137 8 40 46 W 33 38dB 8 200 16 700 NG LP NG 81 LP 82 EX22C ES22 RHFE 556 FAIII EX22 RHFE 556 WTA 111 3 162 7 52 W 32 42dB 8 200 21 500NG 8 200 20 700 LP NG 81 LP 82 ES38 RHFE 1004 FA 203 4 360 6 121 W 37 47dBA 10 500 38 400 NG 10 500 36 500 LP NG 80 6 LP 82 Ensure the correct part number is identified for service parts support Current model specifica...

Page 5: ...mmable thermostat with a temperature range between 55 F to 95 F 13 C to 35 C During normal operation the display will dim to save power Display available in Fahrenheit or Celsius Setback and Frost Protection allows a minimum temperature to be maintained even when off or between scheduled heating events Adjustable maximum temperature setting Energy saving economy setting ...

Page 6: ...wer control Warm air discharge at floor level o Directional louvers to optimize direction of air flow Ultra quiet operation Decibel range of 27 47 is comparable to a normal conversation Gas type is field convertible Restart Functions allow automatic restart after ignition combustion or power failures Small 3 diameter concentric vent ...

Page 7: ...n ignition or combustion failure the unit will attempt to relight automatically Function Child Lock Cool to the touch Cabinets Restricted air filter indication lamp and audible reminder Current model ENERGYSAVERS will flash a reminder lamp and emit an audible beep if it detects operational conditions indicative of a restricted air filter Sealed Heat Exchanger flame and combustion is sealed from th...

Page 8: ...fans fail to maintain the proper speed likely due to a restriction the PCB will not allow the unit to operate Electronic ignition no standing pilot Power failure protection Should the ENERGYSAVER lose power the gas supply will automatically close Upon resumption of power the unit will automatically attempt to restart ENERGYSAVERS are equipped with an inline glass fuse and surge protection to prote...

Page 9: ...uch as number of windows exterior doors construction material etc ENERGYSAVER Sizing The Air Conditioning Contractors Association ACCA has an industry standard Btu calculation in their Manual J publication A qualified and licensed installer should be familiar with this type of calculation Visit http www acca org for more information Rinnai also offers a basic DV sizing calculator at http www rinna...

Page 10: ...as valve and blower control modulate to ensure heat reaches the remainder of the structure without overheating the main area Cold air is detected quickly by the thermistor mounted two inches above the floor and able to detect changes as small as 6 10th s of a degree Fahrenheit These features aid in reducing stratification in the atmosphere different layers of room temperature 1 2 3 Click here to w...

Page 11: ... gas usage can be high due to alternating periods between maximum flame and no flame at all The Energysaver s modulating technology has the ability to replace only the heat escaping the structure by continuously operating at heating levels based on the demand at that moment This results in different layers of temperatures throughout the structure leading to a less than comfortable living environme...

Page 12: ...nto the structure 7 When filled the humidifier tray ensures the air is not too dry if needed 8 Thermistor PCB determine gas and fan settings 9 When temperature set point is reached if needed gas valves close combustion fan stops Convection fan continues to run to cool down unit 10 When temperature drops process starts over ENERGYSAVER Direct Vent Furnaces Operation Sequence Spark and sensing elect...

Page 13: ...sent Flashing red fault code is present Economy Feature Setback Feature Timer and Clock Setup Override Temporarily bypasses timers EX08C 11C 17C 22C MODELS Temperature Control and Display Room temp lamp stays on Room temp displays only when adjusted ES38 MODELS Production after 7 2011 Economy Feature Timer 1 and 2 Note While off pressing Timer 1 and 2 together will change the display from F to C F...

Page 14: ...ration 6 Timer and Clock Setup 7 Setback Feature 8 Restricted Filter Indicator This lamp is on the front panel of the ES38 9 Operation Lamp Green standby Solid red when flame is present Flashing red fault code is present This lamp is on the front panel of the ES38 10 On Off Button 14 Control Panel Review C Series models ES38 MODELS Production after 7 2011 5 EX08C 11C 17C 22C MODELS 1 2 3 6 4 7 8 1...

Page 15: ... Celsius L approx 13 16 17 18 19 20 21 22 23 24 25 26 H approx 35 Temperature Control and Display Room temp lamp stays on Room temp displays only when adjusted ES38 MODELS Production before 7 2011 Economy Feature Function Lock Pressing both arrows will engage The below table shows the temperature range of all models ...

Page 16: ...ved the unit will reduce the temperature by 2 F After 30 additional minutes the unit will reduce the temperature an additional 2 F The maximum temperature reduction will not exceed 4 F This reduction will not occur if the unit is undersized and cannot maintain the initial set point Economy Function Initial Set point is 70 F After 30 minutes of maintaining 68 F the unit will maintain 66 F No furthe...

Page 17: ... separate timers and a setback function The timers allow two separate heating events to be set Timer 1 and Timer 2 individually or both as needed can then be engaged to allow the unit to turn on and off for those events The ENERGYSAVER is designed to attempt to have the area at the set point temperature when the timer event begins meaning it could turn on several minutes earlier to achieve set poi...

Page 18: ...r s event pressing Override will turn the unit off until the next Timer s event If the unit is off between Timer events pressing Override will turn it on It will continue to run until the end of the next Timer s event and return to Timer operation If Override is turned off the unit will return to Timer operation Clock Timer and Setback Functions C Series ...

Page 19: ...ature and gas usage during extended periods of nonuse or inactivity such as sleeping or when the home is empty NOTE When this feature is used as a setback function for energy savings it is not advisable to reduce setback more than 4 6 F from the regular set point This could cause the ENERGYSAVER to use more gas to return to the set point and cancel any savings achieved This feature can also be use...

Page 20: ...l attempt to restart automatically when the power is restored The timers will retain their settings after a power outage After an outage the clock will retain the time at that moment until power resumes Therefore a short power outage a few minutes will have virtually no effect on timer operations whereas a longer outage will require the clock to be reset Dashes will initially display to indicate a...

Page 21: ...tory If at some point after 15 seconds of established flame the flame fails the unit will immediately attempt to relight with no code flashing If the unit cannot relight after this flame failure code 11 will flash and the unit will try to ignite again in one hour If the unit continually or intermittently fails to ignite a qualified service technician may be needed to determine the cause Each manua...

Page 22: ...temperature thermistor wire shorted or touching bare metal 33 High limit thermistor disconnection High limit thermistor open circuit 34 High limit thermistor short circuit High limit thermistor shorted or touching bare metal 49 Pressure sensor disconnect or breakdown Check sensor connection to PCB hoses to blower motor 53 Abnormal spark sensed Spark not sensed correctly 61 Abnormal combustion fan ...

Page 23: ...e the installation manual for full details The exterior can be cleaned with a damp warm cloth Ensure the vent termination is kept free of snow ice or any other obstructions Ensure the filter s are kept clean to ensure proper operation If the filter s become blocked the filter indicator light will illuminate and the unit will beep every five minutes If ignored the unit will eventually cease operati...

Page 24: ... replacement parts only a simple manifold gas pressure adjustment Only a dual port manometer will be required to complete this adjustment All EnergySaver furnaces can be field converted from NG to LP or LP to NG Depending on model and year of manufacture a conversion kit may be included with the product If not contact Rinnai for information on acquiring the proper kit 1 800 621 9419 High Altitude ...

Page 25: ...for Setting Maximum Temperature Limit for ENERGYSAVER Furnaces ES08 ES11 EX08C EX11C ES17 ES22 EX17C EX22C EX17 EX22 WTA Models ES38 1 While the unit is off press the Function Lock or Child Lock and Up arrow buttons at the same time for about 3 seconds until the unit beeps 1 While the unit is off press the Economy and Select buttons at the same time for about 3 seconds until the unit beeps 1 While...

Page 26: ... the appliance and inspect it before use Follow all applicable national and local codes For additional information see the installation owner s manual and the product s rating plate Installation Overview DANGER WARNING CAUTION This is the safety alert symbol This symbol alerts you to potential hazards that can kill or hurt you and others Indicates a potentially hazardous situation which if not avo...

Page 27: ...peration and need not be changed for operation up to 2000 ft 607 m elevation For operation at elevations above 2000 ft 609 9 manufactured to specified deration conditions for Canada and the United States Refer to the high altitude adjustment procedure s If the flooring is carpet tile or other combustible material other than wood then the appliance must be installed on a metal or wood panel extendi...

Page 28: ...ce is only for use with the type of gas indicated on the rating plate This appliance is not convertible for use with other gases unless a certified kit is used If a conversion of the unit is needed conversions must be performed by a qualified service provider at the owner s expense This appliance must not be connected to a chimney flue serving a separate solid fuel burning appliance A shut off val...

Page 29: ... inch pilot drill bit 1 8 inch drill bit not shown No 2 Phillips bit No 2 Phillips screwdriver 2 adjustable wrenches Pipe wrench Channel locks Needle nose pliers Side cutters Leak detector Pipe dope or LP Gas approved Teflon Tape Tape measure Jig saw Recommended Tools Needed for Installation Eye protection is required ...

Page 30: ...30 View of Properly Installed Unit ...

Page 31: ...cking clamps Wall mounting template included Jo Mar shut off gas valve Packing board to place under unit if installed on carpet unit must be installed on an approved surface Extension venting vent covering and nonstandard wall terminations are available separately Furnace Packaging and All Hardware Ensure correct gas type is on package NOTE Do not discard or cut into box the wall template for term...

Page 32: ...ware Top of box contains screw hardware back spacers vent termination etc Documentation packet contains installation manual and Warranty registration Installer Leave all documentation with unit Consumer Retain all documentation for future use WARNING DO NOT USE SUBSTITUE MATERIALS USE ONLY PARTS CERTIFIED WITH THE APPLIANCE ...

Page 33: ... Sheet metal screws for attaching air intake clamps not used on all models Screws for attaching exhaust sleeve 3 and top back spacer 2 to wall HARDWARE PACKET Use the pipe stoppers connectors clamps and screws according to the installation instructions in order to ensure no leakage of exhaust gases CAUTION Longer tie wrap for securing intake hose to back frame Shorter tie wrap for securing air int...

Page 34: ...wood flooring it must be installed on a metal or wood panel extending the full width and depth of the heater The furnace may be installed on combustible wood flooring Installing On Combustible Flooring 2 Place furnace on board Remove toe plate from furnace Mark board to fit under furnace with no visible excess 3 Cut board to fit full width of unit CAUTION Practice good safety habits when using pow...

Page 35: ...val 2 50 mm Zero clearance to back wall and above Maintain 10 250mm per side for future servicing FURNACE LOCATION Furnace must be installed where the proper clearances from combustibles can be maintained Also ensure installation location is not in an area of excessive cold or warm air conduction ...

Page 36: ...et clearance above a forced air inlet located within 10 feet ANSI Z223 1 Any other local state or national code requirements Avoid vent locations over public walkways or near dryer vents Ensure any wall drilling will not compromise support studs existing electrical plumbing or HVAC systems etc 12 from grade or snow level 24 from any flammable obstruction 10 from any non flammable obstruction 20 fr...

Page 37: ...rily tape the template to the wall at floor level 4 Ensure template does not slip TEMPLATE PLACEMENT Included with each furnace is a wall template to simplify mounting and vent hole location 2010 and newer models have the template printed on the cardboard packaging Ensure the cardboard is cut at the bottom of template ...

Page 38: ...ate anywhere in the shaded arc for the pilot bit 3 Also score the two screw holes for the mounting wall bracket with a bit 4 Drill the vent hole with a pilot bit long enough to extend through the entire wall and no larger than the center bit of the hole saw being used CAUTION Practice good safety habits when using power equipment Score two mounting screw holes bit ...

Page 39: ...39 Interior Wall Preparation INSTALLING THE MOUNTING BRACKET Using the two previous scored screw holes mount the rear mounting bracket to the wall ...

Page 40: ...ided by the previously drilled pilot hole 2 Exterior Continue drilling hole guided by the previously drilled pilot hole DRILLING THE VENT HOLE NOTE Drill holes level or sloped downward 2 to the outside Vent termination must have outward pitch to ensure condensation drains to the outside ...

Page 41: ...1 2 Attach the drip leg to the furnace Use two wrenches to prevent damage to the furnace 3 If using appliance flex gas line recommended attach flair adaptor to the drip leg NOTE The connection of the flexible gas line will be covered in a following procedure IMPORTANT Ensure all code and gas line sizing requirements are followed All connections should be properly tightened and sealed with pipe dop...

Page 42: ...king tabs align correctly Secure one screw at the bottom of each side back spacer ROOM AIR THERMISTOR NOTE The room air thermistor comes with approximately 14 of wire It can be moved higher if needed if there is an excessive amount of cold air conduction present This should be a last resort ideally the cold air conduction should be eliminated Room air thermistor yellow wires can be raised several ...

Page 43: ...on INSTALLING THE AIR INTAKE HOSE CLIP Mount the hose clip at the bottom of the furnace as shown below Models prior to 2010 use a clip in this location see manual for details Use the longer tie wrap included with hardware ...

Page 44: ...flanges is zero inches This appliance can only be used with one of the five types of Rinnai vent kits These kits and their dimensions are listed below and in each owner s installation manual NAME KIT NUMBER KIT WALL DIMENSIONS S Vent Kit FOT 150 3 4 75 115 mm A Vent Kit FOT 151 4 9 115 240 mm B Vent Kit FOT 152 9 15 240 400 mm C Vent Kit FOT 153 15 23 5 8 400 600 mm D Vent Kit FOT 154 23 5 8 31 60...

Page 45: ...n Sleeve Outside terminal 1 Disassemble the flue manifold by first pulling out the inside connection 2 To remove the outer terminal pull and release the two internal stainless steel ties and then pull out the outer terminal NOTE Make sure the black gasket is always on the interconnector piece as shown ...

Page 46: ...tend beyond the red line on the sleeve ADJUSTING THE SLEEVE LENGTH 2 If a shorter length is necessary an extension can be removed Cut the plastic at the pre existing mark and remove the extension NOTE Vent Kit S does not have the removable extension IMPORTANT Only cut the plastic green film with a knife The vent itself is NOT designed to be cut Practice good safety habits when using sharp tools CA...

Page 47: ...installed at the top of hole 3 Attach the sleeve to the inside wall using 3 screws If needed use sheet rock anchors to secure to wall Practice good safety habits when using power equipment tools CAUTION 2 Ensure the sleeve extends 3 16 to 3 8 5 10 mm NOTE The flange is offset 2 to allow condensate to drain outside ...

Page 48: ...o the terminal seal to compensate for siding angle Practice good safety habits when using power equipment and sharp tools CAUTION 3 On the inside pull hard on the left and right hand ties Clip the ties over the notches inside the sleeve The ties should pull 2 or 3 notches past the starting point 4 Cut the ties leaving about 20mm past the notch Bend the excess back and parallel to the wall Terminal...

Page 49: ... 1 Push the assemble into the terminal tube with the label top matching the location on the sleeve Ensure that the seal is in place on the inner tube 2 Attach the inside connection with 3 screws NOTE The inner connection can still be turned to install the screws ...

Page 50: ...50 Vent Termination OUTSIDE VIEW OF CORRECTLY INSTALLED TERMINATION ...

Page 51: ...ach gas line accordingly 1 Ensure all connections are properly tightened and sealed with pipe dope or Teflon tape 2 Attach the included shut off valve and field supplied flexible gas line to the wall supply and furnace Leak test all connections 3 NOTE Many models will allow the gas valve to be positioned behind the back spacer but still accessible by the consumer ATTACHING THE GAS CONNECTION Part ...

Page 52: ...TO PLACE 1 If necessary the unit can be leveled using the adjustable legs under the front right and left hand sides 2 Slide the furnace into place Ensure furnace is level and aligned to vent termination back spacer mounting bracket and gas line if necessary ...

Page 53: ...ld NOTE Never bend the exhaust pipe that exits the furnace The following components can be connected by reaching behind the appliance as it is positioned against the wall 2 When sliding the tube ensure it does not extend beyond the red line 3 Connect the flue outlet to the manifold NOTE NEVER bend the exhaust pipe that exits the furnace ...

Page 54: ...itioned against the wall 3 Fit the locking clamp over the connection between the sliding tube and manifold Engage the hook and rotate it until it snaps against the body of the clamp 4 Slide the insulation sleeve up to the flue manifold Slip the securing clips over the sleeve as shown Insulation sleeve Connecting the Vent Flue ...

Page 55: ...cted by reaching behind the appliance as it is positioned against the wall 1 Connect the air intake hose to the side of the termination NOTE NEVER cut the gray air intake hose It is sized to length for a standard termination 2 Using the zip tie provided fasten the air intake to the termination ...

Page 56: ...orative sheet metal screws 2 Place top back spacer on the back of furnace clipping the spacer bracket into the wall bracket The following components can be connected by reaching behind the appliance as it is positioned against the wall Installing the Top Back Spacer ...

Page 57: ...57 1 Insert screws for top spacer on right and left side of back spacers 2 Tighten two sheet metals screws on top back spacer Installing the Top Back Spacer continued ...

Page 58: ...tallation manual Replace toe kick plate 1 To direct air flow if needed the front louvers can be adjusted after removing louver plate 5 screws 2 Install the filter 3 Open all gas valves 4 Turn unit on and set temperature 5 Educate consumer on use and care 5 screws secure louver plate Vertical louvers can be gently turned to direct air flow ...

Page 59: ...extension sets this reducer must be connected to the VENT TERMINATION ONLY Do not use the smaller extension sets with this reducer installed at the furnace The ES38 will not operate correctly Included with the ES38 is male to female street elbow to attach to the unit before a union or flex line This allows the installer to select the direction in which the gas line will be connected ...

Page 60: ...60 Extended Venting And High Altitude Installation Procedures ...

Page 61: ...cessible All pipe stoppers connectors screws and hangars must be used in accordance to their instructions The seals must be air tight for both the intake and exhaust air supply hoses The intake air hose must equal the exhaust hose length to maintain a balanced flue system The humidifier trays are made of enamel covered steel to resist rust and corrosion from the condensate draining back to the uni...

Page 62: ...al or vent instructions The exhaust elbow assembly attached on the back of the unit must remain as a 90 elbow Never bend or straighten this component Do not shorten the intake air hose attached to unit from factory This hose can never be cut or altered in length The extension that is added to this hose can be cut The exhaust elbow exiting the unit should never be straightened although it appears i...

Page 63: ...ation Use kit FOT 156 Use kit FOT 220 Use kit FOT 103 61 to 80 1 2m extension from exhaust to termination Use kit FOT 157 Use kit FOT 221 Use kit FOT 114 Standard bent elbow can be straightened for extensions less than 12 Use kit FOT 158 only 1 Use kit FOT 158 Use kit FOT 158 Use kit FOT 115 Long bent elbow can be straightened for extensions less than 24 Not available for the ES08 Use kit FOT 190 ...

Page 64: ...evel Set code to A1 or A5 For installations from 2001 5200 above sea level Set code to A2 or A6 For installations from 5201 7700 above sea level Set code to A3 or A7 For installations from 7701 10 200 above sea level Set code to A4 or A8 LP For installations from 0 2000 above sea level Set code to L1 or L5 For installations from 2001 5200 above sea level Set code to L2 or L6 For installations from...

Page 65: ...ode to A6 For installations from 5201 7700 above sea level with a vent length of 0 to 7 ft Set code to A3 with a vent length of 7 to 13 ft Set code to A7 For installations from 7701 10 200 above sea level with a vent length of 0 to 7 ft Set code to A4 with a vent length of 7 to 13 ft Set code to A8 LP For installations from 0 2000 above sea level with a vent length of 0 to 13 ft Set code to L1 or ...

Page 66: ... 20 INCHES Selecting the Correct Vent Extension Kit EXAMPLES OF EXTENSION SETS The following examples are for ES11 EX11C Models Other models will vary Instructions and all hardware are included FOT 157 EXTENSION SET 61 80 INCHES ...

Page 67: ...es CAUTION Vent Extension Installation Guidelines PROPER VENTING INSTALLTION GUIDELINES Example Using 2 sets of extensions and 1 standard bent elbow Example Using the 80 extension set VERTICAL RISE OF EXTENSION FROM TOP OF THE FURNACE TO THE TERMINATION OR ELBOW CANNOT EXCEED 10 FEET ON THE 17 OR 22 MODELS Other models may vary see Owner s Installation Manual ...

Page 68: ...o ensure no leakage of exhaust gases CAUTION Vent Extension Installation Guidelines PROPER VENTING INSTALLTION GUIDELINES INCORRECT Only two elbows are allowed Venting cannot be turned down INCORRECT Never arrange elbows where condensation can collect in the venting CORRECT Slope venting where condensation is allowed to drain ...

Page 69: ...wise note the two positions for intake air flexibility Alternate Vent Termination Options ALTERNATIVE TERMINATION CONNECTION 1 Remove the plug from the back of the termination 2 Reposition the plug to the bottom of the termination where labeled exhaust 3 Extension venting or elbows can now be connected to the back of the termination NOTE The elbow that is integrated into the termination DOES NOT c...

Page 70: ...ual to ensure the vertical rise limit is not surpassed 1 Located on the top back spacer are two sets of two punch outs one on the left and one on the right Remove the two that the extension will travel thru Discard the excess sheet metal 2 If the top back spacer is already secured to the furnace temporarily remove it to allow fastening of the extension components to the furnace air intake and exha...

Page 71: ...t pipes or bends including the furnace exhaust by fitting the male end into the female end 3 If needed extend the telescopic portion of the extension to the desired length Do not extend beyond the red line Male end Female end Telescopic extension NOTE Never cut the exhaust extension 4 Use pipe stopper A to clamp the connection of two pipes 5 Use pipe stopper B to secure the length of the telescopi...

Page 72: ...rewing another air intake hose into the hose joint Hose Joint Air intake hoses Air intake elbow 1 The air intake extension is connected between the air connection at the rear of the heater and the air intake port on the flue manifold 2 Cut the air intake extension to the desired length The lengths of the air intake hose and the exhaust pipe must be the same in order for the appliance to operate pr...

Page 73: ...o offset the clamp from the wall A one inch clearance from combustibles should always be maintained from the exhaust The clamps provided with the extension kit ensure this clearance is maintained from the wall and the air intake 2 If extension are installed horizontally the air intake hose should be underneath the exhaust so in the event the air intake sags it will not contact the exhaust ...

Page 74: ...74 Decorative Covers For Vent Extension Kits ...

Page 75: ...75 Vent Cover with Elbow Vent Cover and Termination Cover Basic Installation Vent Extension Decorative Cover EXAMPLES OF VENT COVERS ...

Page 76: ...76 Basement Installation painted vent cover Painted without priming Basement Installation rough in stage Basement Installation finishing stage Vent Extension Decorative Cover EXAMPLES OF VENT COVERS ...

Page 77: ...e mounting bracket is installed to the wall behind the extension venting The cover is mounted to the bracket from the sides The cover is paintable aluminum and can be custom cut All covers are sold as kits Side View Mounting Bracket Vent Extension Decorative Cover INSTALLATION OVERVIEW ...

Page 78: ...kit FOT 140 Manifold Kit B Vent Cover Use kit FOT 133 Straight Cover Kit A Use kit FOT 141 Straight Cover Kit B Vent Cover Elbow Use kit FOT 134 Elbow Cover Kit A Use kit FOT 142 Elbow Cover Kit B NOTES ES08 EX08 models cannot use extended venting Each kit comes with all required mounting hardware Vent Extension Decorative Covers New ES Series ...

Page 79: ...79 This completes the direct vent installation course Please contact technical support with any questions or issues 1 888 746 6247 DV Installation Fundamentals Level2 201102 081611 ...

Reviews: