Rinnai
6
Split AC OM
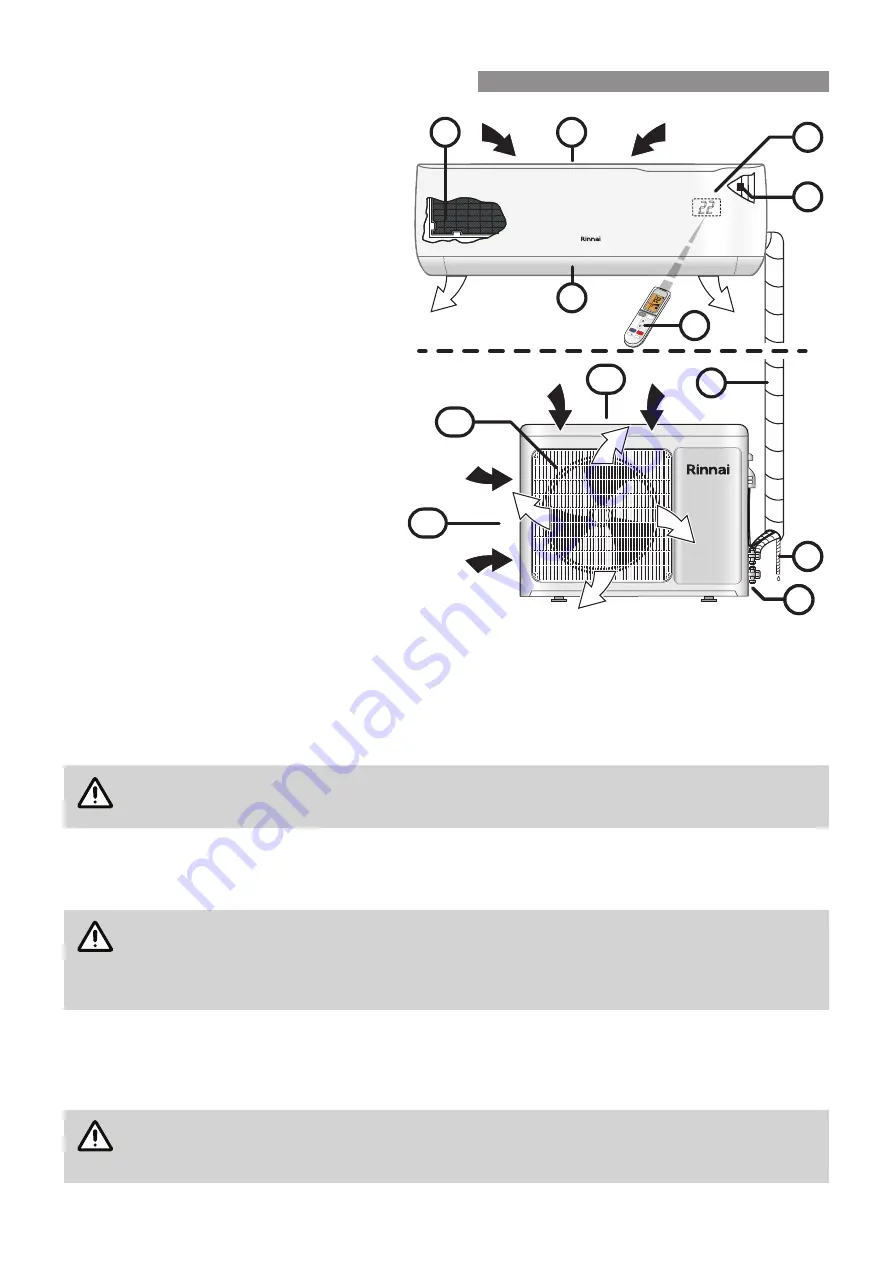
APPLIANCE COMPONENTS
1�
Indoor unit air inlet
2� Filter (located behind front access panel)
3� Manual ON/OFF (Auto) override button
(located behind front access panel)
4�
Indoor unit air outlet (with louvres and
vanes for setting air flow direction)
5� Remote control
6�
Signal receiver window and set temperature
display (the display is built into the front
access panel)
7� Refrigerant pipes, electrical cable(s)
(covered with binding tape)
8�
Condensate drain hose (covered with
binding tape)
9� Refrigerant entry (for service and installer
use only)
10� Outdoor unit air inlet (on rear & left side of
unit)
11� Outdoor unit air discharge and protective
grille (on front of unit)
REMOTE CONTROL BATTERIES
Insert batteries before using the remote control. The battery type used is AAA (1.5 V).
1� Remove the battery cover at the rear of the remote control�
2�
Insert the new batteries and make sure that the + and - terminals of the batteries are installed correctly.
3� Reattach the battery cover�
NOTE
If the LCD screen of the remote control starts to fade or fails to transmit, replace the batteries.
REMOTE CONTROL CRADLE
For convenience a slide-in cradle is provided for fixing the remote control to a wall.
IMPORTANT
To Install:
Choose a safe and easily-accessible place. DO NOT mount the cradle in direct sunlight as this
may damage the controller.
Fix the cradle to the wall using the holes provided using 2 screws.
CONTROLLER OPERATING BASICS
Point the remote control towards the signal receiver window (6) of the air conditioner to operate it (as shown in the
image above)�
NOTE
The remote control may operate other electronic devices if pointed towards them. Make sure to
point the remote control towards the signal receiver of the air conditioner.
For proper operation, use a soft cloth to clean the signal transmitter LED and the receiver window.
9
8
9
7
INDOOR UNIT
OUTDOOR UNIT
10
10
1
3
2
6
4
8
11
ON/OFF
FAN
COOL
SWING
SWING
TURBO
C
LRSWING
COOL
SWING
SPEED
HEAT
RUN
5
AIR CONDITIONER BASICS


