background image

Infinity REU-2425W

- 38 -

Issue 2 - 5/07/04 ©Rinnai

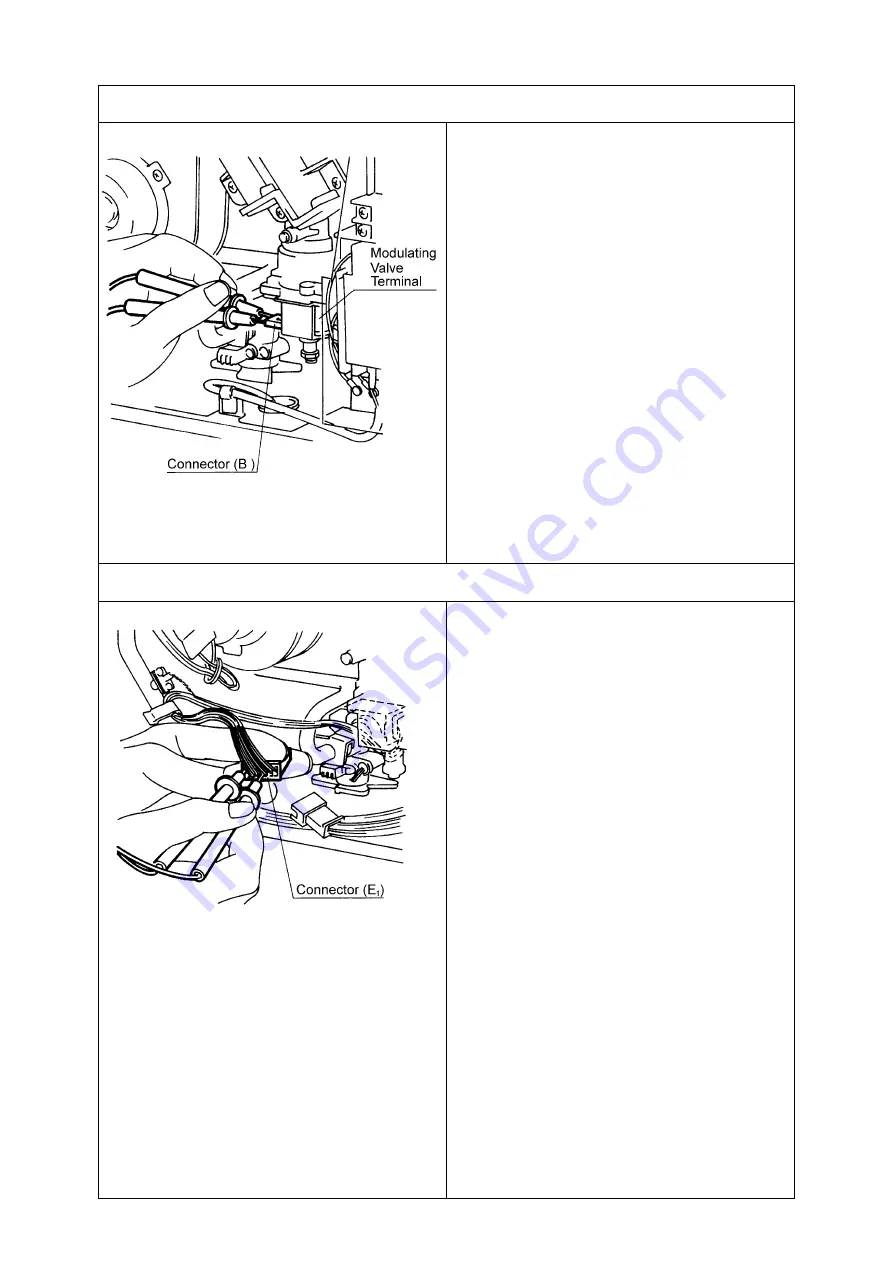
17) Is the modulating valve operating normal?

ad. # Disconnect the modulating valve 

festoon terminals and measure the 
resistance at the terminals.

Normal:

 60 ~ 100

If normal, go to (ae).

Faulty: 

Replace the modulating valve.

ae. Re-connect terminal and measure 

the pink ~ pink voltage at the 
modulating valve festoon terminal.

Normal:

 DC 0.5 ~ 25 V

If normal, go to (af) below.

Faulty:

 Replace PCB unit.

af. Investigate the change in gas 

secondary pressure when the 
remote control preset temperature is 
altered from 37 to 75 C.

Normal:

 If the secondary pressure 

changes, proceed to check item 4) 
below.

Faulty:

 Replace the modulating valve.

18) Is the water flow servo normal? (2008/2408)

ag. # Disconnect connector and 

measure the red ~ blue resistance on 
the water flow servo side.

Normal:

 10 ~ 30  

If normal, go to (ah).

Faulty:

 Replace the water flow servo 

with water flow sensor.

ah. Disconnect connector, and measure 

the voltage between orange (+) and 
grey(-) on the water flow control side.

Normal:

 DC 11 ~ 13 V

If normal, go to (ai).

Faulty:

 Replace the PCB unit.

ai. With connector (E

1

) connected (do 

not turn water ON... wait for the water 
flow servo to return to fully open), 
measure the voltage between brown 
and grey.

Normal:

 DC 4 ~ 6V

Faulty:

 Change water flow servo with 

sensor.

aj. Leaving the relay connector (E

1

connected (do not turn water ON... 
wait for the water flow servo to return 
to fully open), measure the voltage 
between yellow and grey.

Normal:

 Less than DC 0.5 V

Faulty:

 Change water flow servo with 

sensor.

°

Summary of Contents for REU-2018W

Page 1: ...INFINITY REU 2018W REU 2020W REU 2422W REU 2425W Infinity Compact Continuous Flow Gas Hot Water System SERVICE MANUAL ...

Page 2: ... Head Office is certified as complying with ISO 9001 by SAI Global Rinnai New Zealand has been certified to ISO 9001 Quality Assurance by Telarc All Rinnai products are Certified to WaterMark by SAI Global WaterMark certification is awarded to products and fittings complying with safety and water contamination standards SAI Global ...

Page 3: ... avoid incorrect wiring Do not disassemble Parts within cannot be exchanged or diagnosed faulty This manual has been compiled by Rinnai Australia Technical Services Department While many individuals have contributed to this publication it will be successful only if you the reader and customer find it useful We would like to extend an invitation to users of this manual to make contact with us as yo...

Page 4: ...ositions 14 11 Water Flows 16 12 Main Components 18 13 Time Charts 20 14 Operation Flow Principle 21 15 Operation Principles 23 16 Fault Finding 25 17 Fault Finding Table 26 18 Maintenance Monitor Error History 27 19 Component Circuit Value Table 29 20 Wiring Diagram 30 21 Fault Diagnosis 31 22 Electrical Component Analysis 40 23 Gas Conversion 43 24 Gas Pressure Setting Procedure 44 25 Dismantlin...

Page 5: ...tz IC integrated circuit kcal h kilocalorie per hour kPa kilopascals LED light emitting diode L min Litres per minute mA milliamps MJ h megajoule per hour mm millimetres mmH2O millimetres of water guage pressure NOX oxides of nitrogen NO NO2 OHS overheat switch PCB printed circuit board CPU central processing unit POT potentiometer rpm revolutions per minute SV solenoid valve ø diameter o C temper...

Page 6: ...f components is shown on the cutaway diagram on page 11 All components are supported within a box formed from 0 8 mm coated steel The heat exchanger occupies the top section of the box and the burner is situated in a chamber formed from 0 8 mm aluminised steel attached to the bottom of the heat exchanger The air for combustion is supplied by a fan which is connected to the burner box by a duct at ...

Page 7: ...suitable volume of hot water can be supplied throughout all seasons by the water flow control device and water flow servo mechanism REU 2425W model will supply up to 24L min maximum unmixed controlled by an automatic electro mechanical water flow device See Water Flows on page 16 for precise details on water flow Water Temperature Control With a remote control connected the hot water control range...

Page 8: ...Infinity REU 2425W 5 Issue 2 5 07 04 Rinnai 3 Dimensions Note All dimensions are in mm ...

Page 9: ...2A and BC 70 2A Deluxe Controllers have Kitchen MC 70 2A and Bathroom BC 70 2A versions Kitchen Controls are intended for the Kitchen or other convenient area where the majority of hot water is used Bathroom Controllers are intended to be fitted in the Bathroom or ensuite and allow the user to have a bath filled to the required level and temperature automatically Up to two Deluxe controllers can b...

Page 10: ...it s installation without a Temperature Limiting Device Installations without a Temperature Limiting Device are shown in Diagram 1 If you are unsure about your local regulations contact your regulating authority or Rinnai If the appliance does not have this label or your local regulations require installation with a Temperature Limiting Device then install the appliance in accordance with Diagram ...

Page 11: ...our local electrical component retailer 4 Located the terminals for controls the position of which is marked on the Printed Circuit Board casing Connect the 4 spade connectors to the terminals on the P C B Fig 2 Polarity is not important Either wire colour can be connected to either terminal 5 Replace cover of the Appliance Ensure that the special screw is placed at the bottom right hand corner fo...

Page 12: ...er outlet will release the built up pressure if the pressure inside the heat exchanger reaches 2100 kPa until 1500 kPa is maintained Combustion Fan Revolution Check The combustion fan rpm is continually monitored by a magnetic pulse counter connected to the PCB If the fan revolutions deviate from the speed required for complete combustion a signal is sent to the PCB and the revolutions adjusted ac...

Page 13: ...00 mm Depth 170 mm Weight 18 kilograms Noise level 49 dB A Connections Gas supply R 20mm Cold water inlet R 20mm Hot water outlet R 20mm Ignition system Direct electronic ignition Electrical consumption Watts Normal Standby Anti frost protection 55 8 80 Water temperature control Simulation feedforward and feedback Water flow control Water flow sensor automatic electro mechanical water flow control...

Page 14: ...Infinity REU 2425W 11 Issue 2 5 07 04 Rinnai 7 Cut away Diagram ...

Page 15: ...Infinity REU 2425W 12 Issue 2 5 07 04 Rinnai 8 Schematic Diagram ...

Page 16: ...U 2425W Input NG Propane LPG HI MJ h 188 LO 21 Gas Consumption NG Propane LPG HI kW 52 3 50 LO 5 93 Integral Injector size 18 NG mm ø 1 7 Propane LPG ø 1 0 Damper 1 piece NG NIL Propane LPG A Pressure NG HI kPa 0 90 LO 0 08 Propane LPG HI kPA 2 26 1 90 LO 0 17 0 15 Burner type NG Propane Common Dip Switch positions Refer to page 14 ...

Page 17: ...um water flow select Temperature limiting requirements Alternate type DIP Switches explained Top switch settings 1 8 1 Gas type used only during conversion 2 To select maximum water flow volume 4 to 8 To select the temperature with or without remote connected Bottom switch settings 1 3 1 Factory use To select the capacity of appliance 2 3 Combustion control The Infinity REU 2425W model delivers ma...

Page 18: ...d or not Dip Switch Settings for Alternative PCB a Fixed hot water temperature without remote connected Upper limit hot water temperature with remote connected Note a The black squares indicate the position of switches b It will be noted that some dip switch configurations are the same for a given temperature whether controllers are connected or not These similarities are not mistakes ...

Page 19: ...ction The water flow is indicated where the line intersects the bottom of the chart How to calculate water flows The following information is an outline of the formula required to measure accurately the flow rate in litres per minute as well as being the base for the charts on the next page The most useful way in which this formula can be utilised is to calculate the water flow rate where there is...

Page 20: ...REU 2425W will at a preset temperature of 50 C and an incoming water temperature of 15 C be 18 litres per minute The chart opposite indicates that the water flow rate of the REU 2425W will at a preset temperature of 50 C and an incoming water temperature of 25 C be 24 litres per minute Mixed Water Flows Output water temp Incoming 15 C Incoming 25 C Incoming 30 C Incoming 35 C Incoming 45 C Incomin...

Page 21: ...very low water pressures maximum performance is not reached unless the incoming pressure is 200 kPa or more 2 Preset Bypass A preset volume of cold water is mixed with water heated in the heat exchanger 3 Burner The burner assembly is made up of 18 identical stainless steel bunsen burners secured by an aluminised steel framework An aluminium manifold with 18 integral injectors supplies gas to the ...

Page 22: ...to a change in control signal than the combustion fan Controlling the gas valve based upon data from the combustion fan means that combustion remains satisfactory even if there are sudden changes in input conditions 6 Water Flow Sensor and Water Flow Control device Water flow is detected by a turbine magnetic pulse generating device Water flows through the turbine magnetic sensor providing informa...

Page 23: ...Infinity REU 2425W 20 Issue 2 21 03 05 Rinnai 13 Time Charts Normal Combustion Sequence Error Sequence Ignition Flame Failure Pre purge Defect Sequence ...

Page 24: ... gas sld SV1 Closed Sparker OFF Pre purge 2 sec Water flow ON 2 7 L min or more Combustion fan operates Pre purge 14 Flashing 32 Flashing 71 Flashing 72 Flashing 61 Flashing 61 Flashing Modulating valve Closed Change over sld SV3 Closed Change over sld SV2 Closed Main gas sld SV1 Closed Eliminate cause Pull out power plug Remote control indicators OFF ON OFF Switch OFF Error display OFF Water flow...

Page 25: ...lenoid valve abnormal 14 Flashing 16 Flashing 12 Flashing 52 Flashing 10 Flashing Combustion indicator OFF Yes Yes Yes No No No N1 Change over sld SV3 Open 13 Modulating valve control Change over sld SV3 cntrl 14 Thermistor faulty open or short circuit 32 Flashing Combustion fan rpm abnormal 61 Flashing Solenoid valve circuit abnormal 71 Flashing Thermal fuse melted B C D Hot water tap OFF Water f...

Page 26: ... combustion fan pre purges the combustion chamber A rev counter on the combustion fan indicates the fan rpm to the main PCB Once the pre purge cycle is completed the PCB controls the fan rpm by varying the DC voltage to the fan motor This maintains the correct air gas ratio throughout the time the water heater is in use to ensure good combustion The gas is ignited by direct electronic spark and th...

Page 27: ... the gas input and water flow to maintain a constant temperature It also continually monitors the combustion fan rpm adjusting the gas rate to match When the hot water tap is turned off the water flow sensor stops revolving and the magnetic pulse ceases indicating to the PCB that there is no water flowing in turn the PCB closes the gas valves The combustion fan continues to operate for 65 seconds ...

Page 28: ...trated below Fault Finding Table Describes possible faults and error codes page 26 Operational Flow Chart page 21 Component Circuit Value Table page 29 Electrical Component Table page 40 Summarises running and standby electrical values for all components Wiring Diagram page 30 Maintenance Monitor Error History Provides accumulated number of startups combustion time history of operational faults an...

Page 29: ...tor 32 Short or faulty wiring in water temperature thermistor Does not operate 6 Check hot water outlet thermistor 52 Modulating solenoid valve answer abnormal Operates then stops 12 Check modulating solenoid valve 61 Combustion fan faulty After 12 5 seconds operation 4 Check combustion fan 65 Warning Code given Tap left open at bath fill function Close tap 71 Solenoid valve circuit error Unit doe...

Page 30: ...e ON OFF button a second time to set the controller in the ON mode This feature can now be used with the appliance in operation 2 The maintenance number will be shown in the Water Temperature display 3 Data will be shown in the Clock display 4 To select the required maintenance number press the Water Temperature UP and DOWN buttons Display Monitor Contents No Contents Units Data Range 01 Water flo...

Page 31: ...on value Example 25 25 C C 0 999 09 Hot water fan current flow value Example 6 x 10 60 mA 10 mA 0 999 10 Bath fill amount this counts the litres during bath fill operation Litres 0 999 Error History To Display Error Memory History This feature will show the last 10 faults in sequence 1 Turn off at the ON OFF button This can be done during operation 2 Press the ON OFF button while holding the Water...

Page 32: ...ody earth AC 100 160 V over DC 1A 6 Thermistor C1 white white Thermistor resistance value Temp resistance 15 C 11 4 14 kΩ 30 C 6 4 7 8 kΩ 7 Thermal Fuse B2 red red Below 1 Ω 8 Over Heat Switch B3 red red Below 1 Ω 9 Sparker I1 grey grey AC 90 110 V 10 Solenoid Valve SV2 I1 pink black DC 80 100 V 0 9 1 3 kΩ 11 Solenoid Valve SV2 I2 yellow black DC 80 100 V 1 3 1 9 kΩ 12 Modulating Valve B1 pink pin...

Page 33: ...Infinity REU 2425W 30 Issue 2 5 07 04 Rinnai 20 Wiring Diagram ...

Page 34: ... the electric fuse 3A Normal less than 1 If normal proceed to check item 2 below Faulty Replace fuse 5A If it blows again investigate cause of short circuit 2 Is the main transformer normal Check the transformer c Measure the voltage in between the red wires of the relay connector A1 Normal AC90 110 V 15 21 If normal check d below Faulty Check for AC 90 110 V on the PCB terminal J black black d Ch...

Page 35: ... control cable conductors f Check the voltage between terminals on the remote control terminal mount H1 Normal DC 10 13V If normal check for open circuit or shorts before replacing the remote control Faulty Replace PCB No combustion despite remote control indication 4 Is the water flow sensor normal g Measure the voltage between red and black of the relay connector a2 Normal DC 11 13V If normal go...

Page 36: ...rod Measure resistance between flame rod terminal A2 and the appliance earth Normal 1 M or more If normal replace the PCB unit Faulty Replace the flame rod 6 Is the water temperature thermistor normal If error 32 is displayed check the water temperature thermistor j Disconnect connector C1 and measure the resistance of white and white Resistance 1M open circuit Resistance below 1 short circuit Nor...

Page 37: ...DC11 13V If normal go m below Faulty Replace the PCB unit m Measure the voltage at connector D1 black white Normal DC2 9V If normal proceed to check item 5 below Faulty Replace the combustion fan 8 Is the sparker operating normally Checking the motor n Measure the voltage at connector I4 grey grey Normal DC 90 110 V DC 0 V when fan is OFF If normal check o below Faulty Replace the PCB unit o Disco...

Page 38: ...change over solenoid valve SV2 r Disconnect the main gas solenoid valve SV2 connector and measure the resistance at the solenoid terminals Normal 1 3 1 9 k If normal check s below Faulty Replace the change over solenoid valve SV2 s Measure voltage at change over solenoid valve SV3 blue black connector Normal DC 80 100V If normal check item 8 below Faulty Replace the PCB unit 11 Is the change over ...

Page 39: ...Faulty Replace the remaining flame safety device Combustion stops due to flame failure 13 Is the flame rod functioning normally x Measure the voltage between the flame rod terminal A2 and the appliance earth Normal AC 100 160V If normal check y below Faulty Replace the PCB unit y Check that the flame rod attachment is not loose Normal Replace the PCB unit Faulty Secure the flame rod brackets 14 Is...

Page 40: ...eed to check item 2 below Faulty Replace water temperature thermistor 16 Is the changeover solenoid valve SV3 normal ab Disconnect the changeover solenoid valve SV3 connector and measure the resistance between the solenoid terminals Normal 1 3 1 9 k If normal go to ac Faulty Replace the changeover solenoid valve SV3 ac Measure the voltage at the changeover solenoid SV3 blue black connector Normal ...

Page 41: ...ng valve 18 Is the water flow servo normal 2008 2408 ag Disconnect connector and measure the red blue resistance on the water flow servo side Normal 10 30 If normal go to ah Faulty Replace the water flow servo with water flow sensor ah Disconnect connector and measure the voltage between orange and grey on the water flow control side Normal DC 11 13 V If normal go to ai Faulty Replace the PCB unit...

Page 42: ... and measure the resistance between blue and blue on the heater exchanger s heater side Normal 135 175 If normal go to item 2 below Faulty Replace anti frost heater assy 20 Is the frost sensing switch normal am Detach connector J2 and measure the resistance between blue and blue Measure at room temperature of 4 3 C Normal Less than 1 if normal check the wiring AC100V circuit Faulty Replace the fro...

Page 43: ...s or shorts Yes Go to A 6 2 No Replace faulty solenoid valves ii Measure the sparker resist ance Disconnect the sparker con nector I4 and measure the resistance between both termi nals Is resistance 1M Yes Go to A 5 iii No Replace sparker 4 iii Check wiring Are there any shorts Yes Rectify Replace 5 No Replace PCB 6 6 Check 240V 100V transformer i Measure voltage between red red A1 connector AC 90...

Page 44: ...B 7 No Replace PCB 24 7 Check solenoid valve SV2 i Disconnect connector I from PCB measure resistance between yellow black 1 3 1 9k Yes Go to B 7 ii No Replace SV2 25 ii Measure voltage between yellow black of SV2 connec tor DC80 100V Yes Go to B 8 No Replace PCB 26 Error code 11 dis played on digital moni tor 8 Check changeover solenoid valve SV3 i Disconnect connector I from PCB measure resistan...

Page 45: ...valve 41 D Can not adjust water temperature 4 Check water flow servo i Measure resistance between red blue water flow servo con nector I1 10 30 Yes Go to D 4 ii No Replace water flow servo with sensor 42 ii Measure voltage between orange grey water flow servo connector I1 DC11 13V Yes Go to D 4 iii No Replace PCB 43 iii Measure voltage between brown grey water flow servo connector I1 don t turn wa...

Page 46: ...on the inside front cover 8 Remove PCB protective plastic cover 9 Disconnect flame sensor and sparker lead 10 Remove combustion chamber cover 11 screws 11 Remove manifold 5 screws 12 Fit or remove damper assembly 3 screws depending on gas type Note Damper is only used on LPG models 13 Fit new manifold ensuring no wires are trapped Check O rings are correctly positioned 14 Refit combustion chamber ...

Page 47: ...ppliance for access to the regulator screw modulating valve Unlock screw and adjust to Natural 0 8 kPa Propane 0 17 kPa LPG NZ 0 15 kPa c Lock regulator screw modulating valve 2 High d Position No 3 of the bottom set of dip switches to the ON position leaving No 2 ON e The HI potentiometer on the PCB adjust the pressure to Natural 0 90 kPa Propane 2 26 kPa LPG NZ 1 90 kPa f Position switch No 2 an...

Page 48: ...ith Water Flow Servo 46 4 Removal of Sparker 47 5 Removal of Combustion Fan 47 6 Removal of Water Temperature Thermistor 47 7 Removal of Transformer 48 8 Removal of Manifold and Burner 48 9 Removal of Gas Control 49 10 Removal of Heat Exchanger 49 11 Removal of Thermal Fuse 50 Unless otherwise stated reassembly is the reverse of dismantling e g Isolate gas supply Disconnect electrical supply from ...

Page 49: ...er a Remove the four 4 screws holding the panel in place phillips driver 4 Removal of PCB CAUTION 240 volt potential exposure Isolate the appliance and reconfirm with a neon screwdriver or multimeter a Remove the 2 screws on the P C B and pull out towards you phillips driver 5 Removal of Water Flow Sensor with Water Flow Servo CAUTION 240 volt potential exposure Isolate the appliance and reconfirm...

Page 50: ...illips driver b Disconnect high tension lead connector 7 Removal of Combustion Fan CAUTION 240 volt potential exposure Isolate the appliance and reconfirm with a neon screwdriver or multimeter a Detach the sparker refer to section 4 b Remove the three 3 screws that secure the fan in place disconnect connector and pull the fan towards yourself to remove it phillips driver 8 Removal of Water Tempera...

Page 51: ...crews to release the transformer phillips driver e Disconnect connectors 10 Removal of Manifold and Burner CAUTION 240 volt potential exposure Isolate the appliance and reconfirm with a neon screwdriver or multimeter a Remove the sparker refer section 4 1 screw b Remove eleven 11 screws that hold the combustion chamber front panel in place and remove the panel phillips driver c Remove the five 5 s...

Page 52: ...rol in place disconnect connectors pull out the gas control 12 Removal of Heat Exchanger CAUTION 240 volt potential exposure Isolate the appliance and reconfirm with a neon screwdriver or multimeter Isolate Water Supply Drain All Water a Remove PCB unit refer to section 2 a b Remove the heat exchanger water connection pipe refer to section 3 a c Remove one 1 screw from the outlet connection clip t...

Page 53: ...t the heat exchanger unit towards yourself 13 Removal of Thermal Fuse CAUTION 240 volt potential exposure Isolate the appliance and reconfirm with a neon screwdriver or multimeter h Remove the heat exchanger unit refer to section 10 i Disconnect and remove the thermal fuse phillips head Fit the fuse as shown below ...

Page 54: ...Infinity REU 2425W 51 Issue 2 5 07 04 Rinnai 26 Exploded Diagram ...

Page 55: ...Infinity REU 2425W 52 Issue 2 5 07 04 Rinnai ...

Page 56: ...Infinity REU 2425W 53 Issue 2 5 07 04 Rinnai ...

Page 57: ...Infinity REU 2425W 54 Issue 2 5 07 04 Rinnai ...

Page 58: ...ion AU168 325 202 128 000 92073469 1 117 ELECTRODE AU168 321 202 129 000 92072917 1 118 ELECTRODE Flame Rod Electrode AU168 322 230 044 000 92072891 1 119 GASKET Electrode AU168 312 580 375 000 92095629 1 120 CLIP Electrode retainer AH43 262 506 153 000 1 121 SLEEVE Electrode AU102 681 518 031 000 90164856 1 125 HEAT EXCHANGER Comp Assy DU195 906 314 383 000 92081660 1 127 BRACKET PCB AU195 330 53...

Page 59: ...224 229 000 92081918 1 725 COVER Transformer BU168 1533 098 900 000 1 801 SCREW FT ZBA0410UK 501 408 000 1 802 SCREW ZB10510UK 501 397 000 803 SCREW Tapping ZFAB0408SZ 501 249 000 1 804 SCREW FT ZBA0408UK 501 398 000 1 805 SCREW Truss Tapping ZBD0408UK 501 329 000 1 806 SCREW ZAD0408UK 501 399 000 92087535 1 807 SCREW CP 21478 412 501 400 000 1 808 SCREW Tapping ZAA0408UK 501 261 000 1 809 SCREW Z...

Page 60: ...Infinity REU 2425W Issue 1 5 07 04 Rinnai Notes ...

Page 61: ... 03 9271 6625 Fax 03 9271 6622 Help Line Sales Service Tel 1300 555 545 Fax 1300 555 655 Hot Water Service Line Tel 1800 000 340 Help Line Spare Parts Technical Info Tel 1300 366 388 Fax 1300 300 141 NEW ZEALAND LTD Internet www rinnai co nz E mail sales rinnai co nz Head Office New Zealand 691 Mt Albert Road Royal Oak Auckland P O Box 24 068 Tel 09 625 4285 Fax 09 624 3018 24 hr Service Tel 0800 ...

Reviews: