background image

36

Rinnai Corporation RHFE-201FA


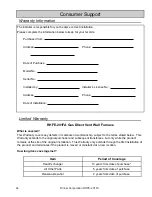
Consumer Support 


Warranty   Information   


Limited 

Warranty    


RHFE-201FA Gas Direct Vent Wall Furnace 

What is covered? 

This Warranty covers any defects in materials or workmanship, subject to the terms stated below.  This 
Warranty extends to the original purchaser and subsequent transferees, but only while the product 
remains at the site of the original installation.  This Warranty only extends through the first installation of 
the product and terminates if the product is moved or reinstalled at a new location. 
 

How long does coverage last? 


Item 

Period of Coverage 

Heat Exchanger 

10 years from date of purchase * 

All Other Parts 

5 years from date of purchase 

Reasonable Labor 

2 years from date of purchase 

The installer is responsible for your heater’s correct installation. 

Please complete the information below to keep for your records: 
 
 Purchased 

from: 

 Address: 

Phone: 


Date of Purchase:  

 Model 

No.: 

 Serial 

No.: 

 Installed 

by: 

Installer’s License No.: 

 Address: 


Phone: 


Date of Installation: 

Summary of Contents for RHFE-201FA

Page 1: ... by a qualified installer service agency or the gas supplier WARNING If the information in these instructions is not followed exactly a fire or explosion may result causing property damage personal injury or loss of life Owner s Operation and Installation Manual for the RHFE 201FA Energysaver Gas Direct Vent Wall Furnace INSTALLER Leave this manual with the appliance CONSUMER Retain this manual fo...

Page 2: ...Instructions General Instructions 14 Gas Connection 15 Clearances to Combustibles 15 Installation Parts 16 Drilling Flue Hole 17 Dimensions 17 Flue Terminal Clearances 18 19 Flue Manifold Installation 20 21 Connecting the Appliance 22 Operating Instructions 23 Cut Away Diagram 24 Wiring Diagram 25 Ladder Diagram 26 Flow Diagram 27 Parts List 28 35 Consumer Support Warranty Information 36 Limited W...

Page 3: ...rs Do not use this appliance if any part has been under water Immediately call a qualified service technician to inspect the appliance and to replace any part of the control system and any gas control which has been under water This appliance is equipped with a three prong plug for your protection against shock hazard and should be plugged directly into a properly grounded three prong receptacle D...

Page 4: ...B AFUE Rating Natural Gas 80 6 Propane 83 Fan CFM output Low 48 3 High 70 6 Specifications Rinnai is continually updating and improving products Therefore specifications are subject to change without prior notice The efficiency rating of this appliance is a product thermal efficiency rating determined under continuous operating conditions and was determined independently of any installed system Sa...

Page 5: ...tion instructions for the parts list of the vent kit The A Vent Kit is included with the appliance The following flue manifold sizes are available Name Kit No fits walls S Vent Kit FOT 150 3 4 1 2 in 75 115 mm A Vent Kit FOT 151 4 1 2 9 1 2 in 115 240 mm B Vent Kit FOT 152 9 1 2 15 3 4 in 240 400mm C Vent Kit FOT 153 15 3 4 23 5 8 in 400 600 mm D Vent Kit FOT 154 23 5 8 31 1 2 in 600 800 mm Flue M...

Page 6: ...RATURE CONTROL DISPLAY OPERATION LAMP RATING PLATE MODEL NUMBER SERIAL NUMBER GAS TYPE ETC WARM AIR OUTLET HUMIDIFIER TRAY OPEN THE DOOR AND POUR WATER INTO THE TRAY VENT TERMINAL COMBUSTION EXHAUST COMBUSTION AIR INTAKE HOSE EXHAUST PIPE AIR FILTER THERMISTOR GAS CONNECTION 1 2 NPT POWER CORD PLUG 120V AC FILTER LAMP ...

Page 7: ...p is green when this feature is on FILTER LAMP Flashes when filter is dirty OPERATION LAMP This lamp turns green when power is on Lamp will change to red when burner is on TEMPERATURE BUTTONS adjust temp to lower setting adjust temp to a higher setting ENERGY SAVING BUTTON Lamp is green when this feature is activated ON OFF BUTTON Easy operation One touch ignition ...

Page 8: ...will then show the room temperature The default temperature setting is 72 F To change the temperature setting press one of the temperature control buttons once The Set Temp should light up and the display will show the current temperature setting Continue to press the control buttons until the desired temperature setting is reached After 10 seconds the display will return to showing the room tempe...

Page 9: ...which determines the vertical air flow direction is fixed and cannot be adjusted CAUTION Do not adjust the air flow louvers while warm air is flowing Sensible Temperature Control The sensible temperature control feature allows comfortable heating which matches the conditions in the room Based on the information collected by the room temperature thermistor when the heating starts the heating capaci...

Page 10: ...rews 3 Use pressurized air to remove dust from the main burner heat exchanger and fan blades 4 Use soft dry cloth to wipe cabinet Do not use wet cloth or spray cleaners on the burner The flue should be inspected annually for blockages or damage Motors are permanently lubricated and do not need periodic lubrication Keep fan and motor free of dust and dirt by cleaning annually Verify proper operatio...

Page 11: ...t for the hot air Is the flue blocked The fan is started automatically after a short delay This is to allow the heat exchanger to warm up helping to avoid cold draughts This is caused by grease or oil and dust on the heat exchanger and will stop after a short time This is simply expansion noise from the heat exchanger This is the sound of the solenoid gas valves opening and closing Is the air filt...

Page 12: ...r blocked Gas Escape Function Lock Set Gas turned off at meter tank or valve Plug In Push On Off button to attempt restart after power is restored Purge air Installer Service Call Service Call Clear obstruction Service Call Clear obstruction Clean filter Service Call Cancel Function Lock Turn gas on No ON indicator Burner doesn t ignite Unusual combustion Combustion stops during operation Smell of...

Page 13: ...re Combustion fan failure Faulty ON OFF switch Faulty solenoids Faulty Flame Rod Communication Error Check gas is turned ON Service call if repeated Check gas is turned ON Service call if repeated Clean filter Service call if repeated 1 Service call Service call Service call Service call Service call Service call Service call Turn heater OFF then ON again Lower room temperature to less than 104 F ...

Page 14: ...e volume of warm air next to the floor Any particles in the air such as cigarette smoke could cause discoloration in carpet The warm air flow could discolor nylon carpets containing dyes or vinyl surfaces To prevent discoloration of the floor covering a mat may be placed under the appliance which extends about 30 inches 750 mm in front of it This appliance is not designed to built in This applianc...

Page 15: ...etion of gas pipe connections all joints including the heater must be checked for gas tightness by means of leak detector solution soap and water or an equivalent nonflammable solution as applicable Since some leak test solutions including soap and water may cause corrosion or stress cracking the piping shall be rinsed with water after testing unless it has been determined that the leak test solut...

Page 16: ...ers and hardware listed below Installation Parts Flue Manifold 1 Spare rubber seal 1 A Flue units only For weatherboard installations Back Spacer Set 1 1 1 2 1 1 3 10 2 1 1 1 Insulation Clip Plastic tie for air inlet Clamp Wall Bracket Spacer Bracket Pipe Stopper Manual Valve Set Screw Screw Screw Owner s Manual Conversion Manual For Back Spacer For Flue Manifold For Clamp 5 Screw For Wall Bracket...

Page 17: ...enter of the appliance If the FOT 158is used then do not use the tem plate The center of the w all opening w ill be 16 1 2 in 418 5 m m above the base of the appliance See diagram For weatherboard walls drill through the center of the weatherboard from the outside first and then through the plasterboard A template is provided Dimensions 3 7 16 88 4 5 16 109 5 4 3 4 121 WALL OPENING POSITION GAS CO...

Page 18: ...ration RHFE 201FA Flue Terminal Clearances INSIDE CORNER DETAIL FIXED CLOSED OPERABLE FIXED CLOSED OPERABLE B B B A J B M C F B B E D L G A H K I X V AIR SUPPLY INLET VENT TERMINAL AREA WHERE TERMINAL IS NOT PERMITTED ...

Page 19: ...chanical air supply inlet to building or the combustion air inlet to any other appliance 6 inches 15 cm 6 inches 15 cm K Clearance to a mechanical air supply inlet 6 feet 1 83 m 3 feet 91 cm above if within 10 feet 3 m horizontally L Clearance above paved sidewalk or paved driveway located on public property 7 feet 2 13 m M Clearance under veranda porch deck or balcony 12 inches 30 cm to non flamm...

Page 20: ...ness plus 3 16 3 8 inch 5 10 mm NOTE Do not extend beyond the red line For other than the S type flue manifold if a shorter length is necessary an extension can be removed Cut the plastic and remove the extension The flue manifold must exhaust to the outside Do not exhaust into other rooms The flue is not designed to be positioned under floors or below the heater This appliance can only be used wi...

Page 21: ...tion Assembly Push the assemble into the terminal tube ensuring that the seal is in place on the inner tube Attach the inside connection with 3 screws The inner connection can still be turned to install the screws 4 Install the Terminal Check that the terminal seal is in place For weatherboard walls add the second seal next to the terminal seal to compensate for weather board angle From the outsid...

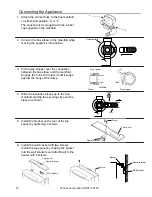
Page 22: ... and rotate it until it snaps against the body of the clamp 4 Slide the insulation sleeve up to the flue manifold and slip the securing clip over the sleeve as shown 5 Install the bracket on the rear of the top spacer by tightening 2 screws 6 Install the wall bracket with two screws Install the top spacer by clipping the spacer into the wall brackets and attaching it to the heater with 2 screws a ...

Page 23: ...TO APPLIANCE 1 Set the thermostat to lowest setting 2 Turn off all electric power to the appliance using the ON OFF button 3 Locate the manual gas valve on the side of the heater Turn the manual valve clockwise to the full OFF position NOTE The fan will continue to operate until the appliance is cool Do not turn the appliance off by unplugging it from the wall Keep burner and control compartment c...

Page 24: ...24 Rinnai Corporation RHFE 201FA Cut Away Diagram ...

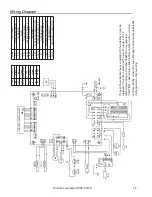
Page 25: ...aced with a wire of a least a 194 F temperature rating and number 18AWG or its equivalent CAUTION Label all wires prior to disconnection when servicing controls Wiring errors can cause improper and dangerous operation Verify operation after servicing MARK PS FR F TR SV1 2 ER SP FM OHS1 2 TF POV BL R TH OH TH PARTS NAME PRESSURE SENSOR FLAME ROD FUSE TRANSFORMER SOLENOID VALVE 1 2 ELECTRODE SPARKER...

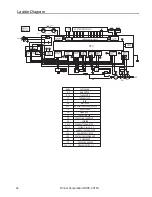
Page 26: ... UNIT MAIN BURNER MB PS PRESSURE SENSOR OHS 1 2 OVERHEAT SWITCH 1 2 CPU CONTROL DISPLAY UNIT TEMP CONTROL CIRCUIT CONTROL DISPLAY CIRCUIT SOLENOID VALVE CIRCUIT MODULATING VALVE CIRCUIT POWER SUPPLY CIRCUIT CONVECTION FAN CIRCUIT FM F 3A AC120V TF 216 R TH OH TH TF DETECTING CIRCUIT POV GAS MB FR CF MS SV2 SV1 IGNITION CIRCUIT SP ER FLAME ROD CIRCUIT PS BL FCC COMB FAN CIRCUIT COMB FAN SIGNAL CIRC...

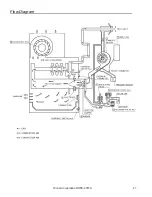
Page 27: ...27 Rinnai Corporation RHFE 201FA Flow Diagram ...

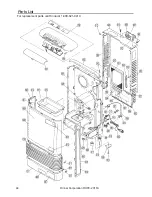
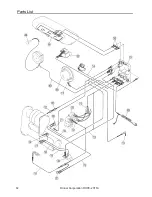
Page 28: ...28 Rinnai Corporation RHFE 201FA Parts List For replacement parts call Rinnai at 1 800 621 9419 ...

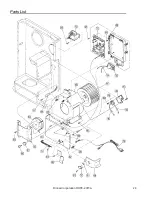
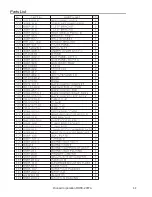
Page 29: ...29 Rinnai Corporation RHFE 201FA Parts List ...

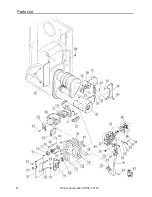
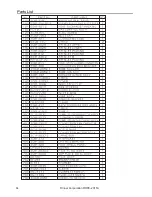
Page 30: ...30 Rinnai Corporation RHFE 201FA Parts List ...

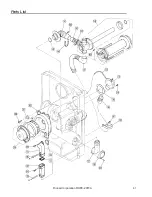
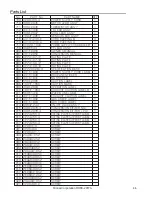
Page 31: ...31 Rinnai Corporation RHFE 201FA Parts List ...

Page 32: ...32 Rinnai Corporation RHFE 201FA Parts List ...

Page 33: ...Parts List 33 Rinnai Corporation RHFE 201FA ...

Page 34: ...Parts List 34 Rinnai Corporation RHFE 201FA ...

Page 35: ...6 CAUTION MARK 1 809 308F 2063 OPERATION LABEL 1 810 1001F 1654 EXHAUST CAUTION LABEL B 1 811 550F 1418 WATER LINE LABEL 1 812 431F 1830 EXHAUST CAUTION LABEL 1 813 431F 1862 GAS CHECK LABEL 1 813 431F 1863 GAS CHECK LABEL 1 814 BRR37 244 ON OFF VALVE ASS Y 1 815 308F 2070 3 CONVERSION KIT FOR NG 1 815 308F 2070 4 CONVERSION KIT FOR LPG 1 816 CP 74255 3 RATING PLATE SUPPORT LABEL 1 816 CP 74255 4 ...

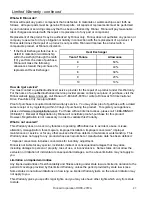
Page 36: ...Warranty only extends through the first installation of the product and terminates if the product is moved or reinstalled at a new location How long does coverage last Item Period of Coverage Heat Exchanger 10 years from date of purchase All Other Parts 5 years from date of purchase Reasonable Labor 2 years from date of purchase The installer is responsible for your heater s correct installation P...

Page 37: ...se with a dated sales receipt or by registering within 30 days of purchasing the product To register your appliance please visit www rinnairegistration com For those without internet access please call 1 866 RINNAI1 746 6241 Receipt of Registration by Rinnai will constitute proof of purchase for this product However Registration is not necessary in order to validate this Warranty What is not cover...

Page 38: ...38 Rinnai Corporation RHFE 201FA ...

Page 39: ......

Page 40: ... in Japan 2008 09 1 0 3 International Drive Peachtree City Georgia 3 0 2 6 9 Tel 1 8 0 0 6 2 1 9 4 1 9 Fax 1 8 8 8 4 7 4 6 6 2 4 www rinnai us Register your product at www rinnairegistration com or call 1 866 RINNAI1 746 6241 ...

Reviews: