background image

Reference Manual V1.16 


Software Versions 4.xx 

Page 34 

003X-652-116


(Entry Means 
to Full Setup)  


full setup menu using the push button on the rear of the instrument causes all 
future access to the full setup to be restricted to the push button. 

Options are: OFF, ON 

Default: OFF 


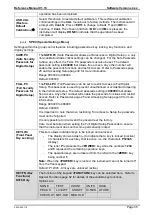
CAL (Scale Calibration) 

Items within this group perform various calibration routines. Certain items in the Scale Build 
can affect the calibration of the scale. Always check that these sections are correctly 
configured to suit the current application before attempting to calibrate the scale.  

ZERO (Zero 
Calibration) 


Select to perform Zero Calibration. While the zeroing is in progress the display 
will show 

Z.in P

.  


SPAN (Span 
Calibration) 


Select to perform Span Calibration. While the span calculation is in progress 
the display will show 

S.in P

.  


ED.LIN (Edit 
Linearisation 
Points) 


Select to view linearisation setup and start linearisation routines. While 
linearisation is in progress the display will show L.in P. Refer to ED.LIN (Edit 
Linearisation Points) 
Page 28 for more information. 

CLR.LIN (Clear 
Linearisation 
Points) 


Select to view linearisation setup and select linearisation points to clear. Refer 
to CLR.LIN (Clear Linearisation) Page 29 for more information. 

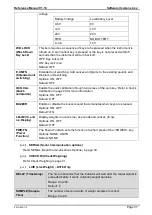
DIR.ZER 
(Direct Zero 
Calibration) 


Select to enter the mV/V value of the zero calibration directly. This feature is 
used to enable approximate calibrations to be performed in situations where a 
standard ZERO calibration is impractical (e.g. calibration on a partially filled 
silo). 


DIR.SPN 
(Direct Span 
Calibration) 


Select to enter the mV/V value of the full scale capacity of the scale build. This 
feature enables the instrument to be calibrated based on the rated output 
capacity of the load cells rather than using test weights. The accuracy of this 
method is limited to the accuracy of the published load cell ratings. 


G.INST 
(Installation 
Gravity) 


Select to enter the gravitational acceleration of the location at which the scale 
is installed. Only necessary when using the Gravity Compensation feature. 

Range 9.750 to 9.860 

Default: 9.810 

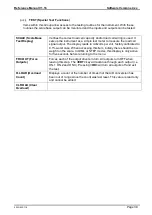
G.FAC 
(Factory 
Gravity) 


Select to enter the gravitational acceleration of the location at which the scale 
is calibrated. Only necessary when using the Gravity Compensation feature.  

Range 9.750 to 9.860 

Default: 9.810 

G.FIRST (First 
power up 
prompt) 


Select to set the indicator to prompt the user to enter the Installation Gravity 
on next power up. Only necessary when using the Gravity Compensation 
feature.  

Options ON, OFF 

Default: OFF 

FAC.CAL 
(Restore 
Default Factory 
Calibration) 


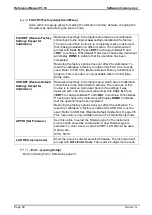
Select this choice to restore default factory calibration. This restores all 
calibration critical settings in the 

BUILD

OPTION,

 and 

CAL 

menus back to 

factory defaults. The instrument will prompt with 

Cont. N

. Press 

<EDT>

 to 

change to 

Cont. Y

 and 

<OK>

 to continue. If 

Cont. Y

 is chosen and then 

<OK> 

or 

<ITM> 

is pressed, the instrument will display 

DONE

 to indicate that the 

Summary of Contents for X300 IP69K376

Page 1: ...X300 IP69K K376 K378 Digital Indicator Reference Manual...

Page 2: ...in order to improve design performance or reliability The information in this manual is believed to be accurate in all respects at the time of publication but is subject to change without notice Rins...

Page 3: ...Notes...

Page 4: ...liary Connections 9 RS 232 Serial 9 Remote Input 13 Outputs 14 3 9 opto LINK Optional 15 3 10 Connecting Shields 16 Cable Shield Connection and Earthing 16 3 11 Regulatory Sealing Requirements 16 4 DA...

Page 5: ...Access using Safe Setup 30 Setup Display Prompts 31 8 2 Exiting Full or Safe Setup 31 8 3 Groups and Items 31 8 4 Setup Menus 32 BUILD Scale Build 32 OPTION Scale Options 33 CAL Scale Calibration 34 S...

Page 6: ...enu Setup CHECK W 51 13 SPECIAL FUNCTIONS KEY 52 13 1 Introduction 52 13 2 Key Functions 52 NONE 52 TEST 52 COUNT 52 UNITS 52 HOLD and PEAK HOLD 52 SHOW T 53 HI RES 53 A TARE 54 CHECK W 54 NET HLD 55...

Page 7: ...enables software upgrades and the use of computerised setup and calibration via the Viewer software Refer to opto LINK Optional page 15 for more information The instrument comes with two different fi...

Page 8: ...by Scale Technicians who are installing the instrument Communications Manual Contains details on the extended networking capabilities communications protocol 1 4 Document Conventions The following do...

Page 9: ...2 to 24VDC 9 6 12 and 24V batteries 2 5 VA max ON OFF key with memory feature Variants AC AC Power supply 110 240VAC 50 60Hz in 12VDC 1 2A out Battery 12V battery pack rechargeable NiMH Case Materials...

Page 10: ...stability The instrument should be installed away from any sources of excessive electrical noise The load cell cable is particularly sensitive to electrical noise and should be located well away from...

Page 11: ...drive both it and the load cells If an optional battery pack is fitted then the supplied charging system must be used 3 7 Load Cell Connection Load Cell Signals and Scale Build Very low output scale b...

Page 12: ...to maintain accuracy The BUILD CABLE option must be set to 4 to allow for 4 wire connection Refer to CABLE page 33 Figure 3 4 Wire Connections 6 Wire Connection The excitation and signal lines are con...

Page 13: ...Manual V1 16 Software Versions 4 xx Page 10 003X 652 116 Network One Instrument to PC RXD TXD GND Figure 5 RS 232 One Instrument to PC using COM Port DB9 Figure 6 RS 232 One Instrument to PC using COM...

Page 14: ...communications errors or for longer cable runs lower the baud rate to 4800 or 2400 and or use the Long Ring Network in Figure 8 below which uses a separate return path from the Last Instrument to the...

Page 15: ...nstruments to PC RXD TXD GND The Long Ring Network layout can be used in situations where each leg of the cable run can be up to about 150 m 500 ft at 9600 baud If there are communications errors lowe...

Page 16: ...put i e SPEC REM FN The SERIAL TYPE option must be set to AUTO PRINT or AUTO PR When using SERIAL TYPE of PRINT or AUTO PR the SPEC REM CHR must be set to an appropriate character that will not affect...

Page 17: ...rs on the output lines Over Pass and Under when the outputs are active e g to connect to a PLC connect 24V to the common terminal The outputs can then be connected directly to PLC inputs To drive exte...

Page 18: ...rom a PC The PC end of the opto LINK cable is a standard female DB9 connector or USB connector The instrument end of the cable consists of an infrared transceiver which attaches to the left side of th...

Page 19: ...connected to earth via a single reliable link to avoid earth loops Where each instrument is separately earthed interconnecting cable shields should be connected at one end only This also applies to co...

Page 20: ...nnunciators Editing Annunciator Key Name Description GRP ZERO Steps through the list of Groups Steps through the available options when editing a particular item POWER Steps through the list of Groups...

Page 21: ...d display the current setting e g 0000 00kg The currently chosen digit will be flashing Press SEL to advance to the next digit When the digit to edit is flashing press EDT repeatedly to cycle from 0 t...

Page 22: ...ithin of a division of true zero NET Visible when the displayed reading represents NET weight MOTION Visible when the displayed reading is not stable OVER Visible when check weighing is enabled and th...

Page 23: ...due to some diagnostic error for longer than 10 seconds the operation is cancelled and the STABLE ERROR message is displayed To improve the stability of the weight reading increase the filtering or r...

Page 24: ...weight and the NET annunciator will be lit The TARE key can operate in all modes i e Industrial NSC OIML and NTEP Refer to Industrial vs OIML and NTEP Modes page 24 for more information The weight ta...

Page 25: ...ctivated 5 9 PRINT Key If a printer or computer has been attached to the instrument and the manual print function has been selected the PRINT key will trigger an output of the current weight reading T...

Page 26: ...ry Terms page 68 Term Definition Units Units of measurement kilograms tonnes pounds etc Full Scale Total change in weight between zero gross load and full capacity gross load Resolution or Count by Sm...

Page 27: ...e with the respective trade certified standards For more information refer to the Calibration Counter section below and also to the USE Scale Use section page 33 for setup information The following ta...

Page 28: ...de critical settings 6 6 Passcodes The instrument has two levels of passcodes to provide a security lock on accessing Setup via the keypad Full Setup Passcode Safe Setup Passcode The Full Setup passco...

Page 29: ...he Trade approved range Note It should not be assumed that just because the instrument has successfully calibrated a scale that the scale is correct for trade use Always check the scale build against...

Page 30: ...ble to calibrate the instrument directly by entering the mV V signal strength at Zero and full scale Span The Direct Zero setting CAL DIR ZER specifies a gross zero point for the scale The Direct Span...

Page 31: ...earisation is applied For example L1 050 indicates that linearisation point one is active and was entered at about 50 of full scale Unused linearisation points are shown with a row of dashes e g L2 Pr...

Page 32: ...is reset to equal G FAC 3 Set the G FIRST setting to ON This enables the user prompt The scale can then be sent to the installation location When the indicator is powered up the user will be prompted...

Page 33: ...strument will respond with the message ENTRY DENIED Refer to Passcodes page 25 for more information Full Setup 1 Instrument on 2 Press and hold both the POWER and SELECT keys together for two seconds...

Page 34: ...Option 3 Press the GRP key repeatedly When End displays press ITM or OK The instrument will beep and then display SAVING Software Version e g V1 0 Calibration Counter e g C 00010 Refer to Calibration...

Page 35: ...or example if a scale is to weigh 500 0 kg in 0 5 kg increments CAP is set to 500 0 and RES is set to 5 Range 000100 to 999999 Default 003000 RES Count by Resolution Sets the resolution or Count by of...

Page 36: ...0 5 3 0 0 5 graduations per second Default 0 5 1 0 0 5 graduations per second INIT Z Initial Zero on Startup This function can be used to automatically ZERO the indicator during power up The amount o...

Page 37: ...o enable approximate calibrations to be performed in situations where a standard ZERO calibration is impractical e g calibration on a partially filled silo DIR SPN Direct Span Calibration Select to en...

Page 38: ...p This passcode is used to prevent unauthorised or accidental tampering in the instrument setup The default passcode setting is 000000 that allows free access Any other number will enable the passcode...

Page 39: ...The remote input can also be set to BLANK where when the remote input is pressed and held the indicator displays dashes i e and the front five key functions are disabled When the remote input is rele...

Page 40: ...he zero key Refer to Quick Calibration in page 29 for more information Options ON OFF Default OFF BUZZER Enable or disable the buzzer sound that emanates when keys are pressed Options ON OFF Default O...

Page 41: ...Settings Items within this group set date and time related functions D FMT Date Format This sets the date format Options are DD MM Y4 MM DD Y4 Y4 MM DD DD MM Y2 MM DD Y2 Y2 MM DD Default DD MM Y4 T FM...

Page 42: ...reads in millivolts per volt factory calibrated to 0 1 worst case When accessing this item initially there should be no weight on the scale In OIML or NTEP modes this display is only active for five...

Page 43: ...ll Digital Setup mode USR DEF Restore Default Settings Except for Calibration Restores all settings in the digital setup which are not calibration critical back to the stored default settings The main...

Page 44: ...rk Automatic Weight Output AUTO o The automatic output is normally used to drive remote displays a dedicated o Select between two standard formats master slave and custom Single Output SINGLE o The si...

Page 45: ...ws the indicator to respond to simple ASCII key press commands and enable the indicator to be used in legacy systems The response setting S RESP defines if there is any response sent to successful com...

Page 46: ...ring the first character being a space followed by the actual units e g kg or t If the weight reading is not stable the unit string is sent as S1 Displays G N U O E representing Gross Net Underload Ov...

Page 47: ...aud rate determines the serial data transmission speed Options are 2400 4800 9600 19200 38400 Default 9600 BITS Serial Format Options The Bits options allow the data transmission bit pattern and inter...

Page 48: ...n completed I LOCK Print Interlock Sets the type of printing interlock to be used Options are NONE MOTION Printing is enabled every time the scale becomes stable RET Z Printing is enabled after the sc...

Page 49: ...s and G for Gross or N for Net Line 3 Alternate Gross or Net reading to line 2 Net reading when the Gross reading is displayed on the second line Gross reading when the Net reading is displayed on the...

Page 50: ...21 154 9 kg G 0 0 kg N 0 0 kg T 000051 06 05 2003 15 21 50 4 kg G 0 0 kg N 0 0 kg T 000052 06 05 2003 15 21 71 0 kg G 0 0 kg N 0 0 kg T 000053 06 05 2003 15 21 13 3 kg G 0 0 kg N 0 0 kg T ITEMS 5 TOT...

Page 51: ...urrent count if counting is turned on ID DA H Current print ID Time C0 H Current time Date BF H Current date Total Weight DB H Total of printed Display Weight since last summary print long press Total...

Page 52: ...Disables the status on weight AF H Disables the status on weight Enable D840 traffic light support mapped to setpoint status B0H Enable D840 traffic light support mapped to setpoint status Place sign...

Page 53: ...key to print the programmed summary print string up to 99 characters including tokens 11 6 Master Serial Output In Master mode the instrument sends out the entire contents of the LCD at the selected a...

Page 54: ...ding that is used for check weighing GROSS Use gross weight readings always DISP Use the displayed weight gross or net NET Use net weight readings always Default GROSS OVER Target for Over This is the...

Page 55: ...the display again before returning to normal operation COUNT Use this key to perform pieces counting Press the COUNT key to switch between weight display and counts display The instrument annunciator...

Page 56: ...rent weight Press the TARE or ZERO key to clear any residual weight and return the scale to the zero state Place the mass to be weighed on the scale Once the weight moves outside the zero dead band th...

Page 57: ...rom the scale When the gross weight is stable within the zero dead band the instrument will automatically zero and the gross weight of zero will be displayed The next box can be placed on the scale an...

Page 58: ...he display before editing mode is entered to indicate that the under threshold is being edited Press the OK key to enter the under threshold Change the threshold to the required value using the SEL an...

Page 59: ...ance high value The TOL HI appears briefly on the display before editing mode is entered to indicate that the tolerance high value is being edited Change the tolerance high value to the required value...

Page 60: ...4 Appendix Trade Sealing Details Attachment of Lead Seal through optional Captive Security Screws Please note that security screws are available as an option and that they are less corrosion resistant...

Page 61: ...Versions 4 xx Page 58 003X 652 116 15 Appendix Dimensions Weight Indicator Dimensions in mm 1 inch 25 4 mm 3D View Front View Side View Bottom View Weight Indicator Wall Mount Dimensions in mm 1 inch...

Page 62: ...2 HI RES High Resolution x 10 mode 32 CABLE 4 Wire or 6 Wire 33 OPTION USE Scale Use 33 FILTER Reading Average 33 MOTION Motion Detection 33 INIT Z Initial Zero on Startup 33 Z TRAC Zero Tracking Sens...

Page 63: ...W D LOCK Wash Down Key Lock 37 E UNITS Extended unit switching 37 QCK CAL Quick calibration 37 BUZZER 37 LB OZ lb and oz Display 37 PWR FN Power Function 37 SERIAL TYPE Serial Output Type 43 AUT FMT S...

Page 64: ...R Set Hour 38 MINUTE Set Minute 38 QA OPT Quality Assurance Feature 38 QA YEAR Set Year for QA 38 QA MONTH Set Month for QA 38 QA DAY Set Day for QA 38 TEST SCALE Scale Base Test Display 39 FRC OUT Fo...

Page 65: ...ion Resolution U The weight is below the minimum allowable weight reading Increase the weight or decrease the minimum allowable weight reading O The weight is above the maximum allowable weight readin...

Page 66: ...point Points must be spaced by at least 2 of full scale from each other RES LO The scale build is configured for less than 100 graduations Check the resolution count by and capacity settings RES HIGH...

Page 67: ...n set too low or too high Fix up scale build E0100 The digital setup information has been lost Re enter setup E0200 The calibration information has been lost Re calibrate E0300 All setup information h...

Page 68: ...ceived from a module RESPONSE 40H Error Set to indicate that the data in this message is an error code and not a normal response 20H Reply Required Set by the master to indicate that a reply to this m...

Page 69: ...hex chars where 00020000 H Overload 00010000 H Underload 00008000 H Error see System Error 00004000 H SETUP menus active 00002000 H Calibration in progress 00001000 H Motion 00000800 H Centre of Zero...

Page 70: ...ommunications that do not involve checksums use either a CRLF ASCII 13 ASCII 10 as a terminator or a semicolon ASCII There is no start of message delimiter Message Ring Network Enhancement Instruments...

Page 71: ...gross load and full capacity gross load i e the nominated total capacity of the scale It is always given in displayed weight units Resolution The smallest change in weight units that the display can s...

Page 72: ...s to Drive PLC 14 Figure 13 opto LINK Attachment 15 Figure 14 Editing Annunciators 17 Figure 15 Display and Controls Illustration 19 Figure 16 Chart Zero and Span Points to Interpolate Weight from Loa...

Page 73: ...ation 23 Glossary of Terms 68 Gravity 29 34 59 GravityR 34 Group and Items 31 H HI RES 32 59 HOLD 52 HOUR 38 I Industrial vs OIML and NTEP Mode 24 INIT Z 33 59 K Key Functions 52 KEY FN 35 37 52 60 KE...

Page 74: ...Reference Manual V1 16 Software Versions 4 xx 003X 652 116 Page 71 Zero Calibration Routine 27 ZERO Key 21...

Page 75: ...Notes...

Page 76: ......

Reviews: