23
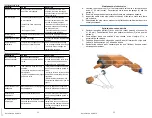
Changement de la cartouche à position variable
A.
Retirer le cache vis (1), dévisser la vis de blocage (2) et retirer la pognée (3).
B.
Dévisser la noix (4) et par la suite la cartouche (5). Si la cartouche n’est pas
dévissable a la main, insérer la poignée sur celle-ci pour la dévisser.
C. Visser la nouvelle cartouche (5) jusqu’au bout, en vous assurant qu’il y est
contact entre le joint d’étanchéité de la cartouche et le corps de valve (6) (NE
PAS TROP SERRER).
D. Avant de visser la noix (4) insérer la poignée (3) sur la cartouche pour la
positionner. Si la cartouche est en position fermée et que la poignée n’est pas
correctement alignée, dans l’une ou l’autre des positions, serrer la cartouche à
l’aide de la poignée (très peut, environ 9°).
E.
Une fois la poignée bien aligner, visser la noix (4) pour fixer la cartouche dans
cette position, attention de ne pas la déplacer lors du serrage de la noix.
F.
Remettre la poignée en place et faire un test d’eau pour détecter toute fuite.
Gui-22 rev 09 03/2012
Changing a variable position cartridge
A.
Remove the handle screw cap (1), unscrew the Allen screw (2) and remove the
handle (3).
B.
Unscrew the nut (4) followed by the cartridge (5). Should the cartridge be hard
to unscrew, reinstall the handle to help unscrew.
C. Screw the new cartridge (5) all the way in, making sure there is contact be-
tween the gasket of the cartridge and the body of the valve.(6)(DO NOT OVER-
TIGHT).
D.
Before repositioning the nut (4) insert the handle (3) onto the cartridge to set its
position. If the cartridge is in the close position and that the handle is not
properly aligned in either way, tight the cartridge using the handle (slightly,
about 9°).
E.
Once the handle is well aligned, screw the nut (4) to fix the cartridge in this po-
sition, be careful not to disturb the position while tightening the nut.
F.
Return the handle in place and carry out a water leak check.


