5
Warning
Before turning on the valve, it's mandatory to drain the water sources.
A.
Turn off the water sources. (4)
B.
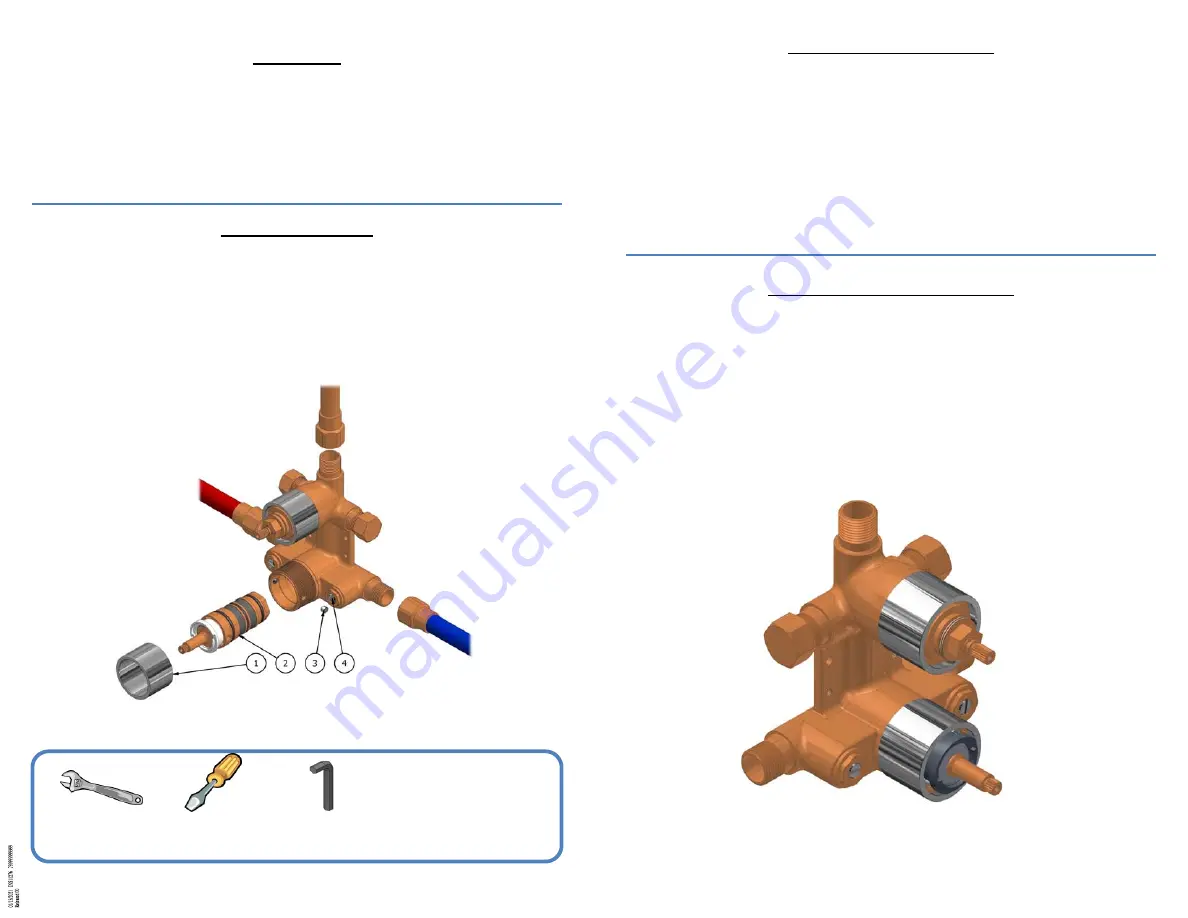
Unscrew the decorative sleeve (1).
C.
Remove the thermostatic cartridge (2) by unscrewing the set screw (3).
D.
Gently turn on the water sources (4) (be careful for hot water).
E.
Turn off water sources after waiting a minute.
F.
Put the thermostatic cartridge (2) and the decorative sleeve (1) back in place.
Mise en garde
Avant de mettre la valve en fonction, il est obligatoire de purger les alimentations d'eau.
A.
Fermer les alimentations d'eau. (4)
B.
Dévisser le manchon décoratif (1).
C.
Retirer la cartouche thermostatique (2) en dévissant les vis d’assemblage (3).
D.
Ouvrir lentement les alimentations d'eau (4) (attention à l'eau chaude)
E.
Fermer les alimentations d'eau (4) après avoir purger pendant une minute
F.
Replacer la cartouche thermostatique (2) et le manchon décoratif (1).
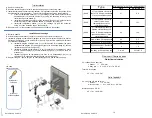
Screwdriver /
Tournevis
Adjustable key /
Clef ajustable
You need / Vous avez besoin:
Allen key /
Clef hexagonale
Gui-22 rev 09 03/2012
6
Practical tips before installation
A. Depending of the area, the installation of an "on demand" water heater may not be recom-
mended with this system.
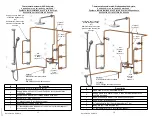
B. Follow the installation drawing. The disposition of the body jets should be between the
shoulders and knees.
C. For ¾” valve, all the piping and fitting are ¾” in diameter except for the pipes specified on
the drawing. For a ½” valve all the piping will be ½” in diameter.
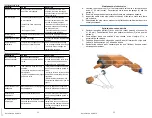
D. Connect the water supplies. Be sure to connect the cold water supply to the right side of
the valve and the hot supply to the left side.
E. The water connections to the valve have to be from the main water line supply for the cold
water and from the hot water tank for the hot water.
F. For an installation in an open shower, make a thermal barrier at the shower entrance (ex:
thermal light)
G. Supply the body jets higher than the highest body jet.
Conseils pratiques avant l'installation
A. Selon la région, l'installation de ce système est déconseillée avec un chauffe-eau ''sur
demande''
B. Suivez les schémas de montage. La disposition des jets de corps devrait être entre la
hauteur des épaules et celle des genoux.
C. Dans le cas d’une valve de ¾”, les tuyaux d’alimentation sont de diamètre ¾” et les dia-
mètres de sorties de valves varient selon les schémas. Pour une valve de ½” tous les
raccords et la tuyauterie sont de ½”.
D. Faites le branchement des conduites d’eau. Assurez-vous de joindre le conduite d'eau
froide sur le coté droit (en vue de face) de la valve et d'eau chaude sur le coté gauche.
E. Le branchement, pour l'eau froide, peut être raccordé directement à l'entrée d'eau de la
maison, et pour l'eau chaude, directement au chauffe-eau.
F. Dans le cas d’une installation dans une douche sans porte, créer une barrière thermique à
l’entrée de la douche (ex: lumière chauffante).
G. Alimen-
ter les jets de corps
de plus
haut que tous les
jets de
corps.
Gui-22 rev 09 03/2012


