background image

 17 


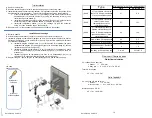
Trim installation 

A.  Remove the template. 
B.  Slide the decorative plate, fix it with the two screws and put on the screw caps 
C.  Install the temperature handle (bottom handle), it is important to place the stop button of the 

handle at twelve o'clock (upwards).  There are three different ways to do the installation: 

a.  Place the temperature handle (11) on the cartridge (5) and hold it in place with the 

handle adapter (10) and the handle (9) by using the assembly screw (8), then 
install the cap on the handle (7).  

b.  Install the temperature handle (4) on the cartridge (5) and hold it in place with the 

assembly screw (3), then install the handle (1) using the set screw (2).  

c.  Install the temperature handle (14) on the cartridge (5) with the assembly       

screw (13), then install the cap on the handle (12). 

D.  Repeat step "C" for the top handle (this handle does not have a stop button). 


Installation de l'habillage 

A.  Retirer le gabarit.   
B.  Glisser la plaque décorative et la fixer avec les deux vis et visser les caches vis. 
C.  Installer la poignée de température (poignée du bas). Il est important de placer le bouton 

d'arrêt de la poignée à douze heures (vers le haut). Voici les trois méthodes différentes 
pour effectuer l'installation: 

a.  Installer la poignée de température (11) sur la cartouche (5) et maintenir en place 

l'adaptateur de poignée (10) et la poignée (9) avec la vis d'assemblage (8), ensuite 
installer le chapeau sur la poignée (7). 

b.  Installer la poignée de température (4) sur la cartouche (5) et maintenir en place 

avec la vis d'assemblage (3), ensuite installer la poignée (1) à l'aide de la vis de 
pression (2). 

c.  Installer la poignée de température (14) avec la vis d'assemblage (13) sur la   

cartouche (5) et, ensuite installer le chapeau sur la poignée (12). 

D.  Répéter l'étape "C" pour la poignée du haut (cette poignée n'a pas de bouton d'arrêt). 

Screwdriver / 

Tournevis 

You need /  
Vous avez besoin :  

Allen key /  

Clef hexagonale 

Gui-22 rev 09  03/2012 

 18 


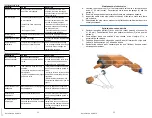
Flow chart / Charte de debit 

Water flow calculation 


Ex.: 1 shower and 6 body jets.  

1 Shower      

    2.5 G.P.M. 

6 Body jets   

    6 x 1.3 G.P.M. = 7.8 G.P.M. 

 
 Total G.P.M. needed 


2.5 + 7.8 = 10.3 G.P.M.  


Calcul de débit 


Ex. : 1 douche et 6 jets de corps. 

1 Douche           

   2,5 G.P.M. 

6 Jets de corps   

   6 x 1,3 G.P.M. = 7,8 G.P.M. 

 
Total du besoin en G.P.M.  


2,5 + 7,8 = 10,3 G.P.M. 


L/Min.

G.P.M. ( U.S.A. )

(XX22)

½" Thermostatic valve w ith 

shut-off / Valve thermostatique 

½" avec contrôle de volume

37

9,8

(XX32)

¾" Thermostatic valve w ith 

shut-off valve / Valve 

thermostatique ¾" avec 

contrôle de volume

57

15,1

(XX42)

½" Thermostatic pressure 

balance valve w ith shut-off 

valve / Valve thermostatique 

pression équilibrée ½" avec 

contrôle de volume

46

12,2

Show er head / Tête de douche

9,5

2,5

Hand show er / Douchette

9,5

2,5

Eco hand show er / Douchette 

éco

6

1,6

Eco body jet / Jet de corps éco

2 to / a 6

0,5 to/a 1,6

Maximum flow  rate at 60psi / Débit maximum 

Type

Gui-22 rev 09  03/2012 

Summary of Contents for Kit 1

Page 1: ...s as for merchant value specific warranty of any particular use explicit or implicit statutory or tacit other than foreseen above Technical information is subject to change without notice Nous vous remercions d avoir choisi un produit Riobel Il s agit d un produit de haute qualité conçu pour durer et garder son aspect original Nous vous invitons avant de procéder à l installation à lire attentivem...

Page 2: ...ts Système thermostatique typique 4 jets de corps page 17 Trim installation Installation de l habillage page 18 Flow chart Charte de dédit page 19 Cartridge maintenance Entretien des cartouches page 20 Troubleshooting guide Tableau de dépannage page 22 Maintenance of the check valve Entretien de la valve d arrêt page 23 Changing a variable position cartridge page 24 Changement de la cartouche à po...

Page 3: ... specified on the drawing For a valve all the piping will be in diameter D Connect the water supplies Be sure to connect the cold water supply to the right side of the valve and the hot supply to the left side E The water connections to the valve have to be from the main water line supply for the cold water and from the hot water tank for the hot water F For an installation in an open shower make ...

Page 4: ...il and 4 body jets Système thermostatique avec douchette sur rail et 4 jets de corps Optional Mixed water for bidet or others Facultatif Eau mélangée pour bidet ou autres Description 1 Hand show er on rail Douchette sur rail 2 Supply elbow w ith shut off valve Coude de raccordement avec contrôle de volume 3 Kit 2 thermostatic valve w ith shut off valve Valve thermostatique avec contrôle de volume ...

Page 5: ...ou autres Hot Chaud Cold Froid Gui 22 rev 09 03 2012 10 Cold pipe Froid tuyau Optional Mixed water for bidet or others Facultatif Eau mélangée pour bidet ou autres Hot pipe Chaud tuyau Kit 4 Thermostatic system with 4 body jets hand shower on rail and shower head Système thermostatique avec 4 jets de corps douchette sur rail et tête de douche Description 1 Hand show er on rail Douchette sur rail 2...

Page 6: ...42 Eco Thermostatic system with hand shower on rail 3 body jets and shower head Système thermostatique avec douchette sur rail 3 jets de corps et tête de douche Optional Mixed water for bidet or others Facultatif Eau mélangée pour bidet ou autres Description 1 Hand show er on rail Douchette sur rail 2 Supply elbow w ith shut off valve Coude de raccordement avec contrôle de volume 3 Show er head w ...

Page 7: ...the highest body jet Alimenter les jets de corps plus haut que tous les jets de corps Gui 22 rev 09 03 2012 14 Thermostatic system with 6 independent body jets hand shower on rail and shower head Système thermostatique avec 6 jets de corps indépendants douchette sur rail et tête de douche Description 1 Hand show er on rail Douchette sur rail 2 Supply elbow w ith shut off valve Coude de raccordemen...

Page 8: ...03 2012 16 Typical thermostatic system 4 body jets Système thermostatique typique 4 jets de corps Optional Mixed water for bidet or others Facultatif Eau mélangée pour bidet ou autres Hot Chaud Cold Froid Description 1 Hand show er on rail Douchette sur rail 2 Supply elbow Coude de raccordement 3 Body jets 4x Jets de corps 4x thermostatic valve w ith shut off valve Valve thermostatique avec contrô...

Page 9: ...oignée 10 et la poignée 9 avec la vis d assemblage 8 ensuite installer le chapeau sur la poignée 7 b Installer la poignée de température 4 sur la cartouche 5 et maintenir en place avec la vis d assemblage 3 ensuite installer la poignée 1 à l aide de la vis de pression 2 c Installer la poignée de température 14 avec la vis d assemblage 13 sur la cartouche 5 et ensuite installer le chapeau sur la po...

Page 10: ...tretien des cartouches A Fermer les alimentations d eau B Enlever les poignées faire référence au dessin selon votre type de poignée A B ou C C Dévisser les manchons de finition 3 D Enlever les vis de finition 5 6 ainsi que la plaque de finition 4 E Au besoin fermer les valves d arrêt sur la valve principale enlever la cartouche dévisser les vis de serrage 1 réinstaller temporairement une poignée ...

Page 11: ...nti retour au maximum en dévissant les vis à tête plates Rincer l intérieur de la valve ses composantes internes ainsi que les tuyaux Température de l eau inadéquate Mauvais ajustement de la poignée de température Retirer la poignée de température et ajuster la position de la cartouche Variation de la température Manque d alimentation d eau Faire le branchement directement des sources principales ...

Page 12: ...ention de ne pas la déplacer lors du serrage de la noix F Remettre la poignée en place et faire un test d eau pour détecter toute fuite Gui 22 rev 09 03 2012 Changing a variable position cartridge A Remove the handle screw cap 1 unscrew the Allen screw 2 and remove the handle 3 B Unscrew the nut 4 followed by the cartridge 5 Should the cartridge be hard to unscrew reinstall the handle to help unsc...

Reviews: