background image

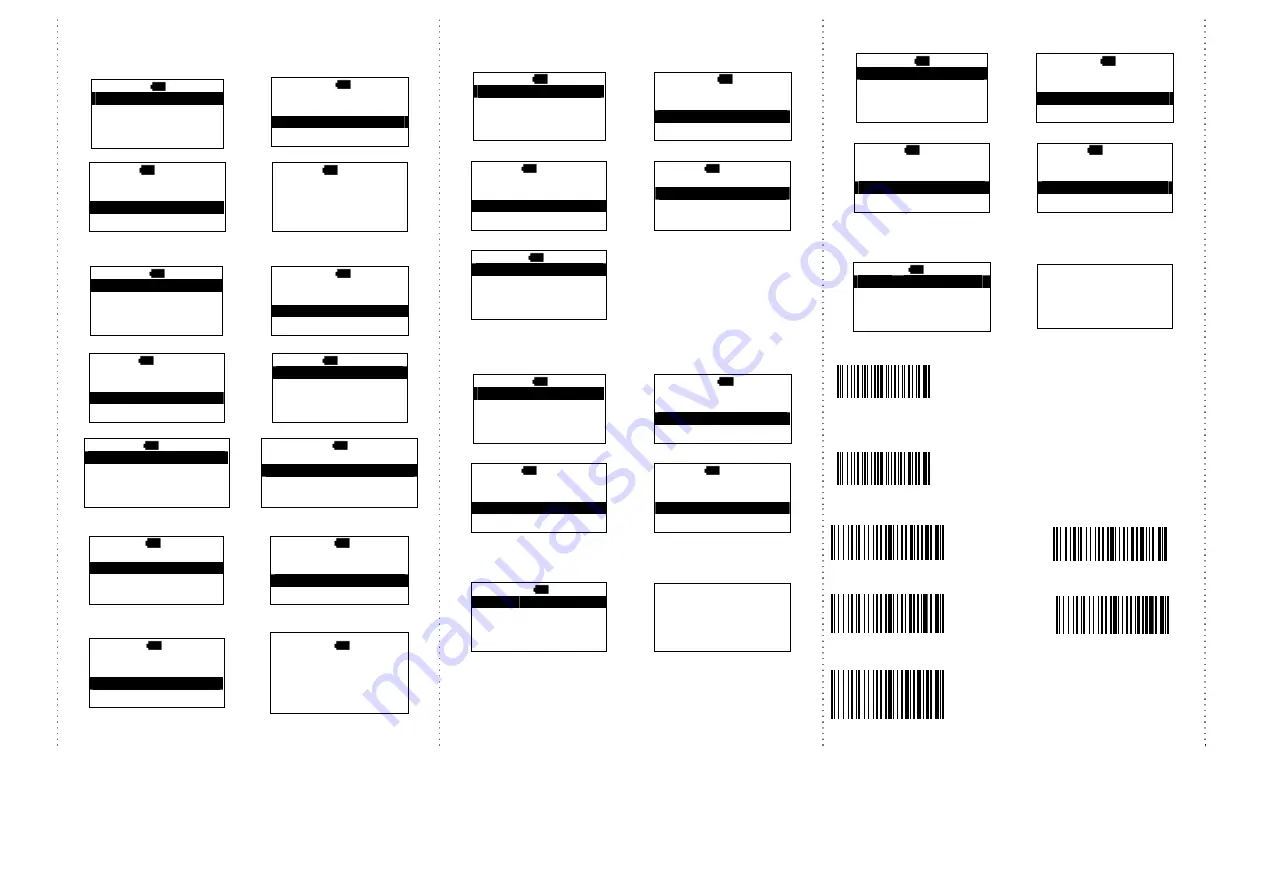
Transmission Speed


Transmission speed is dependent on your device. In order not to lose 

data, please choose the correct speed.   

1. Main MENU 

2. 

select

 Setup 


MAIN> 

  H  12:52

Direct-scan 

Memory-scan 

Upload 


ENTER 


MAIN> 

  H  12:52

Memory-scan 

Upload 

Setup 


ENTER 


3.

 select

 Output Speed

4. 

select

 the speed type, 

S> 

  H  12:52

BT Status 

Sleep time 

Output Speed 

ESC 

ENTER 


S/O> 

  H  12:52

Unlimited 

Extra high 

High 
ESC 

ENTER 


RTC (Real-time clock) 

1. Main MENU 

2.

 select

 Setup 


MAIN> 

  H  12:52

Direct-scan 

Memory-scan 

Upload 


ENTER 


MAIN> 

  H  12:52

Memory-scan 

Upload 

Setup 


ENTER 


3. 

select

 Time setup

4. 

select 

Stamp 

S> 

  H  12:52

Sleep time 

Output Speed 

Time setup 

ESC 

ENTER 


S/T> 

  H  12:52

Stamp 

Format 

Date adj. 
ESC 

ENTER 


5. 

select

 Date Stamp

6. 

Date Stamp is on or off.

S/T/S> 

  H  12:52

Date Stamp 

Time Stamp 

Interval char. 

ESC 

ENTER 


S/T/S/D> 

  H  12:52

Date Stamp 

On 

Off 

ESC 

ENTER 


7. 

press

 ESC, 

select

 Time 

Stamp 

8. 

Time Stamp is on or off


S/T/S> 

  H  12:52

Date    Stamp 

Time    Stamp 

Interval char. 

ESC 

ENTER 


S/T/S/T> 

  H  12:52

Time    Stamp 

On 

Off 

ESC 

ENTER 


        9. 

press

 ESC,

 select

Interval char. 

8. 

select

 Interval char. 

S/T/S> 

  H  12:52

Date    Stamp 

Time    Stamp 

Interval char. 

ESC 

ENTER 


S/T/S/P

  H  12:52

Interval char. 


ESC 

ENTER 


The format of Date setting 


1. Main MENU

2. 

select

 Setup 


MAIN>

H 12:52

Direct-scan

Memory-scan

Upload


ENTER


MAIN> 

  H 12:52

Memory-scan 

Upload 

Setup

ENTER 


3. 

select

Time setup

4.

select

 Format 

S>

H 12:52

Sleep time

Output Speed

Time setup

ESC

ENTER 


S/T>

  H 12:52

Stamp 

Format 

Date adj. 
ESC

ENTER 


5. 

select the format of date


S/T/F>

H 12:52

MM/DD/YY

DD/MM/YY

YY/MM/DD
ESC

ENTER 


Date setting 


1. Main MENU

2. 

select

 Setup 


MAIN>

H 12:52

Direct-scan

Memory-scan

Upload


ENTER


MAIN> 

  H 12:52

Memory-scan 

Upload 

Setup

ENTER 


3. 

select 

Time setup

4. 

select

 Date adj.

S>

H 12:52

Sleep time

Output Speed

Time setup

ESC

ENTER 


S/T>

  H 12:52

Stamp 

Format 

Date adj. 

ESC

ENTER 


5.


Set the date, press 

  to select 

number,  then,  press 

ENTER

  to 

go to the next

6. 

Save the date data


S/T/D>

H 12:52

Year

(00-99) :    11

Month    (01-12) :    12

Date

(01-XX) :    02

ESC

ENTER


Save    it ? 


NO


YES


Time setting 

1. Main MENU

2. 

select

Setup 


MAIN>

H 12:52

Direct-scan

Memory-scan

Upload


ENTER


MAIN>

  H  12:52 

Memory-scan 

Upload

Setup

ENTER 


3. 

select

Time setup

4. 

select

Clock adj. 

S>

H 12:52

Sleep time

Output Speed

Time setup

ESC

ENTER 


S/T>

H  12:52 

Format

Date adj.

Clock adj.

ESC

ENTER 


5. 

set the time. Press 

  to   

select the number, then,   

press the 

ENTER

 to go the next


6. 

save the time setting


S/T/T>

H

12:52

Hour

(00-23) : 00

Min

(00-59) : 00

Sec

(00-59) : 00

ESC

ENTER 


Save    it ?

NO

YES 


Trigger Mode 

Trigger always 
(You can read the next code, even the data is 
under transmitting or transmitting 
completely.)


Trigger standard 

(Default)


(You can read the next code after the data is 
transmitting completely.)


Multi-language UI setting


(can be changed to different UI by reading the below setting code) 


Germany UI                                              Japan UI 


English UI


(

Default

)


Spain UI


French UI 


Summary of Contents for iDC9600KW

Page 1: ...ot follow the safety instructions and information on proper handling in this manual we assume no liability for any resulting personal injury or damage to property Don t put scanner in places excessively high temperatures such as expose under direct sunlight Don t use scanner in extremely humid area or drastic temperature change The rechargeable battery is permanently built into the product and can...

Page 2: ...to B3 A1 select SPP device B1 select HID device S B S 12 52 HID device SPP device dongle ESC ENTER S B S 12 52 HID device SPP device dongle ESC ENTER A2 select Simple pairing or Pairing B2 select Simple pairing or Pairing S B S S 12 52 Simple pairing Pairing ESC ENTER S B H S 12 5 2 Simple pairing Pairing ESC ENTER A3 Setting Completed B3 Setting Completed Setting Completed Setting Completed After...

Page 3: ...ts down it is recommended to charge it fully before turning it on charged by USB power adapter of smartphone only Under power saving mode there will not be LED indication when charging Soft Keyboard setting code for Android iOS For Android For iOS Under Android system If you want to raise lower soft keyboard please read the above setting code first Then press left button for 2 seconds to raise key...

Page 4: ...654321 Q ty 1 ESC SCAN ENTER C3 Press the ENTER to type the q ty D3 Press the ENTER to type the q ty M H 12 52 1234567 Q ty 1 ESC SCAN ENTER M H 12 52 7654321 Q ty 1 ESC SCAN ENTER C4 press to choose number then press ENTER to confirm D4 scan numeric code page 5 M H 12 52 1234567 Q ty 5 ESC ENTER M H 12 52 7654321 Q ty 5 ESC SCAN 5 Then scan the next barcode 5 end by X code then be ready to scan t...

Page 5: ...TER 3 select Time setup 4 select Format S H 12 52 Sleep time Output Speed Time setup ESC ENTER S T H 12 52 Stamp Format Date adj ESC ENTER 5 select the format of date S T F H 12 52 MM DD YY DD MM YY YY MM DD ESC ENTER Date setting 1 Main MENU 2 select Setup MAIN H 12 52 Direct scan Memory scan Upload ENTER MAIN H 12 52 Memory scan Upload Setup ENTER 3 select Time setup 4 select Date adj S H 12 52 ...

Page 6: ... LF 80 F1 29 41 A 59 Y 71 q 0B CTRL K VT 81 F2 2A 42 B 5A Z 72 r 0C CTRL L FF 82 F3 2B 43 C 5B 73 s 0D Enter CR 83 F4 2C 44 D 5C 74 t 0E CTRL N SO 84 F5 2D 45 E 5D 75 u 0F CTRL O SI 85 F6 2E 46 F 5E 76 v 10 CTRL P DLE 86 F7 2F 47 G 5F _ 77 w 11 CTRL Q DC1 87 F8 30 0 48 H 60 78 x 12 CTRL R DC2 88 F9 31 1 49 I 61 a 79 y 13 CTRL S DC3 89 F10 32 2 4A J 62 b 7A z 14 CTRL T DC4 8A F11 33 3 4B K 63 c 7B ...

Page 7: ...BLE EAN 8 DISABLE ENABLE EAN 13 DISABLE 1D Symbologies 2 ENABLE GS1 DataBar DISABLE ENABLE Interleaved 25 DISABLE ENABLE MSI DISABLE ENABLE CODABAR DISABLE ENABLE CODE 39 DISABLE ENABLE ISBN DISABLE ENABLE GS1 128 DISABLE 2D Symbologies ENABLE PDF 417 DISABLE ENABLE QR Code DISABLE ENABLE Data Matrix DISABLE ENABLE Aztec Code DISABLE ...

Page 8: ... g a bent paper clip into the small hole To click the reset button inside How to assemble the Glove set Glove Holder Ring Trigger cable 1 how to assemble the glove 1 2 how to assemble the glove 2 3 Put Holder on glove VELCRO area 4 Put pocket scanner onto holder pay attention to assembling direction Pressing direction Reset ...

Page 9: ...ger unit you can use plastic hook to adjust the trigger cable 6 Glove set can be used for the right hand also 7 If you want to remove pocket scanner from Glove set you can disassembled it as per above photo Quick guide is subject to change without notice R_191015_01 ...

Reviews: