background image

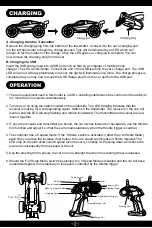
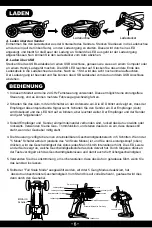
A. Charging from the Transmitter

Remove the charging plug from the bottom of the transmitter. Connect it to the car’s charging port 
(on the left hand side) to begin the charge process. This will be indicated by an LED which will 
remain on for the duration of the charge. Once the LED goes out, charging is complete. You can 
now remove the charging plug from the car.

B. Charging via USB

Insert the USB charge lead into a USB port such as that on a computer or mobile phone 
charger. The LED will illuminate. Connect the end of the USB lead into the car’s charge port. The USB 
LED will go out. After approximately one hour, the light will illuminate once more - the charge process is 
complete and you may now remove the USB charge plug from the car and from the USB port.

1. The radio equipment used in this model is 2.4GHz, enabling interference free control and the ability to  
    run more than one vehicle simultaneously.

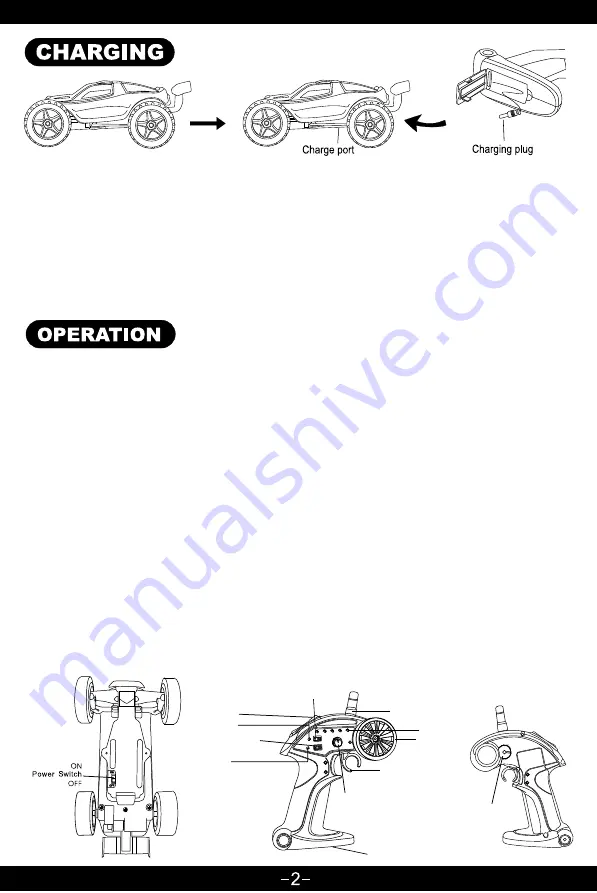
2. Turn the car on using the switch located on the underside. The LED flashing indicates that the  


    receiver is looking for a corresponding signal. Switch on the transmitter. The receiver (in the car) will  
    locate it and the LED will stop flashing and remain illuminated. The transmitter and receiver are now  
    ‘bound’ together.

3. If, once the receiver and transmitter are bound, the car lurches forwards or backwards, use the throttle  
    trim function and adjust it so that the car remains stationary when the throttle trigger is centred.

4. The controller has a 5 speed mode. If the ‘5 Mode’ switch is activated, (rather than ‘All Scale Mode’)  
    each time you press the increase (top) button, the car’s speed will increase in 5km/h intervals.The       
    LED strip on the side shows which speed level the car is currently at. Pressing down will reduce the  
    level and consequently the top speed of the car.

5. Use the steering trim to ensure the car runs in a straight line when the steering wheel is released.

6. Should the ‘Full Scale Mode’ switch be selected, the 5 Speed Mode is disabled and the car will have  
    unrestricted speed, from stationary to full speed, controlled by the throttle trigger. 

Aerial

Shift Up

Power Indicator

Power Switch

Mode Conversion Switch

Charging Light

Forward/Reverse Trim

Charge Port

Throttle/Reverse Trigger

Gear Indicator LEDs

Steering Wheel

Steering Trim

Summary of Contents for RC Racing Speed & Stunt Car C-RMX0040

Page 1: ...own and open it Insert 4x AA batteries ensuring you observe the correct polarity then replace the cover 2 Take the optional Rollbar and form a circle as shown ensuring the adhesive tab is on top when the two ends meet this ensures good adhesion with the panel located on the underside of the car 6 10 Minute Run times 30 40 Metre Range 2 4GHz Secure Transmission Fully Proportional Throttle Steering ...

Page 2: ...or a corresponding signal Switch on the transmitter The receiver in the car will locate it and the LED will stop flashing and remain illuminated The transmitter and receiver are now bound together 3 If once the receiver and transmitter are bound the car lurches forwards or backwards use the throttle trim function and adjust it so that the car remains stationary when the throttle trigger is centred...

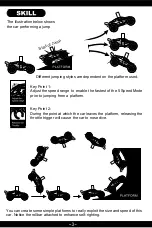
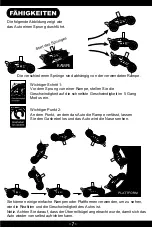
Page 3: ...ping styles are dependent on the platform used The illustration below shows the car performing a jump Key Point 1 Adjust the speed range to enable the fastest of the 5 Speed Mode prior to jumping from a platform Key Point 2 During the point at which the car leaves the platform releasing the throttle trigger will cause the car to nose dive Start of Jump ...

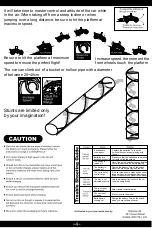
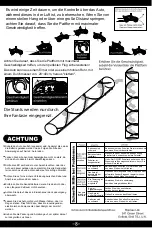
Page 4: ...ut The car is out of control range The trim is not adjusted correctly There is signal interference The car is out of range Batteries are running out Charge the battery Turn off the switch when you are not using the car Move closer to the model Select a new location to play Use the steering trim to ensure the car runs in a straight line Note The on off switch of the car and the controller should be...

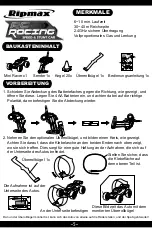
Page 5: ...Gas und Lenkung MERKMALE BAUKASTENINHALT Bedienungsanleitung 1x VORBEREITUNG 2 Nehmen Sie den optionalen Überrollbügel und bilden einen Kreis wie gezeigt Achten Sie darauf dass die Klebelasche an den beiden Enden nach oben zeigt wo sie sich treffen Dies sorgt für eine gute Haftung an der Aufnahme die sich auf der Unterseite des Autos befindet Überrollbügel 1x Die Aufnahme ist auf der Unterseite de...

Page 6: ...isiert und die LED hört auf zu blinken aber leuchtet weiter Der Empfänger und der Sender sind jetzt angebunden 3 Sobald Empfänger und Sender einmal miteinander verbunden sind ruckelt das Auto vorwärts oder rückwärts Verwenden Sie die Gas Trimmfunktion und stellen das Auto so ein dass dieses still steht wenn der Gashebel mittig steht 4 Die Steuerung verfügt über einen voreinstellbaren Geschwindigke...

Page 7: ...elbst aufrichten kann Die folgende Abbildung zeigt wie das Auto einen Sprung durchführt RAMPE Die verschiedenen Sprünge sind abhängig von der verwendeten Rampe Wichtiger Schritt 1 Vor dem Sprung von einer Rampe stellen Sie die Geschwindigkeit auf die schnellste Geschwindigkeit im 5 Gang Modus ein Wichtiger Punkt 2 An dem Punkt an dem das Auto die Rampe verlässt lassen Sie den Gashebel los und das ...

Page 8: ... zerstört werden Heben Sie die Packung und Anleitung auf um später darauf zurück greifen zu können Achten Sie darauf dass Sie die Plattform mit maximaler Geschwindigkeit treffen um den perfekten Flug sicherzustellen Das Auto kann aus einem Eimer oder aus einem hohlen Rohr mit einem Durchmesser von 20 40cm heraus klettern Batterien sind zu schwach Das Auto ist außer Reichweite Es gibt Signalstörung...

Reviews: