background image

1


Dual Technology Outdoor Detector 

 Introduction 

RISCO Group's Dual Technology Outdoor detector, WatchU, is a unique detector with signal 
processing based on two Passive Infrared (PIR) channels and two Microwave (MW) channels. 
 

Mounting Considerations 


Wall Mount Installation 

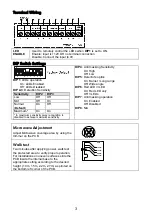
Note: 

The installation knockouts numbering are marked on the 
back plate. 

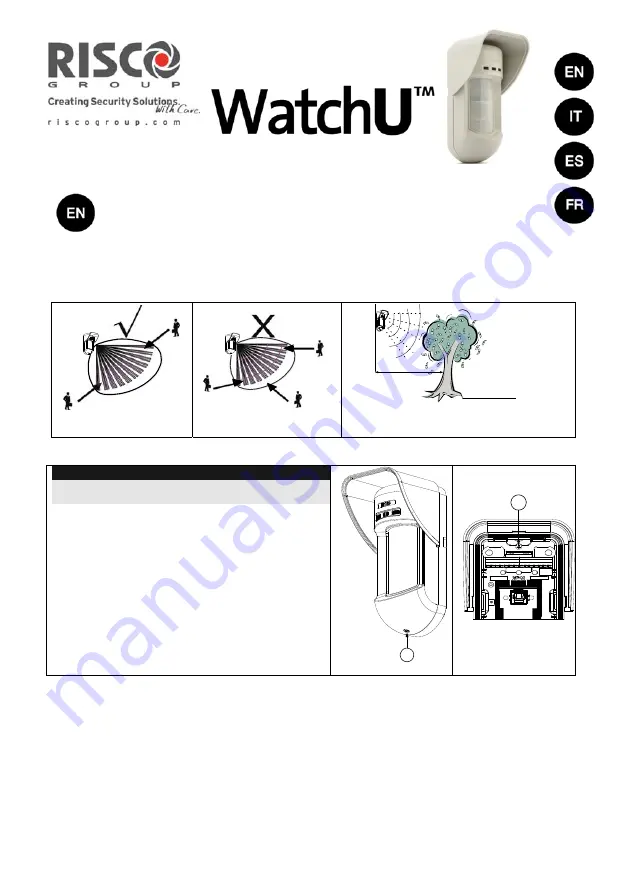
1. Open WatchU front cover  

(unlock C1, Figure 1). 

2. Release internal base (unlock I1, Figure 2). 

3. Select mounting installation as follows: 

Flat Mounting: 

Open knockouts on external base (Figure 3). 


B1 - B4: Wall mounting knockouts 


T1: Back tamper knockout 


W2 / W3: wires entry knockouts  


Figure 1 


Figure 2 


Out of

Detection Range

Keep distance of 
minimum 5m (16') 
from moving objects

5m (16')

C1

I1


Summary of Contents for WatchU

Page 1: ... Installation Note The installation knockouts numbering are marked on the back plate 1 Open WatchU front cover unlock C1 Figure 1 2 Release internal base unlock I1 Figure 2 3 Select mounting installation as follows Flat Mounting Open knockouts on external base Figure 3 B1 B4 Wall mounting knockouts T1 Back tamper knockout W2 W3 wires entry knockouts Figure 1 Figure 2 Out of Detection Range Keep di...

Page 2: ...the equivalent units on the external base as follows Knockouts Description Left Right Mounting Knockouts L1 L2 R1 R2 Tamper spring knockouts T1 T3 T2 T4 Tamper screw anchor T5 T6 Wiring Knockouts W5 W6 W7 W8 Changing Back Tamper position The back tamper is by default secured on the right side of the internal base rear view If you wish to move it to the left side rear view do the following Figure 5...

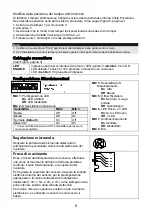
Page 3: ...P 4 Anti masking Sensitivity On High Off Low DIP 5 Detector s optics On Barrier Long range Off Wide angle DIP 6 Red LED 3 LED On Red LED only Off 3 LEDs DIP 7 Anti masking operation On Enabled Off Disabled DIP 8 N A Microwave Adjustment Adjust Microwave coverage area by using the trimmer on the PCB MIN MAX Walk test Two minutes after applying power walk test the protected area to verify proper ope...

Page 4: ...m RED LED Lens Types Wide angle lens RL300 Top view Wide angle lens RL300 Side View Technical Specification Electrical Current consumption 45mA at 12 VDC Stand by 70mA at 12 VDC MAX with LED ON Voltage requirements 9 16 VDC Alarm contacts 24 VDC 0 1A AM contacts 24 VDC 0 1A Physical Size LxWxD 220 x 115 x 123mm 8 7 x 4 5 x 4 85 in Weight 0 632 Kg 1 4lb Environmental RF immunity 30MHz to 2GHz 40V m...

Page 5: ...base esterna fig 3 L1 L2 Fori a sfondare per lato sinistro T3 Foro a sfondare per tamper lato sinistro b W5 W6 Fori a sfondare per passaggio caviRimuovere la molla del tamper c Sostituire la staffa Item 1 con l altra fornita Item 2 Item 1 Item 2 d Inserire la leva B del tamper in T5 e T3 e stringere la vite A figura 3 4 Inserire I cavi esterni attraverso la base esterna W2 W3 Installazione piana o...

Page 6: ... Off Bassa MIC 5 Ottica Rivelatore On Barriera Lunga portata Off Grandangolo MIC 6 LED Rosso o 3 LED On Solo LED rosso Off 3 LED MIC 7 Antimascheramento On Abilitato Off Disabilitato MIC 8 N A MIC 1 Predisposizione LED On LED abilitati Off LED disabilitati MIC 2 3 Sensibilità di rilevazione Sensibilità MIC2 MIC3 Bassa Off Off Media Off On Normale Default On Off Massima On On Con sensibilità massim...

Page 7: ...va seguito poi dal LED rosso di allarme Tipologie di Lenti Grandangolo RL300 Vista dall alto Grandangolo RL300 Vista laterale Altezza di installazione tipica 2 2m 2 4 6 8 10 0 12 14 15 1 3 0 Metri Caratteristiche Tecniche Elettriche Assorbimento di corrente 30mA a 12 Vcc a riposo 42mA a 12 Vcc max con LED illuminati Requisiti di alimentazione 9 16 Vcc Contatti di Allarme 24 Vcc 0 1 A Contatti Anti...

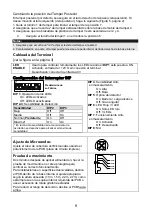
Page 8: ...ados de montaje del lado izquierdo T3 Agujero pre marcado del tamper izquierdo W5 W6 Agujeros pre marcados para entrada de cables b Quite el resorte del tamper c Reemplace la abrazadera del tamper Ítem 1 con la abrazadera plana suministrada Ítem 2 Ítem 1 Ítem 2 d Inserte la palanca del tamper B en T5 y T3 y apriete el tornillo A Figura 3 4 Inserte los cables externos a través de la base externa W2...

Page 9: ...s LEDs On LEDs Activados Off LEDs Desactivados DIP 2 3 Sensibilidad de Detección Sensibilidad DIP2 DIP3 Baja Off Off Media Off On Normal Predeterm On Off Máxima On On En la máxima sensibilidad el reconocimiento de oscilación se desactiva para alcanzar el máximo de sensibilidad DIP 4 Sensibilidad Anti enmascaramiento On Alta Off Baja DIP 5 Óptica del detector On Barrera Largo alcance Off Gran angul...

Page 10: ...ED ROJO de Alarma Tipos de Lente Lente gran angular RL300 Lente gran angular RL300 Vista lateral Especificaciones Técnicas Eléctrica Consumo de corriente 45mA a 12 VDC en reposo 70mA a 12 VDC máx con LED ON Requisitos de voltaje 9 16 VDC Contactos de alarma 24 VDC 0 1A Contactos AM 24 VDC 0 1A Física Tamaño Longitud x Anchura x Profundidad 220 x 115 x 123mm 8 7 x 4 5 x 4 85 in Peso 0 632 Kg 1 4lb ...

Page 11: ...tection B aux endroits marqués T5 et T3 ensuite serrez la vis A figure 3 4 Introduisez les fils électriques extérieurs par le socle externe en W2 W3 figure 3 5 Fixez le socle externe de l appareil au mur 6 Faites passer les fils électriques externes et d autoprotection dans le socle interne figure 4 7 Fixez le socle interne au socle externe bloquez en I1 figure 2 8 Fermez le couvercle bloquez en C...

Page 12: ... 5 optique du détecteur On Barrière Longue portée Off grand angle DIP 6 diode LED rouge 3 LED On diode LED rouge seulement Off 3 diodes LED DIP 7 fonctionnement Anti masque On Activé Off Désactivé DIP 8 N A Réglage Micro onde Réglez la couverture micro onde à l aide du potentiomètre qui se trouve sur la carte PCB MIN MAX Test de passage Deux minutes après la mise sous tension effectuez un test de ...

Page 13: ...ristiques électriques Consommation électrique 45mA à 12 VCC en veille 70 à 12 VCC max avec diodes LED allumées Conditions de tension requises 9 16 VCC Contacts d alarme 24 VCC 1A Contacts AM 24 VCC 0 1A Caractéristiques physiques Dimensions L x l x P 220 x 115 x 123mm 8 7 x 4 5 x 4 85 in Poids 0 632 Kg 1 4lb Caractéristiques environnementales Immunité RF 30MHz to 2GHz 40V m Température de fonction...

Page 14: ...ion that any Product returned by customer conforms to the applicable warranty Non Defective Products Risco will notify the customer of such determination and will return the applicable Product to customer at customer s expense In addition Risco may propose and assess customer a charge for testing and examination of Non Defective Products Entire Liability The repair or replacement of products in ac...

Page 15: ...OWLEDGE INFRINGE UPON ANY PATENT COPYRIGHT TRADEMARK TRADE SECRET OR OTHER INTELLECTUAL PROPERTY RIGHT IN ANY EVENT RISCO SHALL NOT BE LIABLE FOR ANY AMOUNTS REPRESENTING LOST REVENUES OR PROFITS PUNITIVE DAMAGES OR FOR ANY OTHER INDIRECT SPECIAL INCIDENTAL OR CONSEQUENTIAL DAMAGES EVEN IF THEY WERE FORESEEABLE OR RISCO HAS BEEN INFORMED OF THEIR POTENTIAL Risco does not install or integrate the p...

Page 16: ...ort it riscogroup com China Shanghai Tel 86 21 52 39 0066 E mail support cn riscogroup com Spain Tel 34 91 490 2133 E mail support es riscogroup com Israel Tel 972 3 963 7777 E mail support riscogroup com France Tel 33 164 73 28 50 E mail support fr riscogroup com Australia Tel 1 800 991 542 E mail support au riscogroup com USA Tel 1 631 719 4400 E mail support usa riscogroup com All rights reserv...

Reviews: