6 - 7
CZ80 / CV860 Rev. .0
CHAPTER 6: PRESS SECTION
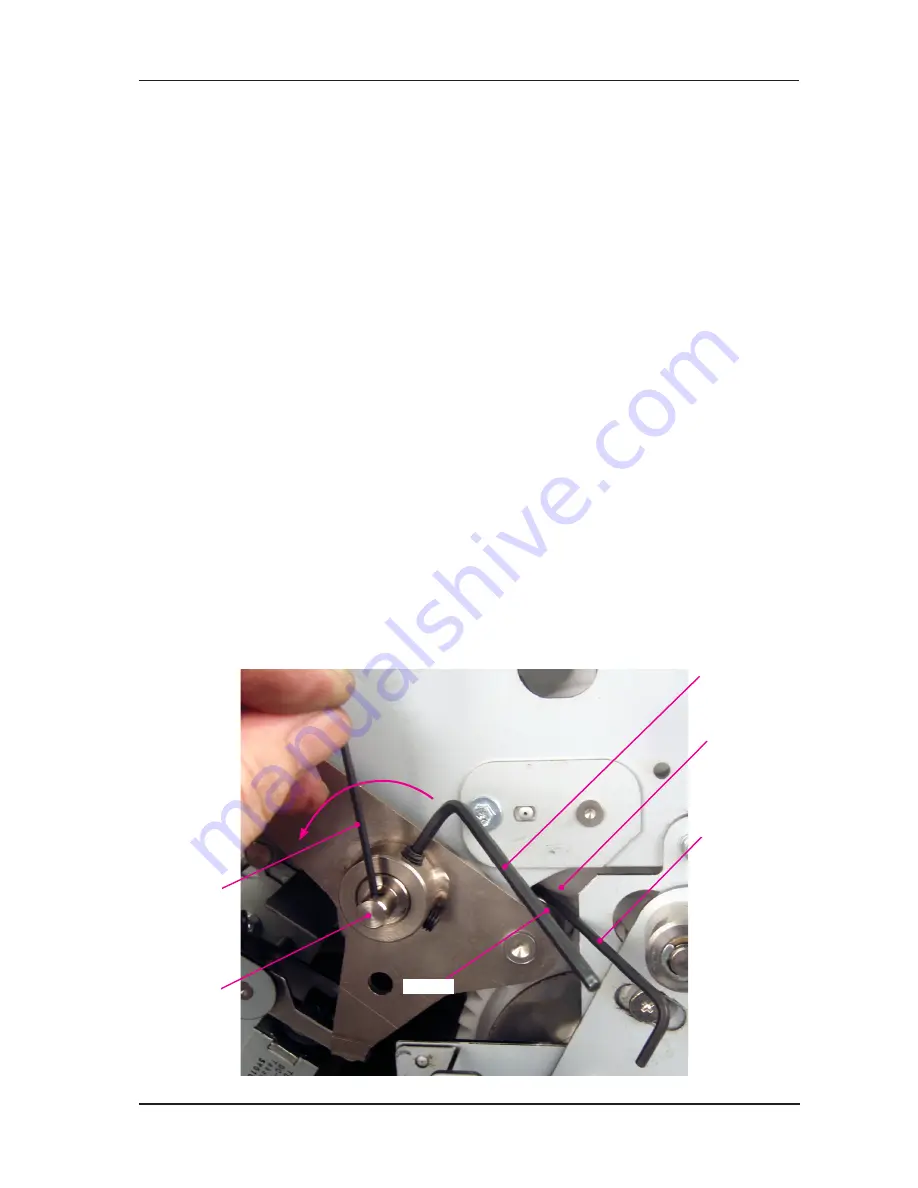
Pressure shaft
Allen wrench
3mm Alen wrench
Pressure cam
Bearing
Allen wrench
ADJUSTMENT
1. Pressure lever assembly position
1) Make confidential master on the Drum.
2) Bring the Drum to Position-B.
3) Turn the machine power OFF, and remove the Rear cover (M3x8 screws; 5 pcs)
4) Open the PCB bracket on rear of the machine. (M3x8 screws; 4 pcs)
5) Being careful not to injure yourself, use your hand to push on the Pressure lever and push the
Solenoid lever down to unhook the both from each other.
6) Confirm that the gap between the pressure cam and Cam follower on the Pressure lever
assembly is 2.5 mm plus/minus 0.5mm.
7) If the gap is too narrow or too big, loosen the two set screws on the Pressure lever assembly.
8) Place a 3mm Allen wrench or 3mm thick plate between the Pressure cam and Cam follower, and
hook a thinner Allen wrench in the hole on the end of the Pressure shaft to rotate the shaft.
9) Rotate the Pressure shaft in the direction shown to lift the Pressure roller up against the Drum.
0) While lifting the Pressure roller against the Drum, tighten the two set screws on the Pressure
lever assembly. The Pressure lever assembly should be pushed all the way in when tightening
the two set screws.
Results of Incorrect Adjustment
) If the gap is smaller than 2.5mm plus/minus 0.5mm, the printing pressure may become too weak
and print density problem may occur.
Also, the Pressure roller may land against the Drum in incorrect position and may cause ink
leakage from the Drum.
2) If the gap is too big, the Pressure roller may hit the Clamp plate of the Drum during printing and
damage the Clamp plate.
RISO Inc. Technical Services & Support
US.RISO.COM


