background image

1-4

Perfect Binder User’s Guide

Using the Printer Driver

This section describes how to allocate original data 
as the cover and the body pages when sending a 
binding job and the setting items of the screen of 
the printer driver.

Set the printer configuration when using the printer 
driver for the first time or when adding optional 
equipment to the printer.

1

Display the [Environment] tab.

The [Environment] tab is displayed when the printer 
being used is right clicked from [Devices and 
Printers] under the [Start] menu and [Printer 
Properties] is opened.

2

Click [Get Printer Info].

Automatically acquires the information of optional 
configuration from the printer. The information 
acquired from this unit is displayed on [Printer 
Configuration].

3

Click [Custom Paper Entry].

You can register up to 99 items worth of irregular 
size paper. For more information on the registration 
method of paper size, see the guides of the 
ComColor GD Series printer.

The original data is divided into cover sheets and 
body pages and printed. The page allocation will 
vary depending on the setting of [Duplex Print] for 
the cover sheet. Prepare the original data suitable 
for the cover type.

The first two pages of the original data are 
allocated on the front and back cover sheets. The 
subsequent pages are allocated on the body 
pages.

The first page of the original data is allocated on the 
cover sheet. The subsequent pages are allocated 
on the body pages.

• The displayed setting items vary depending on 

the selected items or settings made by the 
administrator.

• If the optional equipment necessary for the 

setting is not attached, the setting item is not 
displayed.

• Before performing perfect binding, configure the 

printer driver settings on your computer.

• To perform variable data printing, use mail 

merge available with Microsoft Word.

Setting the Printer 
Configuration

• To set the printer configuration manually, 

select [Finisher:] - [ON (Perfect Binder)].

Allocating the Original 
Data to the Cover Sheet 
and Body Pages

Performing Duplex Printing on 
the Cover Sheet

Performing Simplex Printing on 
the Cover Sheet (blank inside 
covers)

Outside cover 
(Cover 1, 
Cover 4)

Inside cover 
(Cover 2, 
Cover 3)

Body page

Outside cover 
(Cover 1, 
Cover 4)

Body page

Summary of Contents for Perfect Binder G10 120

Page 1: ...User s Guide Series 061 36009 ...

Page 2: ...ference will not occur in a particular installation If this equipment does cause harmful interference to radio or television reception which can be determined by turning the equipment off and on the user is encouraged to try to correct the interference by one or more of the following measures Reorient or relocate the receiving antenna Increase the separation between the equipment and receiver Conn...

Page 3: ...o product improvements 3 RISO KAGAKU CORPORATION shall not be liable for any consequence of using this guide or the machine Trademark Credits Microsoft Windows and Microsoft Word are either registered trademarks or trademarks of Microsoft Corporation in the United States and or other countries PostScript is either registered trademarks or trademarks of Adobe Systems Incorporated in the United Stat...

Page 4: ...on the touch panel screen and buttons items displayed on the computer operation screen are indicated with square brackets Illustrations Used in This Guide The screenshots and illustrations contained in this guide may vary depending on the model of the printer or the usage environment including the connected optional equipment Symbols Notations and Screenshots Used in This Guide Example Press the S...

Page 5: ...g of Used Consumables 12 Usable Paper 12 Handling of Bound Booklets 13 Restrictions on the Printer 14 Part Names and Functions 15 What You Can Do with the Perfect Binder 16 Perfect Binding 18 Binding Method 18 Terms 18 Paper Feed Path 20 Binding Preparations 21 Power Supply 21 Unit Status 22 Loading the Body Pages Cover Manual Binding 23 Chapter 1 Binding 1 1 Basic Operations of the Perfect Bindin...

Page 6: ...osing the Cutting Trash 2 5 Cleaning the Unit 2 7 Troubleshooting 2 8 Precautions when Removing Jammed Paper 2 14 Chapter 3 Appendix 3 1 Specifications 3 2 Consumables 3 4 Types of Consumables 3 4 Index 3 6 Vorsichtsmaßnahmen 3 8 Warnsymbole 3 8 Netzstecker 3 9 Aufstellungsort 3 9 Netzanschluss 3 9 Behandlung 3 10 Warnsymbole 3 11 Vor Inbetriebnahme 3 12 Aufstellungsort 3 12 Netzanschluss 3 12 Abm...

Page 7: ...symbol may cause human injury or damage to properties The symbol indicates a prohibited action A specific prohibited action is drawn inside or next to the symbol The figure on the left indicates that disassembly is prohibited The symbol indicates a forced action or an instruction A specific instruction is drawn inside the symbol The left figure indicates an instruction to remove the power plug fro...

Page 8: ...his product can be used only for this unit Do not use it for another electric product Otherwise a fire or an electric shock might occur Do not plug or unplug the power cord if your hands are wet Otherwise an electric shock might occur CAUTION Connect the plug securely to the optional connection outlet on the printer main unit to avoid a loose connection Do not pull the power cord when unplugging i...

Page 9: ... heat smoke or a foul odor a fire or an electric shock might occur Immediately hold down the Power key on the operation panel turn off the operating power and then turn off the main power switch Next be sure to unplug all of the power cords and contact your dealer or authorized service representative CAUTION Do not insert your fingers in the areas around the body sheet stacker or booklet slot Fail...

Page 10: ...readable contact your dealer or authorized service representative Location of the Caution Label The locations of the caution labels warning are shown below Label Details The location of the label is high temperature Body contact may result in burn Caution Label Do not touch this unit with your bare hands immediately after the unit has been stopped When touching the unit wear the heatproof gloves W...

Page 11: ...d dry Places close to fire or heat Places directly subject to cold air from air conditioners or hot air from heaters as well as radiant heat Places with poor air permeability or ventilation Dusty places Places subject to excessive vibration Install the unit in a place whose levelness is within the following specified range Installation surface level 2 degrees or less Operate the unit under the fol...

Page 12: ...sufficient space for the operations replacing the consumables and maintenance Required Spacing As seen from the front Units mm inch 1 260 49 5 8 2 2 495 98 1 4 2 755 108 7 16 1 As seen from the side Units mm inch 1 320 51 31 32 3 1 635 64 3 8 830 32 21 32 100 3 15 16 ...

Page 13: ... a curtain at the window and store in areas between 5 C and 35 C 41 F 95 F Places subject to sudden temperature variations Places excessively hot and humid or cold and dry Keep the operation environment of the unit and storage temperature of consumable and check the manufacturing date to use as soon as possible after purchase 1 Width Printer and Perfect Binder 2 755 mm 108 7 16 Printer Perfect Bin...

Page 14: ...astic active charcoal paper Primary filter Plastic Usable Paper Cover Sheet Item Plain paper recycled paper Weight 1 Feed tray 80 g m2 104 g m2 21 lb bond 28 lb bond Standard tray cover sheet inserter 80 g m2 210 g m2 21 lb bond 56 lb bond Texture Direction Paper Texture Short grained paper parallel to the short side Paper Warpage 5 mm 7 32 or less Cover Sheet Size 2 Regular Size Cover sheet When ...

Page 15: ...Paper Weight Feed tray 52 g m2 104 g m2 14 lb bond 28 lb bond 1 Standard tray body sheet stacker 52 g m2 128 g m2 14 lb bond 34 lb bond 2 Texture Direction Paper Texture Long grained paper parallel to the long side Paper Warpage 5 mm 7 32 or less Size 3 Regular Size A5 210 mm 148 mm 8 1 4 5 27 32 B5 257 mm 182 mm 10 1 8 7 3 16 A4 297 mm 210 mm 11 11 16 8 1 4 Letter 279 4 mm 215 9 mm 11 8 1 2 Thick...

Page 16: ...ained paper and short grained paper The paper texture is the fibers orientation formed in the paper forming process which influences the finishing of the perfect binding When a long grained sheet is used as the cover the folded spine part is undulated so that the booklet is not neatly binded Also the booklet is easily damaged by opening and closing the booklet repeatedly When a short grained sheet...

Page 17: ...Sheet Dust Box Collects the cover sheet dust cutting trash h Body Sheet Stacker Load the printed body pages into this part for manual binding i Secondary Filter Absorbs vaporized matters and odors generated in the unit when warming up the glue j Side Cover Open this cover to replace the consumables k Glue Sheet Cover Use to hold and supply the glue sheet l Glue Sheet Load the glue sheet used for b...

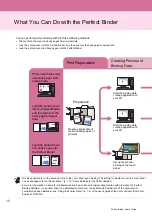
Page 18: ...d cover and body pages into the Perfect Binder Preparation Start the binding data creating application on your PC Start the binding data creating application on your PC Set up the manual binding on the touch panel Cover Cover Page 1 Body page Cover Body page It is also possible to cut the excess portion of the cover sheet upon binding The setting for whether to cut the cover sheet can be changed w...

Page 19: ...ng Binding Data Creating Binding Data Load original data to set imposition and edit data Load original data to set imposition and edit data Load the printed cover into the cover sheet inserter in the Perfect Binder Load the printed cover into the cover sheet inserter in the Perfect Binder Load body pages into the body sheet stacker Printing and binding the cover and body pages Binding the printed ...

Page 20: ...rms of binding used in this guide Binding Method Terms Terms of the Perfect Binding Term Description Binding data Original data with cover data and body page data Cover data Original data for printing on the cover Body page data Original data for printing on the body page Cover 1 Front side of the front cover outer Cover 2 Back side of the front cover inner Cover 3 Back side of the back cover inne...

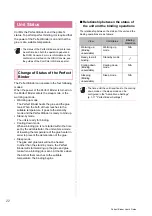
Page 21: ...rature Stand by mode Status that the glue and glue tank is the suitable temperature so that the unit is ready for binding Cooling down mode Status that the glue heater runs at the lower temperature to prevent the deterioration of the glue Sleep mode A status where the heating of the glue heater has been stopped to suppress the power consumption of the Perfect Binder Printer Perfect Binder The powe...

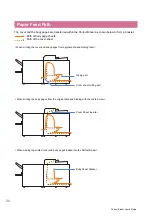
Page 22: ...ts Path of the cover sheet Paper Feed Path When printing the cover and body pages from original data and binding them When printing the body pages from the original data and binding with the printed cover When binding the printed cover and body pages loaded into the Perfect Binder Cover Sheet Inserter Gluing part Cover sheet cutting part Body Sheet Stacker ...

Page 23: ...anel 1 Make sure that the operating power of the printer is off Keep the main power of the printer on 2 Turn off the main power switch of the Perfect Binder When the power of the Perfect Binder is off the power will not turn ON automatically even if a binding job is sent Manually turn the main power switch ON before use Power Supply Turning On the Power When the power is turned on the Perfect Bind...

Page 24: ...ue and glue tank will not be heated In other than the stand by mode the Perfect Binder will start warming up the glue and glue tank when a binding job is sent At the time when the both of them reaches to the suitable temperature the binding begins Relationship between the status of the unit and the binding operations The relationship between the status of the unit and the binding operations are as...

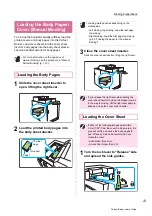
Page 25: ...ormation on the operation of manual binding see the procedure in Manual Perfect Binding p 1 10 Loading the Body Pages Glue part Page 1 The last page Loading method varies depending on the binding side Left binding top binding Load the last page top side up Right binding Load the first page top side up p 25 Loading the paper for the manual binding If you release the right lever when sliding the cov...

Page 26: ...er to fit to the cover and fix the side guides turning the lock lever to Lock side 4 Fit the stopper to the cover sheet size The stopper is fixed with the magnet The cover direction changes depending on the binding side Left binding Right binding Loading direction Loading direction Cover 4 Cover 1 Cover 1 Cover 4 Slide the stopper at the cover s end to fit to the cover If the cover is not loaded c...

Page 27: ...ing Software and printing and binding the data the data is automatically configured To create a booklet bound at the left or top print the body pages from the first page Pages are output facing down To create a booklet bound at the right print the body pages from the last page Pages are output facing up Left binding Top binding Right binding Load the cover sheet outer cover Cover 1 Cover 4 up The ...

Page 28: ...26 Perfect Binder User s Guide ...

Page 29: ...ation Operations of the Binding Job p 1 8 This section describes how to temporarily suspend a binding job and how to change the settings Admin Menu Settings p 1 11 This section describes the settings related to binding in the administrator menu This section describes the operations of binding In addition to the basic operations when using the Perfect Binding Software this section describes the ope...

Page 30: ... output paper of the printed original data is directly bound with this unit and a booklet is completed For more information on operations of the binding data creating software Perfect Binding Software and compatible file formats see the Application Guide For more information on items for configurations and how to transmit original data created with other than the Perfect Binding Software via a pri...

Page 31: ...he booklet slot at the bottom of the right side CAUTION Immediately after binding the spine of the booklet is of a high temperature Be careful not to burn yourself When there is no booklet in the booklet slot press the eject button to move the booklet to the booklet slot Pushing the eject button again stops a booklet to move Eject button ...

Page 32: ...s and printed The page allocation will vary depending on the setting of Duplex Print for the cover sheet Prepare the original data suitable for the cover type The first two pages of the original data are allocated on the front and back cover sheets The subsequent pages are allocated on the body pages The first page of the original data is allocated on the cover sheet The subsequent pages are alloc...

Page 33: ...he finished size The cut off part cut off area and the positioning base point are not required When performing perfect binding via a printer driver compatible with PostScript 3 if the optional print controller has been installed create the original upon adding a cut off area B For Cover 1 and Cover 4 arrange the layout with the upper right corner as a base point For Cover 2 and Cover 3 arrange the...

Page 34: ...ns to the printer dialog box 6 Click Print or OK Perfect binding starts To perform perfect binding put a check mark on Perfect Binding Click Details to display the Perfect Binding dialog box In the Perfect Binding dialog box you can separately configure the paper type and size for the cover sheet and the body pages Performing Perfect Binding If the Collate check box in the print dialog box has bee...

Page 35: ... sheet Yes The cover sheet and body pages are printed and bound No Only body pages are printed On the model without the feed tray a printed cover sheet is fed from the cover sheet inserter and bound Duplex Print cover sheet Select whether to use duplex printing for the cover sheet Yes No Paper tray cover sheet Select the feed tray where the cover sheet is set The selection items will vary dependin...

Page 36: ... pages or set the paper size and type Image Position 4 Touch Close 5 Touch Continue Printing the configured job begins The settings of a perfect binding job can be changed from the Waiting Job List on the printer 1 In the Home 1 screen of the printer touch Print 2 Select the job 3 Touch Change Setting in the sub menu You can change the following settings Slow Printing Print Density Image Position ...

Page 37: ...e glue temperature is low touch Preheat Setting the Binding Functions Glue Temperature It may take a long time to warm up the glue unit to the suitable temperature It is recommended to confirm the glue unit temperature before sending the perfect binding job On the Glue Temperature screen the glue unit temperature is indicated with the bar five levels and message All jobs sent to the printer are no...

Page 38: ...xist within 5 mm 7 32 from the cover binding margin the glue will not fix and cause the body pages to peel off easily Please be careful when you create the cover Solid black thick color A ruled line thicker than 3 pt It may take a long time to warm up the glue unit to the suitable temperature It is recommended that the temperature of the glue tank is checked before performing a perfect binding job...

Page 39: ...he printer select Printer Perfect Binder 2 Set the condition when power is turned on 3 Set the transit time to each mode 4 Touch OK For more information on the administrator mode and methods of the Admin Menu Settings see the guides of the ComColor GD Series printer Admin Menu settings related to the Perfect Binder can be configured from both the operation panel and the RISO Console Perfect Binder...

Page 40: ...e the area that is cut Every time the is touched the cutting position will move away from the spine by 0 1 mm 0 004 and decrease the area that is cut For Cover Gluing Position every time the is touched the gluing position will move to the left by 0 1 mm 0 004 Every time the is touched the gluing position will move to the right towards the cutting position by 0 1 mm 0 004 3 Touch OK Cover Settings ...

Page 41: ...2 7 This section describes how to clean the shaping unit Troubleshooting p 2 8 This section explains how to interpret the LED error indicators and error messages along with measures to be taken in the event of an error This section explains how to replace consumables how to maintain the unit how to interpret error messages and the measures to be taken in the event of an error ...

Page 42: ...ished glue sheet core 3 Remove the finished rolling core 4 Set the new rolling core Align the projection of the Perfect Binder and the notch of the core and fit them This unit warms up the glue so that the glue unit part becomes high temperature Body contact may cause burn The side cover will not open until the temperature inside of this unit is lowered Please wait until this unit cools down When ...

Page 43: ...Press the B10 lever to close the glue sheet cover If the glue sheet is loosed roll the glue sheet core to tighten the sheet 9 Remove the double sided tape on the rolling core and paste the end of the release liner to the rolling core If the release liner is loosed roll the rolling core in the arrow direction to tighten the film 10Close the side cover Glue sheet Release liner Dispose finished glue ...

Page 44: ...ter set the new one to the preexisting secondary filter Replacing the Filters Replace the filters in the following periods Secondary filter after using 12 glue sheets or after approx one year whichever comes first Primary filter after using two glue sheets The check sheet contained with the filters helps you know the time for replacement Write the start date and frequency of replacement to manage ...

Page 45: ...e the cutting trash 1 Open the front cover 2 Pull the cover sheet dust box out toward the front 3 Dispose all of cutting trash Check that no cutting trash is left in the cover sheet dust box Dispose used filters according to the regulations in your local community Depending on the binding frequency or usage environment the filter may not prevent the odor emission in the standard replacement period...

Page 46: ...2 6 Chapter 2 Maintenance Perfect Binder User s Guide 4 Push the cover sheet dust box back to the unit 5 Close the front cover ...

Page 47: ...enance of the unit is performed CAUTION When cleaning the unit open the front cover and turn off the main power switch of the unit Do not perform tasks other than that which is described e g adjustment repair etc For adjustment or repair contact your dealer or authorized service representative Cleaning the shaping unit Wipe the surface of shaping orientation plate and shaping plate with a cloth so...

Page 48: ...s operation panel When an error occurs the error lamp flashes in red Error messages on the printer s touch panel A description of the problem and instructions for resolving the problem are displayed as shown in the illustration below An alphanumeric error code is displayed at the top of the error message screen Be sure to mention this error code when contacting your service representative The firs...

Page 49: ...k on again 2 If the system does not recover contact your dealer or authorized service representative Mention the error code displayed on the touch panel at that time Message Action to Take The Perfect Binder has an error Press the Reset key or Reboot by pressing the power key on the operation panel If recovery has failed call service An error occurred in the Perfect Binder 1 Press the Reset key on...

Page 50: ...the front cover of Perfect Binder The front cover or side cover of the Perfect Binder is not completely closed Securely close it Close the cover sheet inserter of Perfect Binder The cover sheet inserter of the Perfect Binder is not properly set Set the cover sheet inserter properly Message Action to Take Job name This printing job is not acceptable because Perfect Binder is unavailable Printing wi...

Page 51: ...body size allowed for perfect binder stacking has exceeded Check the settings The job has been deleted Original data exceeds the maximum stacking capacity 1 Touch the Close 2 Edit the data and send it again For more information on the binding capacity thickness see Usable Paper p 12 Double feed might have occurred To continue check the pages after the binding is completed Paper is jammed in the bo...

Page 52: ...Take The glue sheet of the Perfect Binder must be replaced soon Call service to prepare a new glue sheet The remaining amount of glue sheet is low Check your glue sheet stock Place an order if required This message does not mean that the binding is immediately disabled Depending on the usage condition contact your dealer or authorized service representative ...

Page 53: ...indicating the location of the paper jam to display how to remove the jammed paper 2 Follow the procedure displayed on the touch panel to remove the paper Touch Back or Next to display the previous or next page The screenshots below are examples of the display when there is a paper jam 3 Touch Close The display will return to the screen of Step 1 Check that the button indicating the location where...

Page 54: ...en remove the paper toward you Paper is transferred through the printer at a high speed during printing Therefore if a paper jam occurs when printing multiple sheets of paper the sheet of paper that caused the paper jam as well as other sheets of paper may remain in the transfer path When using an internal dial to remove jammed paper turn the dial four or five times after removing the first sheet ...

Page 55: ...d booklet is difficult to open body pages fall off from the spine of the booklet Check the paper texture Use the short grained paper for the cover and the long grained paper for the body pages so that the paper texture becomes parallel to the long side of the booklet For more information see Paper texture p 14 The cover sheet length is shorter than that of the body pages and the body pages cannot ...

Page 56: ...ne width 417 16 7 16 For A4 binding 0 5 Spine width 445 17 17 32 For Letter sized binding 0 5 Spine width 451 17 3 4 The edges of the finished booklets are not aligned As the position at which the cover sheet is cut differs depending on the length lengthwise of the cover sheet the finishing of the binding will vary in cases when the length of the paper for the cover sheet set in the printer is inc...

Page 57: ...n index and explanations of consumables Specifications p 3 2 This section explains the key specifications of the Perfect Binder Consumables p 3 4 This section explains the types of consumables Index p 3 6 Vorsichtsmaßnahmen p 3 8 Vor Inbetriebnahme p 3 12 Technische Daten p 3 17 ...

Page 58: ... g m2 128 g m2 14 lb bond 34 lb bond For A5 LEF 64 g m2 128 g m2 17 lb bond 34 lb bond Cover 6 plain paper recycled paper 80 g m2 210 g m2 21 lb bond 56 lb bond Feed Tray Body page plain paper recycled paper 52 g m2 104 g m2 14 lb bond 28 lb bond not available with A5 LEF Cover 6 plain paper recycled paper 80 g m2 104 g m2 21 lb bond 28 lb bond Body Sheet Stacker Body page plain paper recycled pap...

Page 59: ...or heavier is recommended Power Consumption Max 1 500 W Stand by 0 5 W or less shutting off the AC power Operating Noise 4 70 dB A or less when binding Operating Environment Temperature 15 C 30 C Humidity 40 70 RH non condensing Dimensions W D H 1 290 mm 675 mm 1 125 mm 50 25 32 26 9 16 44 5 16 Weight Approx 220 kg 485 lb Safety Information IEC60950 1 compliant Indoor pollution degree 2 At an alti...

Page 60: ...ge without notice For pricing information contact your dealer or authorized service representative Types of Consumables Item Remark Glue Sheet Binds up approx 600 booklets A4 size 5 mm 7 32 width Primary Filter Replace after using two sets of glue sheets Secondary Filter Replace after using twelve sets of glue sheets or after approximately one year Replace at the timing of whichever comes first ...

Page 61: ...ful life What does the crossed out wheeled bin symbol mean The crossed out wheeled bin symbol indicates this product must be disposed of separately to normal waste Please contact your RISO service agent for information about disposal What does the solid bar symbol mean The solid bar under the crossed out wheeled bin indicates this product was put on the market after the 13th August 2005 Who should...

Page 62: ... Disposing the cutting trash 2 5 E Eject button 15 End guide 15 Error lamp 2 8 Error message 2 8 Examples of messages 2 9 F Fiber 14 Filter 12 Front cover 15 G Glue heater 19 Glue sheet 12 15 3 4 Glue sheet cover 15 Glue temperature 1 9 I Information 2 12 L Left binding 24 25 Loading the body pages 23 Loading the cover sheet 23 Loading the paper manual binding 25 Lock lever 23 Long grained paper 1...

Page 63: ...de Side guides 15 Sleep mode 19 22 Slip sheet 18 Spine 18 Stand by mode 19 22 Status confirmation 22 T Thickness of a booklet 18 Top binding 25 Types of consumables 3 4 U Unit error 2 9 Usable paper 12 W Warming up mode 19 22 Warning 2 10 ...

Page 64: ...ieden werden kommen folgende Warnsymbole zur Anwendung Lesen Sie zuerst die Bedeutung der Symbole durch und danach das Handbuch Symbolbeispiele Warnsymbole WARNUNG Dieses Symbol bedeutet dass eine unrichtige Handhabung beziehungsweise das Ignorieren dieses Symbols zum Tod oder schweren Verletzungen führen kann VORSICHT Dieses Symbol bedeutet dass eine unrichtige Handhabung beziehungsweise das Igno...

Page 65: ...rden Werden schwere Gegenstände auf das Kabel gestellt oder wird daran gezogen oder das Kabel geknickt kann das Kabel Schaden erleiden und dadurch einen Brand bzw einen elektrischen Schlag verursachen Das mitgelieferte Spannungskabel darf nur für diese Maschine verwendet werden Verwenden Sie es nicht mit anderen Produkten Andernfalls kann es zum Brand oder zu elektrischen Schlagen kommen Niemals d...

Page 66: ... Geruch verströmt kann es zu einem Stromschlag kommen Halten Sie sofort die Netz Taste am Bedienfeld gedrückt und schalten Sie die Stromversorgung und dann den Hauptstromschalter aus Trennen Sie dann unbedingt alle Stromkabel und wenden Sie sich an Ihren Händler oder den Kundendienst VORSICHT Stecken Sie Ihre Finger nicht in die an das Ablagefach für Textblätter oder an den Einschubschlitz für Bro...

Page 67: ...as Warnsymbol abfallen die Schrift ausgeblichen oder nicht mehr leserlich sein informieren Sie den Händler oder die zuständige Servicestelle Plazierung der Warnsymbole Die Plazierungen der Warnsymbole werden wie folgt gezeigt Details Dort wo das Warnsymbol angebracht ist ist die Temperatur hoch Direkter Kontakt mit dieser Fläche kann zu Verbrennungen führen Warnsymbole Berühren Sie die Maschine un...

Page 68: ...oder sehr kalte und trockene Orte Orte nahe offener Feuerstellen oder Hitzequellen Beheizte Stellen oder Orte die direkter Kaltluft von Klimaanlagen oder Heißluft sowie abgestrahlter Wärme von Heizkörpern ausgesetzt sind Schlecht belüftete Orte Staubige Orte Orte die vielen Vibrationen ausgesetzt sind Installieren Sie die Maschine an einer ebenen Stelle die folgenden Anforderungen entspricht Oberf...

Page 69: ...Drucker und Perfect Binder Schaffen Sie ausreichend Platz um die Maschine bedienen das Material ersetzen und die Maschine warten zu können Abmessungen Von Vorne gesehen Einheit mm 1 260 2 2 495 2 755 1 Von der Seite gesehen Einheit mm 1 320 3 1 635 830 100 ...

Page 70: ...sweise in Fensternähe falls unumgänglich sollten die Fenster mit Vorhängen versehen werden und die Temperatur des Aufbewahrungsortes zwischen 5 C und 35 C liegen Orte die plötzlichen Temperaturschwankungen ausgesetzt sind Sehr heiße und feuchte oder sehr kalte und trockene Orte Achten Sie auf eine angemessene Betriebsumgebung der Maschine und auf entsprechende Lagertemperaturen des Materials und ü...

Page 71: ...toff Mittelteil Papier Leimblatthalter Kunststoff Trennpapier Release Papier Rollenkern Kunststoff Papier Filter Teil Material Sekundärfilter Rahmen Kunststoff Aktivkohle Papier Primärfilter Kunststoff Verwendbares Papier Deckblatt Element Glattes Papier Recycle Papier Gewicht 1 Einzugsfach 80 g m2 bis 104 g m2 Standardfach Deckblatt Einzug 80 g m2 bis 210 g m2 Papierfaser Richtung Papiertextur Ku...

Page 72: ...hren Sie die Booklets in einer nicht hermetisch verschlossenen Umgebung auf Textblätter Element Glattes Papier Recycle Papier Gewicht Einzugsfach 52 g m2 bis 104 g m2 1 Standardfach Textblatteinzug 52 g m2 bis 128 g m2 2 Papierfaser Richtung Papiertextur Langfaseriges Papier parallel zur Längsseite Papierverzug 5 mm oder weniger Größe 3 Reguläre Größe A5 210 mm 148 mm B5 257 mm 182 mm A4 297 mm 21...

Page 73: ... Recycle Papier 80 g m2 bis 210 g m2 Einzugsfach Textblatt Glattes Papier Recycle Papier Papier mit 52 g m2 bis 104 g m2 nicht verfügbar mit A5 LEF Deckblatt 6 Glattes Papier Recycle Papier 80 g m2 bis 104 g m2 Stapelvorrichtung für Textblätter Textblatt Glattes Papier Recycle Papier 52 g m2 bis 128 g m2 Einschub für Deckblätter Deckblatt 6 Glattes Papier Recycle Papier 80 g m2 bis 210 g m2 Papier...

Page 74: ...d empfohlen Papier mit einem Gewicht von 105 g m2 oder mehr zu verwenden Betriebsgeräusch 4 70 dB A oder weniger während des Bindevorgangs Betriebsumgebung Temperatur 15 C bis 30 C Luftfeuchtigkeit 40 bis 70 RF nicht kondensierend Abmessungen B T H 1 290 mm 675 mm 1 125 mm Gewicht Ca 220 kg Sicherheitsinformationen Entspricht mit der Norm IEC60950 1 Für den Einsatz in Innenräumen Grad der Verschmu...

Page 75: ...n bedeutet dass dieses Produkt nach dem 13 August 2005 auf den Markt gebracht worden ist An wen kann ich mich wenden wenn ich mehr über die WEEE Verordnung wissen möchte Für weitere Informationen sollten Sie sich an Ihren örtlichen RISO Kundendienst wenden Riso Kagaku Corporation London Office 610 Centennial Park Centennial Avenue Elstree Herts WD6 3TJ U K Hinweise zu Markenzeichen Microsoft Windo...

Page 76: ...3 20 Chapter 3 Appendix Perfect Binder User s Guide 061 36009 107 ...

Page 77: ......

Page 78: ... Copyright 2016 RISO KAGAKU CORPORATION Please contact the following for supplies and service 2016 10 ...

Reviews: