Troubleshooting
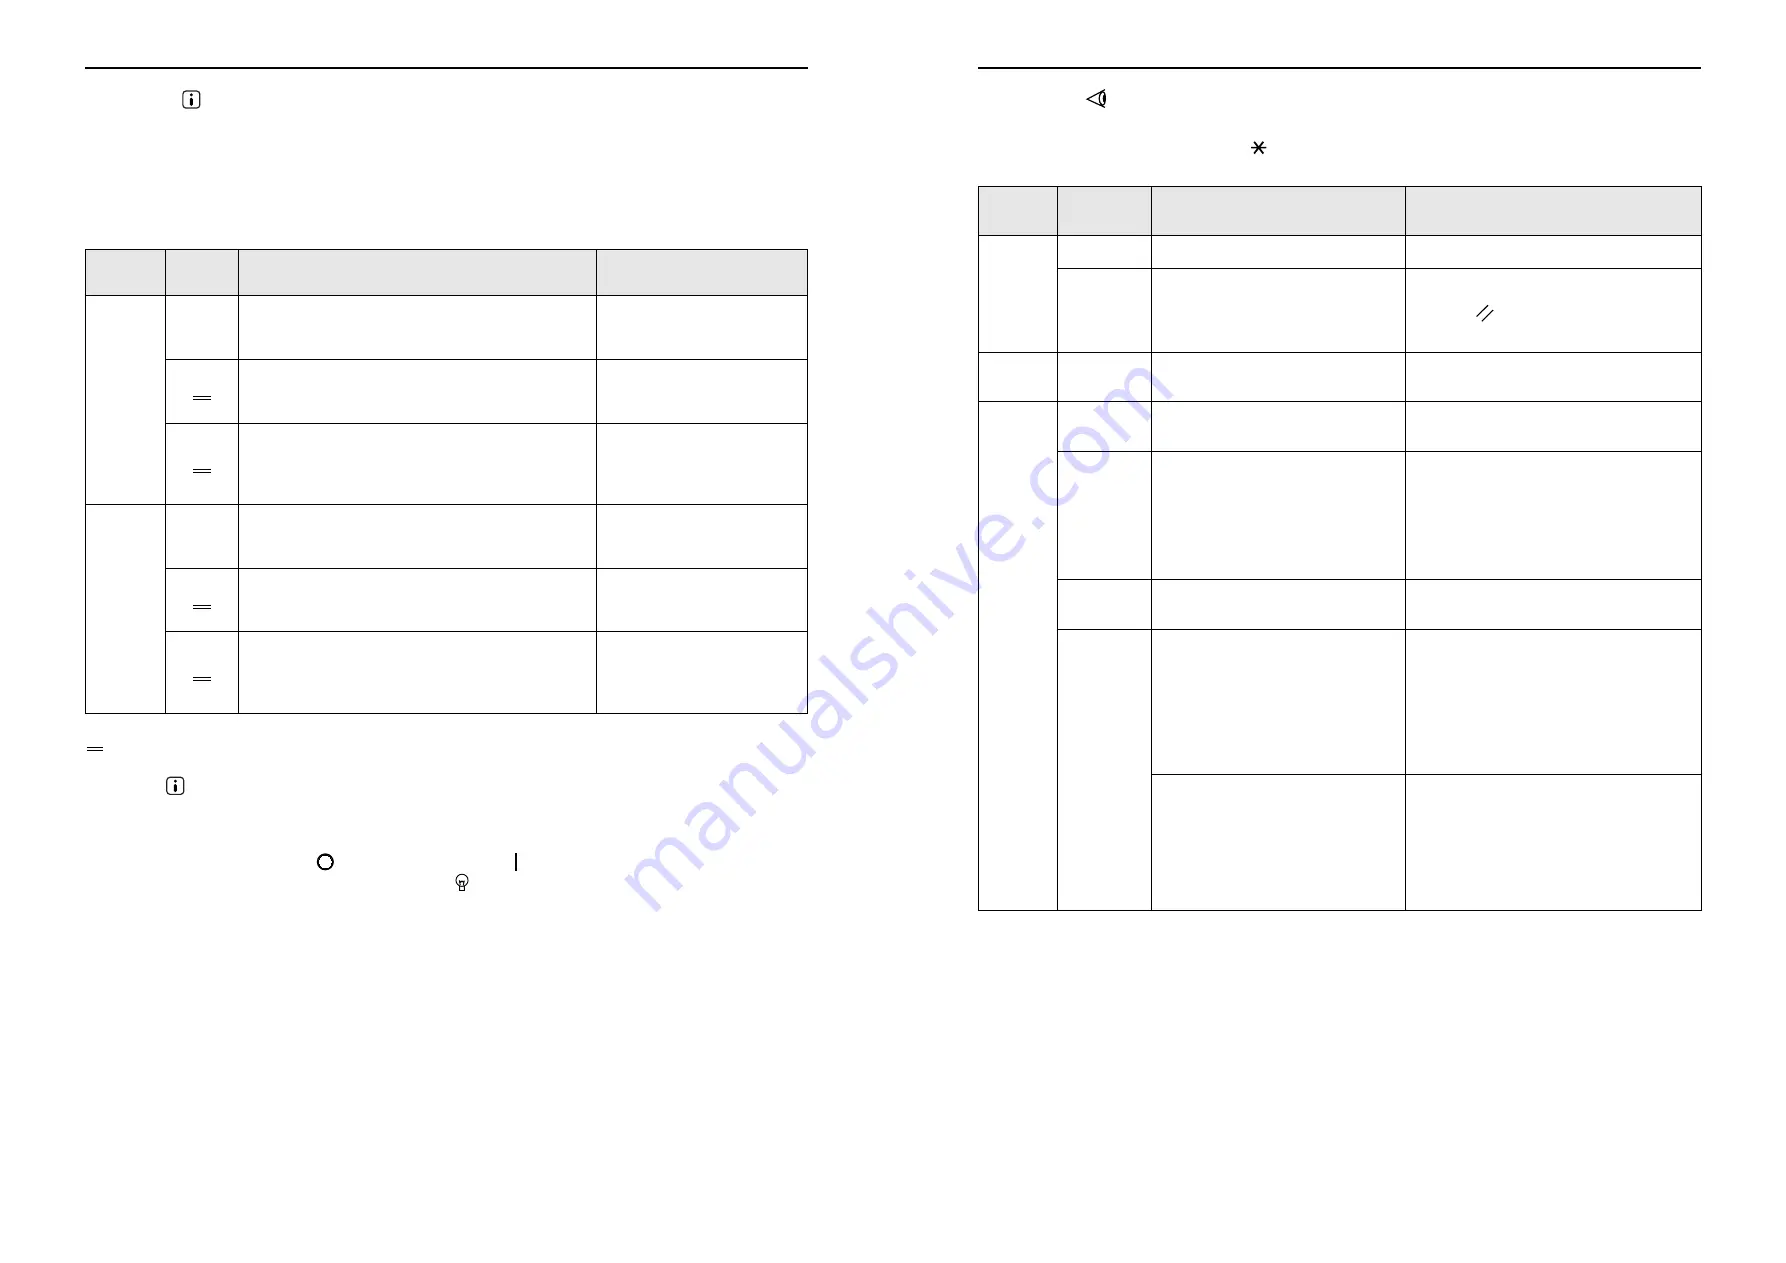
Check & Error Display
88
When the indicator is off and “H” is shown on the Print Quantity Display.
In order to assure optimum printing, the machine acquires information from the consumables.
If any reasons prevent the machine from acquiring the information, “H” is shown on the Print Quantity Display.
Enter an appropriate parameter.
Entering an inappropriate parameter does not affect usual operations but may result in bad print quality.
The table shows the “H” numbers to be shown on the Print Quantity Display and the selectable parameters.
: For RZ2XX, unavailable
Note:
• When the
indicator is off, this indicates that the machine has failed to acquire information from the consum-
ables. If the machine fails to acquire information when consumables are replaced, you need to enter parameters
for shown H No’s. in order to supplement necessary information. If you perform the following operations after enter-
ing H No’s., the information disappears and thus you need to enter H No’s. again.
– After the power switch is set to
(OFF), the switch is set to
(ON) again
– After the machine is placed into the Sleep status, the
key is pressed
Location
No.
H No.
Description
Parameter
3
H1
Ink color setting
Select the same color as the currently used for Print
Cylinder(Drum).
1: black 2: color
H2
Print density fine adjustment (ink)
Perform fine adjustment to optimize the print density
depending on the ink.
1 (light) - 5 (dark)
H3
Sample copy density adjustment (ink)
Perform adjustment for print density for test printing
depending on the ink.
This adjustment is independent of H2.
1 (light) - 5 (dark)
4
H4
Master-making density setting
Set the reference density for the master-making
process.
1 (light) - 10 (dark)
H5
Print density fine adjustment (master)
Perform fine adjustment to optimize the print density
depending on the master.
1 (light) - 5 (dark)
H6
Sample copy density adjustment (master)
Perform adjustment for the print density for sample
copy depending on the master.
This adjustment is independent of H5.
1 (light) - 5 (dark)
Troubleshooting
Check & Error Display
85
When the indicator blinks
Check error locations and error numbers (Error Number Display) and take the following procedures.
If an error number is not shown, press the
[
]
key.
Location
No.
Error No.
Cause
Action
1
c-04
The tray has run out of paper.
Place paper on the Paper Feed Tray.
F-03
Custom-size paper has been placed
on the Paper Feed Tray at the time of
2-Up printing.
Custom-size paper does not allow 2-Up
printing.
Press the
key and then place regular-
sized paper.
2
d-11
The Front Cover is open or has not
been completely closed.
Close the Front Cover completely.
3
d-01
The Print Cylinder(Drum) has not been
set or has not been correctly set.
Set the Print Cylinder(Drum) correctly.
)
p.73
d-02
An inappropriate Print Cylinder(Drum)
has been set.
Set an appropriate Print Cylinder(Drum).
)
p.73
Important!:
• Use a Print Cylinder(Drum) specific to the
machine. Set other cylinders(drums) can
result in malfunction or any other troubles.
d-03
The Ink Cartridge has not been set or
has not been correctly set.
Set an Ink Cartridge correctly.
)
p.66
d-04
An inappropriate Ink Cartridge has
been set.
Set an Ink Cartridge specific to the machine.
)
p.66
Important!:
• Use an Ink Cartridge specific to the
machine.
Using other Ink Cartridges can result in
malfunction or any other troubles.
The label on the Ink Cartridge outlet
surface has come off or surface is with
dirt.
The label on the Ink Cartridge outlet surface
contains information needed for printing. If the
machine cannot read the information, it does
not operate.
Set an Ink Cartridge that is specific to the
machine and that is with label attachment and
free from dirt.
Riso Kagaku Technical Training Center Version


