Functions for Printing
Adjusting the Print Position [Print Position Adjustment]
100
Adjusting the Print Position
[Print Position Adjustment]
The print position on the paper can be adjusted.
Adjustment range Vertical direction (bottom
←→
top): ±15 mm (±
19
/
32
")
Horizontal direction (left
←→
right): ±10 mm (±
25
/
64
")
The positioning may be adjusted while printing is in progress.
Note:
• After adjusting the print position, print a proof copy to check the result.
• The numerical value formed by “Print Position Adjustment” is the target. Set the actual position by verifying and
adjusting the printed material.
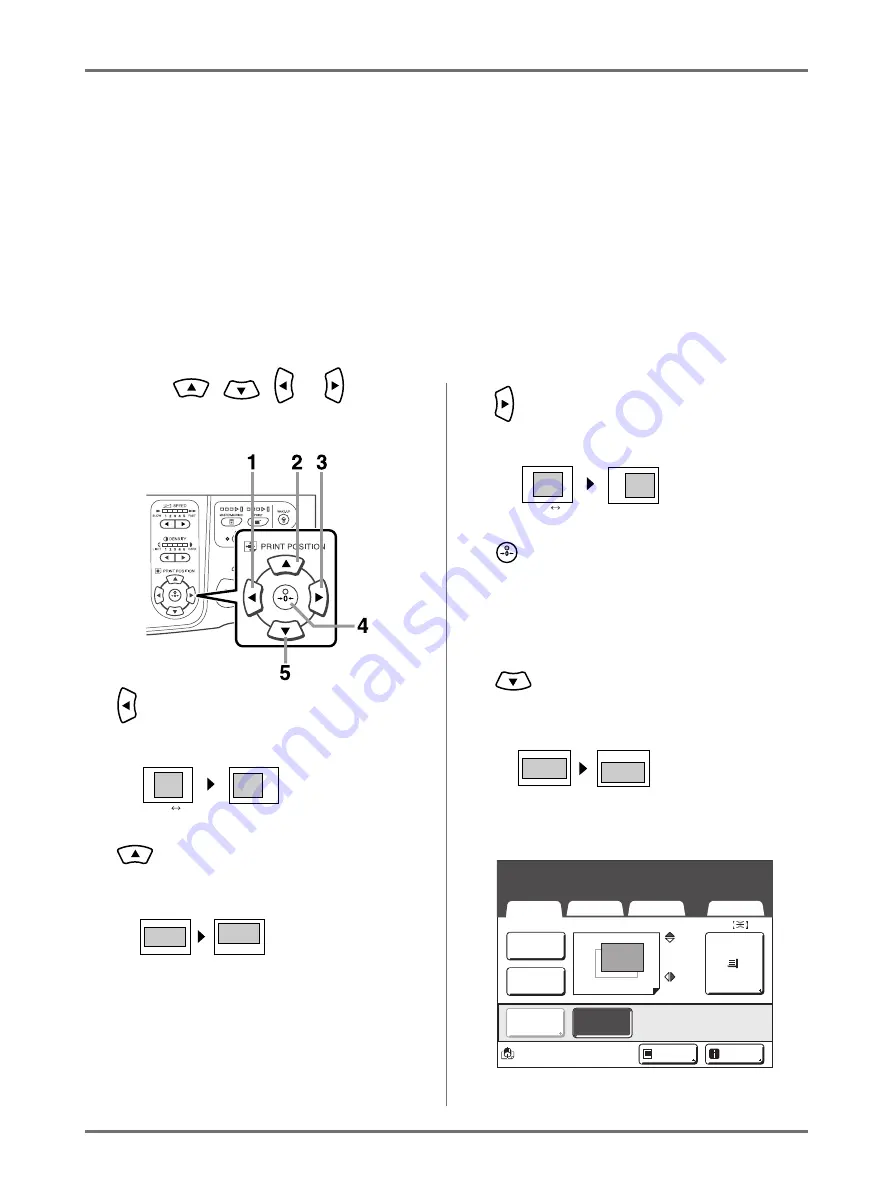
Press
the , ,
or
key
to
move up or down.
1)
Key
Each press shifts the print position downward in steps of
about 0.5 mm (
1
/
64
").
2)
Key
Press the key to move the print image about 0.5 mm
(
1
/
64
") to the left on the paper.
3)
Key
Each press shifts the print position upward in steps of
about 0.5 mm (
1
/
64
").
4)
Key/Original Position Indicator
Press to return to original position.
To restore the original Print Position during printing, hold
the button down for more than 1 second.
When the original Print Position is restored the indicator
will light up.
5)
Key
Press the key to move the print image about 0.5 mm
(
1
/
64
") to the right on the paper.
The Print Basic Screen shows current vertical/horizon-
tal adjustment.
Bottom
Top
Left Side
Right Side
Bottom
Top
Left Side
Right Side
Paper
Black
Basic
Selections
Functions
Admin.
I d l e
Renew Page
I n f o
Print Position
A4
D-Feed
D-Feed
Check
Check
S i l e n t
H i g h S p e e d
3.0 mm
2.5 mm
Select Print Quantity
Select Print Quantity
Summary of Contents for SE 9380
Page 1: ......
Page 2: ......
Page 97: ...Functions for Master Making Checking the Print Image Prior to Making Master Preview 95...
Page 203: ...Storing Original Data and Use Method Copying Moving Stored Data 201...
Page 223: ...Maintenance Cleaning 221...
Page 257: ...Troubleshooting Troubleshooting 255...
Page 263: ...Appendix Specifications 261...
Page 268: ...266 056 36003 001...


