background image

Printed in China

P/No.: MFL42712301

LG Electronics Canada, Inc.

LIMITED WARRANTY

Should your product prove to be defective in materials or workmanship under normal use during the warranty

period listed below, which warranty period runs from the original date of purchase, LG Electronics will, at its

option, repair or replace the product at no charge to you.
The warranty is valid only to the original purchaser of the product, during the warranty period, as long as it is in

Canada.

RITETEMP Room Air Conditioner Warranty Period

Components

Parts

Labor

All Parts

2 Years

2 Years (In-Home Service)

Sealed system

5 Years

2 Years (In-Home Service)

No other warranty is applicable to this product. THE DURATION OF ANY IMPLIED WARRANTIES, INCLUDING

THE IMPLIED WARRANTY OF MERCHANTABILITY, IS LIMITED TO THE DURATION OF THE EXPRESS

WARRANTY HEREIN. LG ELECTRONICS SHALL NOT BE LIABLE FOR THE LOSS OF USE OF THE

PRODUCT, INCONVENIENCE, LOSS OR ANY OTHER DAMAGES, DIRECT OR CONSEQUENTIAL,

ARISING OUT OF THE USE OF OR INABILITY TO USE, THIS PRODUCT OR FOR ANY BREACH OF ANY

EXPRESS OR IMPLIED WARRANTY, INCLUDING THE IMPLIED WARRANTY OF MERCHANTABILITY OR

FITNESS FOR A PARTICULAR PURPOSE, APPLICABLE TO THIS PRODUCT.
Some Provinces or Territories do not allow for the exclusion or limitation of incidental or consequential damages of

limitations on how long an implied warranty lasts; so these limitations or exclusions may not apply to you.

This warranty gives you, (the original purchaser) specific legal rights and you may also have other rights, which vary

from province to province or territory to territory.

THE ABOVE WARRANTY DOES NOT APPLY TO:

1. Service trips to your home to deliver and pickup, install, instruct or replace house fuses, or connect house wiring or 

plumbing, or correction of unauthorized repairs.

2. Damage to the product caused by accident, pest, fire, floods or acts of God.

3. Repairs when your GoldStar product is used in other that normal, single-family household use or contrary to the 

instructions outlined in the product’s owners manual.

4. Damage resulting from accident, alteration, misuse, abuse, or improper installation or maintenance.

5. Products with altered or removed serial numbers.
If the product is installed outside the normal service area, any cost of transportation involved in the repair of the

product, or the replacement of a defective part, shall be borne by you (the owner).

CUSTOMER ASSISTANCE INFORMATION:

Retain your Bill of Sale to prove the date of purchase.

A copy of your Sales Receipt must be submitted when warranty

service is provided.

This warranty is invalid if the factory applied serial number has

been  altered  or removed from the product.

Call 1-888-LG-CANADA (542 2623)

Press the appropriate menu option, and have your product model

and serial numbers and your postal code ready.

Access our web-site at: www.LG.ca (Service Option) or 

Call 1-888-LG-CANADA (542 2623) 

Press the appropriate menu option, have your product

model & serial numbers & your postal code ready.

To obtain Warranty Coverage:

To obtain Product or Customer 

Service Assistance:

To obtain the nearest

Authorized Service Center:

Summary of Contents for HW500CM

Page 1: ...room air conditioner Please retain this owner s manual for future reference after reading it thoroughly Veuilez lire attentivement et en entier ce guide d utilisation et les mesures de s curit ci incl...

Page 2: ...How to Remove the Front Grille 17 Common Problems and Solutions 18 Troubleshooting 19 Inside you will find many helpful hints on how to use and maintain your air conditioner properly Just a little pr...

Page 3: ...orrect operation due to ignoring instructions will cause harm or damage The seriousnessy the following indications Because of the weight of the product it is recommended that you have a helper to assi...

Page 4: ...ord length It will cause electric shock or fire Use the air conditioner on a single outlet circuit See page 7 Do not share the outlet with other appliances It will cause electric shock or fire Always...

Page 5: ...ner falling out of the window creating a safety hazard Close all doors windows and other outside openings to the room Ventilate before operating air conditioner when gas goes out The air conditioner m...

Page 6: ...put a pet or house plant where it will be exposed to direct air flow This could injury the pet or plant Do not use this appliance for special purposes suchas pets foods precision machinery or objects...

Page 7: ...ating devices 3 Do not use this air conditioner fposes e g preserving precision devices food pets plants and art objects Such usagecould damage the items 4 The air conditioner is a consumer comfort ap...

Page 8: ...that could cause harm to theair conditioner This symbol indicates special notes NOTICE WARNING This appliance should be installed in accordance with the National Electric Code Introduction Symbols Use...

Page 9: ...l NOTICE DO NOT USE AN EXTENSION CORD on 230 208 and 230 208 Volt units All wiring should be made in accordance with local electrical codes and regulations Aluminum house wiring may pose special probl...

Page 10: ...the large slot in the receptacle to assure a proper polarity connection Attaching the adapter ground terminal to the wall receptacle cover screw does not ground the appliance unless the cover screw i...

Page 11: ...min H S I L G N E...

Page 12: ...12 Room Air Conditioner Installation...

Page 13: ...backed seal strip Type E to the window width Remove the backing from the seal strip and attach the seal strip to the underside of the bottom window 3 Locating unit in window Open the window and mark...

Page 14: ...k automatically If it does not there is aproblem with the installation 2 Secure the guide panels Extend the guide panels Type G to fill the window opening using 2 screws Type B 2 screws Type C to secu...

Page 15: ...n the FAN speed mode switch to the H or the L setting 2 Set the thermostat control to the temperature mark FAN only Normal cooling 1 Turn the FAN speed mode switch to the H or the L setting 2 Set the...

Page 16: ...he air conditioner more efficient CAUTION Be careful when inserting the drain pipe Push away from the sharp fin area to avoid slipping injuring yourself Removal From Window Turn the air conditioner of...

Page 17: ...replace Cleaning The Air Conditioner The front grille and Inlet grille may be wiped with a cloth dampened in a mild detergent solution The cabinet may be washed with mildsoap or detergent and lukewarm...

Page 18: ...e is aclearance of over 508mm between the back of the air conditioner and the wall or fence behind it 4 Close all doors and windows and check for any source of heat in the room The air conditioner is...

Page 19: ...est setting provides maximum cooling Clean the filter at every 2 weeks See the care and Maintenance section When the air conditioner is first turned on you need to allow time for the room to cool down...

Page 20: ...ntretenir correctement votre climatiseur Rien qu un petit soin pr ventif de votre part peut vous pargner une grande quantit de temps et d argent pendant la dur e de vie de votre climatiseur Vous trouv...

Page 21: ...ymboles suivants En raison du poids du produit il est recommand de recourir un assistant pour l installation de cet appareil Installez toujours le s panneau x extensible s N utilisez pas le cordon d a...

Page 22: ...oc lectrique ou un incendie d au d gagement de chaleur Installez le climatiseur sur un circuit de sortie d di R f rez vous la page 7 Ne partagez pas la prise de courant avec d autres appareils Ceci ri...

Page 23: ...23 23...
Page 24: ...d art C est un climatiseur non pas un syst me de r frig ration de Ins rez toujours fermement les filtres Nettoyez les toutes les deux semaines Faire marcher le climatiseur sans filtres peut provoquer...

Page 25: ...imatiseur des fins nonsp cifi es par exemple conservation d quipements de pr cision nourriture animaux domestiques plantes et objets d art Cette utilisation peut causer des dommages mat riels 4 Le cli...

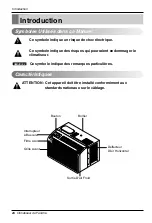
Page 26: ...ager le climatiseur Ce symbole indique des remarques particuli res REMARQUE ATTENTION Cet appareil doit tre install conform ment aux standards nationaux sur le c blage Introduction Symboles Utilis s d...

Page 27: ...des lectriques locaux Une installation lectrique en aluminium peut poser des probl mes particuliers Consultez un lectricien qualifi AVIS Ne jamais appuyer sur le bouton TEST lorsque l appareil est en...

Page 28: ...e murale afin d assurer un branchement respectant la polarit Raccorder la borne de mise la terre de l adaptateur la vis du couvercle de la prise murale n assure pas la mise la terre moins que la vis d...

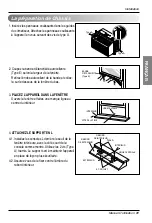
Page 29: ...uverture verticale de 305mm partir du bas de la glissi re jusqu au rebord de la fen tre ATTENTION Cet appareil est un CLIMATISEUR FEN TRE Par cons quent pour une installation appropri e il devrait tre...

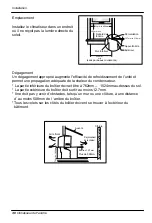
Page 30: ...l efficacit de refroidissement de l unit et permet une propagation ad quate de la chaleur du condensateur La partie inf rieure du bo tier devrait tre 762mm 1524mmau dessus du sol La partie ext rieure...

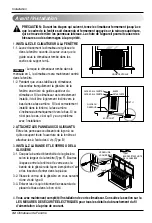
Page 31: ...u bas 3 PLACEZ L APPAREIL DANS LA FEN TRE Ouverz la fen tre et faites une marque ligne au centre du int rieur 4 ATTACHEZ LE SUPPORT EN L 4 1 Installez les consoles L derri re le seuil de la fen tre in...

Page 32: ...INSTALLZ LA BANDE ET LE VERROU DE LA GLISSI RE 3 1 Coupez la bande d etanch it de la glissi re selon la largeur de la fen tre Type F Bourrez l espace entre la fen tre et le verre avec la bande de la g...

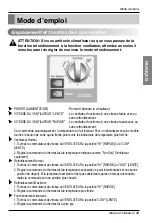
Page 33: ...Ventilateur Normal 1 Tournez le commutateur de vitesse du VENTILATEUR la position HI RAPIDE ou LOW LENTE 2 R glez la commande du thermostat la temp rature indiqu e comme Fan Only Ventilateur seulement...

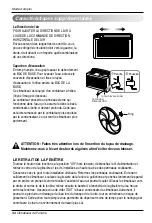
Page 34: ...l cart des bords aiguis s afin d viter de vous blesser LE RETRAIT DE LA FEN TRE Tournez le bouton des fonctions la position Off hors tension d branchez le fil d alimentation et retirez le verrou de l...

Page 35: ...ssion l aide d un chiffon humect d un d tergent doux Sch ma 2 Vous pouvez galement nettoyer le bo tier en utilisant un savon ou d tergent doux et de l eau ti de puis faites le briller l aide de cire l...

Page 36: ...ur et le mur ou la cl ture derri re lui 4 Fermez toutes les portes et fen tres et v rifiez qu il n y ait aucune source de chaleur dans la pi ce Le climatiseur marche normalement lorsque Vous entendez...

Page 37: ...ous devez lui laisser suffisamment de temps pour refroidir la pi ce R glez la commande des modes l position lev e du ventilateur High Fan ou de refroidissement lev High Cool en ajustant le thermostat...

Page 38: ...pouvez en avoir d autres qui varient d une province ou territoire un autre LA GARANTIE SUSMENTIONN E NE S APPLIQUE PAS 1 Au d placement de service domicile pour livrer ou cueillir installer instruire...

Page 39: ...ginal purchaser specific legal rights and you may also have other rights which vary from province to province or territory to territory THE ABOVE WARRANTY DOES NOT APPLY TO 1 Service trips to your hom...

Reviews: