background image

Operation  

UPS-Manual 

21

EN 

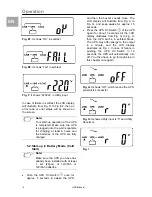
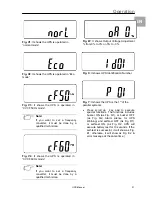
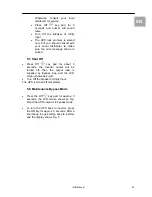
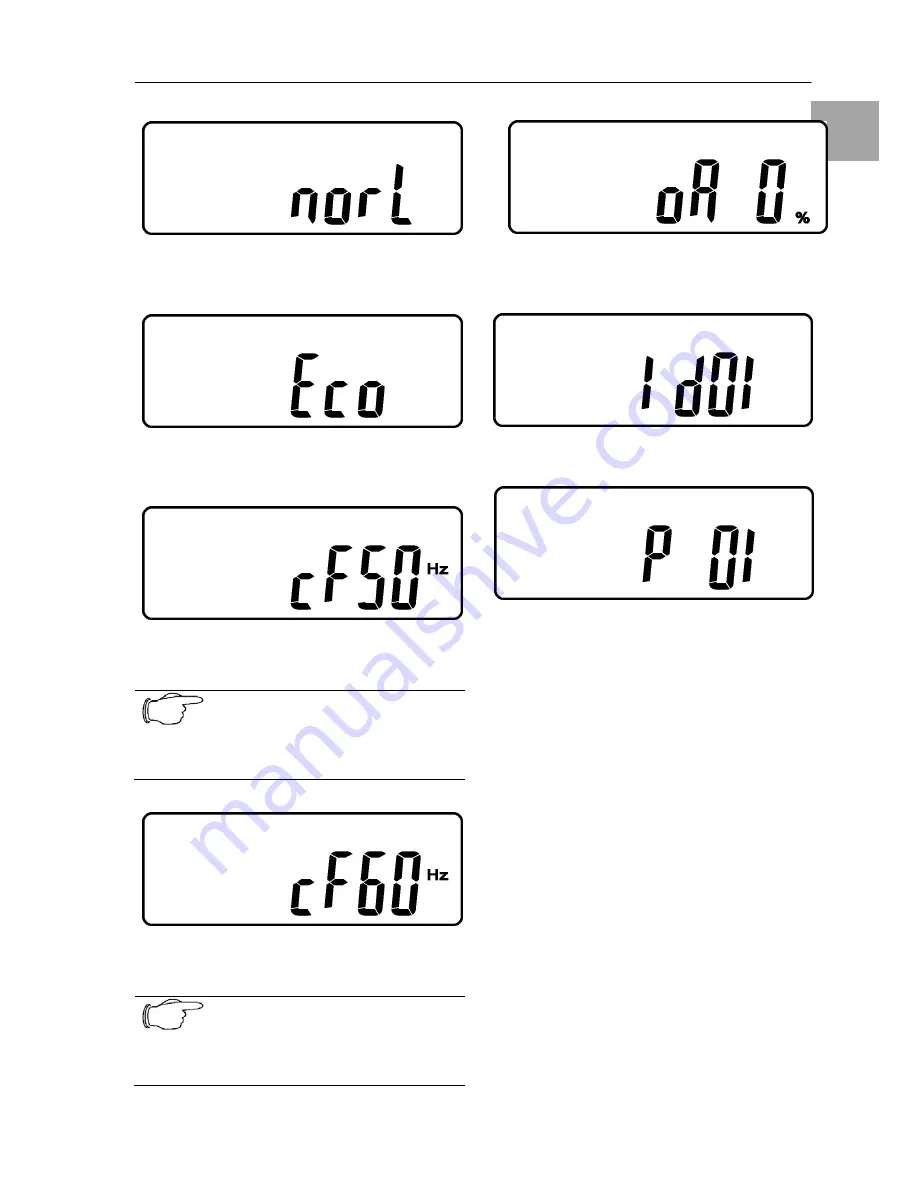
Fig. V1

: It shows the UPS is operated in 

“normal mode” 


Fig. V2

: It shows the UPS is operated in “Eco 

mode” 


Fig. V3

: It shows the UPS is operated in 

“CVCF 50Hz mode” 


Note! 

If you want to set a frequency 
converter, it must be done by a 
qualified technician.


Fig. V4

: It shows the UPS is operated in 

“CVCF 60Hz mode” 


Note! 

If you want to set a frequency 
converter, it must be done by a 
qualified technician.


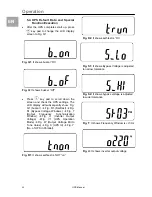
Fig. W

: It shows Output Voltage Adjustment 

% from 0% to 3% or -0% to -3% 


Fig. X

: It shows UPS Identification Number 


Fig. Y

: It shows the UPS is the 1

st

 of the 

parallel systems 

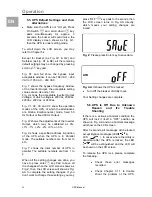
  Press scroll up  key pad to execute 

special functions. The functions includes 
buzzer ON (as Fig. Q1), or buzzer OFF 
(as Fig. Q2, Alarm silence for UPS 
Warning) and self-test OFF (As Fig. R1) 
or self-test ON. (as Fig. R2. UPS will 
execute battery test for 10 seconds. If the 
self-test is successful, it will show as Fig. 
E1; otherwise, it will show as Fig. E2 & 
error message at the same time.) 

Summary of Contents for 7857.433

Page 1: ...Assembly and Operation Instructions UPS System Power Modular Concept PMC 12 4 5 and 6kVA 7857 433 7857 434 ...

Page 2: ...Microsoft Windows is a registered trademark of Microsoft Corporation Acrobat Reader is a registered trademark of Adobe Systems Incorporated ...

Page 3: ... Position 11 4 3 Assembling of the different System Components 12 4 3 1 Tower Assembling steps 12 4 3 2 Rack installation step 13 4 4 Electrical Installation 16 5 OPERATION 17 5 1 Start Up In Normal Mode 17 5 2 Start up in Battery Mode Cold Start 18 5 3 Check Measured Values Figures detected by UPS19 5 4 UPS Default Data and Special Function Execution 20 5 5 UPS Default Settings and their alternat...

Page 4: ... try to repair the unit yourself contact your local supplier or your war ranty will be void 4 If liquids are spilt onto the UPS or for eign objects dropped into the unit the warranty will be null and void 5 Do not install the UPS in an environ ment with sparks smoke or gas 6 The batteries inside the external packages of these ups can have a strengthened gas emission of hydrogen in case of a fire o...

Page 5: ...consequences 1 5 Proper Use This UPS is designed for providing power to IT systems A use different from that described here is considered to be an improper use Rittal cannot accept any liability for damage resulting from the improper use or the non observance of this guide The guides for the used accessories may apply Rittal prohibits the use for life preserving applications such as the use in hos...

Page 6: ...me overheated the internal thermal switch will detect the heat and switch to bypass mode and vice versa 7 Maintenance free sealed type battery minimises after sales service 8 The maintenance bypass switch provides easy and safe troubleshooting or maintenance function when the utility is normal 2 2 Special Features The transformer free converter technology with a housing that can be mounted in a ra...

Page 7: ...lence UPS OFF Switch Special functions log in out Go to next page Go to previous page or change the setting of the UPS To re confirm the change of UPS Setting 3 1 1 Symbols on the LCD DisplayPanel Item Symbol Description 1 LINE Utility or Bypass Source 2 Battery Low 3 Battery Abnormal 4 UPS Overloading 5 UPS Working in Service Mode1 6 A Blackout Transfer occurred in UPS Output 7 Bypass Input Abnor...

Page 8: ...UPS Overheat 30 Er12 UPS Output Overloading 31 Er15 Wrong Procedure to Enter Maintenance Mode 32 Er16 Output Parameters Set Error in Parallel System 33 Er17 ID Numbers are in conflict in Parallel System or ID number Error in single unit 34 Er21 Parallel communication error communication wire disconnected or failure to find ID1 UPS in parallel system 35 Er24 CVCF mode with Bypass input 36 Er27 The ...

Page 9: ...Parallel System F External Battery Connector G Cooling Fan H Utility Input UPS Output Power Connector I Customer Options Slot J Slot 3 2 1 UPS input and output 3 2 2 Battery input Model Maximum Current Conductor Section 4 5 kVA 24 A 4 mm 6 kVA 32 A 4 mm Model Maximum Current Conductor Section 4 5 kVA 25 A AWG 10 6 mm 6 kVA 25 A AWG 10 6 mm B A C D G I E F H J 1 L in 2 N in PE 3 L out 4 N out ...

Page 10: ... Linux please contact your local distributor for a proper solution Highest Priority in descending order 1 EPO input port 2 Optional Interface card 3 RS232 3 3 1 EPO Emergency Power Off The Pin assignments of the EPO Input port are 1 2 1 Æ EPO 2 Æ Ground To enable the EPO function please short Pin 1 2 3 3 2 RS232 Port Descriptions The RS232 interface shall be set as follows Baud Rate 2400 bps Data ...

Page 11: ... freight forwarder and the dealer in case of any visible damage of the packing of the product The packaging is recyclable save it for reuse or dispose it properly Remove the UPS from the carton box Check the package contents Standard contents shall include 1 set of Users Manual UPS communication software with RS232 cable 1 set of accessories pack A1 A2 A3 S1 S2 S3 S4 B1 B2 C1 C2 B3 R1 R2 option In...

Page 12: ... flow to the ventilation louvers of the unit Please ensure the installation site is free from excessive dust and the ambient temperature and humidity should be within the specified limits Do not place the UPS in a dusty or corrosive environment or near any flammable objects This UPS is not designed for outdoor use Note The batteries inside the external packages of these ups can have a strengthened...

Page 13: ...Installation UPS Manual 12 EN 4 3 Assembling of the different System Components 4 3 1 Tower Assembling steps Step1 Mounting of Foot Cover and Power Module S3 ...

Page 14: ...Installation UPS Manual 13 EN Step2 Installation of Power Module and Battery Module 4 3 2 Rack installation step Step1 Mounting of Ear Handle S1 A3 S3 B1 B2 S4 B1 B3 S4 ...

Page 15: ...Installation UPS Manual 14 EN Step2 Installation of Ear Cover to Power and Battery Module Step3 Installation of Rail to Rack Step4 Installation Battery Module to Rail R1 R2 S3 S3 ...

Page 16: ...Installation UPS Manual 15 EN Step5 Installation Power Module ...

Page 17: ...t the parallel hot swap chassis the external bypass or the installation cable is installed correctly For further information please read the manual of DK 7857 443 DK 7857 444 or DK 7857 441 Danger Before starting the installation please make sure the grounding is connected properly Make sure Utility breaker UPS Utility breaker is On Off position Warning Make sure the voltage of Utility matches wit...

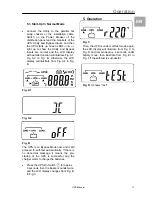
Page 18: ...ise the LCD display will illustrate from Fig A2 to Fig B Fig A1 Fig A2 Fig B The UPS is on Bypass Mode now and it will proceed to self test automatically If there is no abnormal message it means the pre startup of the UPS is successful and the charger starts to charge the batteries Press the UPS On Switch for approx 3 seconds then the Buzzer sounds twice and the LCD display changes from Fig B to F...

Page 19: ... at least 1 set 20pcs of 12V 7Ah or 12V 5Ah batteries Push the UPS On Switch once for approx 5 seconds to awake the UPS and then the buzzer sounds twice The LCD display will illustrate from Fig A to Fig G and keep awake for approx 15 seconds Press the UPS On Switch of the UPS again for about 3 seconds till the LCD display illustrates from Fig G to Fig H then the UPS will be in self test Mode The U...

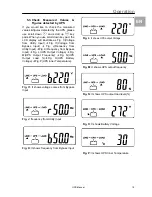
Page 20: ...m Bypass Input Æ Fig J Frequency from Utility Input ÆFig K Frequency from Bypass Input ÆFig L UPS Output Voltage ÆFig M UPS Output Frequency ÆFig N UPS Output Load ÆFig O UPS Battery Voltage ÆFig P UPS Inner Temperature Fig I1 It shows voltage comes from Bypass Input Fig J frequency from Utility Input Fig K It shows frequency from Bypass Input Fig L It shows UPS output Voltage Fig M It shows UPS o...

Page 21: ...ow Fig Q1 buzzer Æ Fig R1 Self test ÆFig S1 Bypass Voltage Windows Æ Fig T Output Frequency Synchronization Window ÆFig U Inverter Output Voltage ÆFig V1 UPS Operation Mode ÆFig W Output Voltage Micro Tune Value ÆFig X UPS Id ÆFig Y No of UPS in Parallel Fig R1 It shows self test is NOT on Fig R2 It shows self test is On Fig S1 It shows Bypass Voltage is adjusted to narrow tolerance Fig S2 It show...

Page 22: ...it must be done by a qualified technician Fig W It shows Output Voltage Adjustment from 0 to 3 or 0 to 3 Fig X It shows UPS Identification Number Fig Y It shows the UPS is the 1st of the parallel systems Press scroll up key pad to execute special functions The functions includes buzzer ON as Fig Q1 or buzzer OFF as Fig Q2 Alarm silence for UPS Warning and self test OFF As Fig R1 or self test ON as...

Page 23: ...position of the UPS when the UPS is in Parallel mode The settable numbers are from 1st to 4th Fig Y shows the total number of UPS in parallel The settable numbers are from 1 to 4 When all the setting changes are done you have to press enter key Pad to save all the changes when the LCD screen shows as Fig Z then the LCD screen will show as Fig AA to complete the setting changes If you don t want to...

Page 24: ...ress Off key pad for about 5 seconds the Inverter output will be turned off then the output load is supplied by Bypass loop and the LCD screen shows as Fig B Turn Off the breaker of Utility Input The UPS is turned off completely 5 8 Maintenance Bypass Mode Press the Off key pad for approx 5 seconds the LCD screen shows as Fig B and the UPS output is in bypass mode To turn the UPS back to inverter ...

Page 25: ...ritical load at the UPS output end If any damage of the coating of AC power cord please replace a new one 3 Remove the short circuit occurred at the EPO terminal 4 Remove the objects blocked on the ventilation holes 5 Make sure the UPS is operated normally If it is on CVCF mode you have to turn off and turn on the UPS again 6 All of the parameters except ID Number in the parallel UPS must be same ...

Page 26: ...P protocol We offer our software with SNMP functionality for Novell OS 2 all Windows running on INTEL and ALPHA DEC VMS Apple Two types of SNMP interfaces with identical functionality are available an external SNMP Adapter Box and an internal SNMP Card Both can manage a parallel system N modules and return either global values which are consistent for the whole parallel system or specific values f...

Page 27: ...re For detailed information please see Software Manual provided with the PMC Software CD ROM RCCMD Remote Console Command module for a multi server shutdown This stand alone software module is designed to receive and execute a command issued by a remote device Thanks to RCCMD it is possible to execute a shutdown in an heterogeneous multiplatform network The new release RCCMD 2 is an application av...

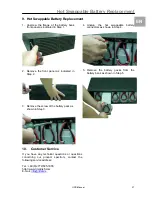
Page 28: ... Step 2 3 Remove the screw of the battery pack as shown in Step 3 4 Unplug the hot swappable battery connectors as shown in Step 4 5 Remove the battery packs from the battery bank as shown in Step 5 10 Customer Service If you have any technical questions or questions concerning our product spectrum contact the following service address Tel 49 0 2772 505 1855 http www rimatrix5 com E mail info ritt...

Page 29: ...y 4500 VA 3600 W 6000 VA 4800 W Rated Power Factor 0 8 Lagging Wave Form Sine Wave THD 3 no load to full Linear load Frequency Stability 0 2 Free Running Frequency Regulation 1 3 Transfer Time 0ms Efficiency AC to AC Normal Up to 90 Efficiency AC to AC ECO Up to 97 Autonomy at load 50 100 50 100 1 Battery 20 Min 9 Min 18 Min 8 Min 2 Batteries 48 Min 23 Min 45 Min 20 Min 3 Batteries 95 Min 39 Min 7...

Page 30: ...ditions PHYSICAL Dimensions WxDxH mm 440x88x660 UPS Module Input Output Connection Hardwire External Battery Connection Plug Play Net Weight Kgs 24 UPS Module BATTERY BANK DIMENSIONS Convertible Rack Tower 7857 442 20pcs 12V 7Ah 440x133x660 3U BATTERY BANK NET WEIGHT 7857 442 w o bat with bat 18 kg 68 kgs ENVIRONMENT Operating Temperature 0 C to 40 C Temperature Warning The battery design life is ...

Page 31: ... Manual 30 EN SAFETY CONFORMANCE Quality Assurance ISO9001 Certified Company Safety Standard EN62040 1 UL1778 EMC Standard EN62040 2 EN61000 3 2 EN61000 3 3 FCC Class A Marks CE WEEE 160 176Vac at 75 load ...

Page 32: ...Rittal GmbH Co KG Postfach 1662 D 35726 Herborn Telefon 49 0 2772 505 0 Telefax 49 0 2772 505 2319 eMail info rittal de www rittal de 04 11 A38862 05 IT74 ...

Reviews: