1
2
3
4
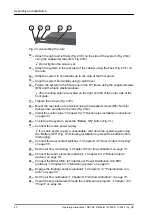
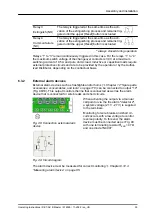
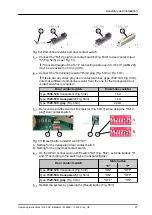
Fig. 34: Suction pipe
1.
Drill suction bores (Fig. 34/1) into the suction pipes (Fig. 34/2). Carry out dis-
tances and bore diameters according to Fig. 34.
The number of suction bores depends on the number of monitored cabinets.
Observe the following specifications:
1 cabinet: 4 suction bores
2 cabinets: 2
×
4 = 8 suction bores
3 cabinets: 3
×
4 = 12 suction bores
4 cabinets: 4
×
3 = 12 suction bores
5 cabinets: 5
×
3 = 15 suction bores
2.
Deburr suction bores.
3.
Degrease areas for red bore marks (Fig. 34/3) on suction pipes.
Cleaning agents that attack plastics must not be used under any circum-
stances.
4.
Glue the red bore marks
3)
into place, making sure they are in the middle of the
suction bores.
5.
If there are too many suction bores:
● Degrease the area around the bore to be sealed.
Cleaning agents that attack plastics must not be used under any circum-
stances.
● Glue the black sticker
3)
(Fig. 34/4) into place, making sure it is in the middle
of the redundant bore.
3)
Included in the scope of delivery of the suction pipe system (part no. 907061).
Assembly and installation
Operating Instructions / DET-AC III Master / 916005 / 11-2022 / en_US
45

