Instruction Manual IM‐116
CUSTOMER'S INFORMATION BOX
CONTENTS ARE INDEPENDENT OF RIVERHAWK DOCUMENT CONTROL
215 Clinton Road
New Hartford, NY 13413
Tel: +1 315 768 4855
Fax: +1 315 768 4941
Email: info@riverhawk.com
REV
373A4028
GE DRAWING NUMBER
Revision H
Page 11 of 29
Puller screw should be free to rotate and move back and forth.
Seam between cylinders closed tightly.
Inspect tensioner guard for any signs of damage. Bent guards should be replaced. Also, be sure
the rubber pad is in place on the end of the guard, if missing, replace.
7.1.1 Fittings
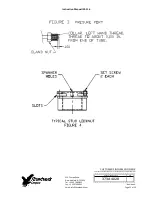
Make sure both male and female parts are clean and free of debris, see Figure 3 for fitting
configuration. Hold female part securely when tightening so as to prevent damage to adjacent
tubing. If fitting leaks first try retightening as needed. If leaking continues then disassemble
and check for scratches or debris on the seating conical surfaces. Clean as required. Replace
plastic caps when finished with tooling.
7.2 Pump
The pump kit is shipped full of hydraulic oil. The pump reservoir cap is sealed for shipment. To
use turn cap to the vent position. To prevent oil spillage close cap when not in use, during
storage and shipment. Lost oil should be replaced with Enerpac Hydraulic Oil. ISO 32. Mineral
Oil may be substituted, if necessary.
7.3 Bleeding Hydraulic System
Follow the tensioner assembly instructions of Section 8.0.
TO AVOID FAILURE, ENSURE SAFETY AND PROPER OPERATION THE TENSIONER ASSEMBLY
MUST BE MOUNTED ON THE STUD BEFORE BLEEDING THE SYSTEM AND TENSIONING BEGINS.
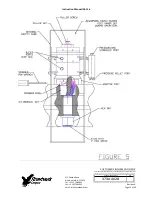
The tensioner has four ports see Fig. 5, one for pressurizing, two for bleeding the system and a
fourth pressure relief port.
To facilitate bleeding, start by first mounting the tensioner at either the 3 0’clock or 9 o’clock
stud position depending on which will critically place the bleed ports in their uppermost
position. In addition, make sure that the pump is always situated below the tensioner assembly.
The puller tool is equipped with 5/8 in. [16 mm] Hex coned stem bleeder fittings installed in the
bleeder ports. With theses two fittings loosened simultaneously, stroke the pump repeatedly
until the streams of oil exiting the tool from each port are free of air, then retighten the fittings.


