

Instruction Manual IM‐116
CUSTOMER'S INFORMATION BOX
CONTENTS ARE INDEPENDENT OF RIVERHAWK DOCUMENT CONTROL
215 Clinton Road
New Hartford, NY 13413
Tel: +1 315 768 4855
Fax: +1 315 768 4941
Email: info@riverhawk.com
REV
373A4028
GE DRAWING NUMBER
Revision H
Page 16 of 29
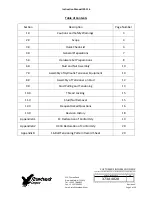
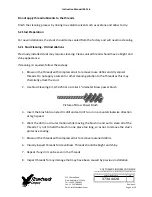
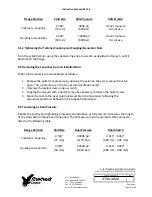
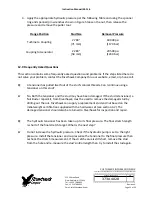
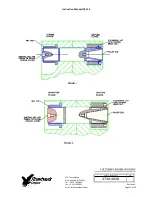
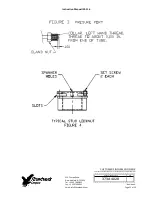
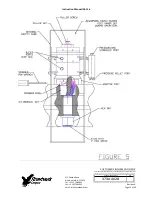
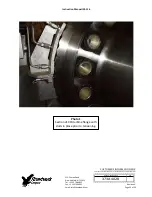
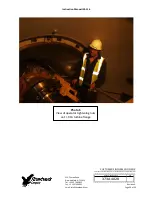
4.
Apply the appropriate hydraulic pressure per the following Table and using the spanner
ring and spanner/pin wrenches shown in Figure 5 loosen the nut, then release the
pressure and remove the puller tool.
Flange Position
Stud Size
Removal Pressure
Turbine to Coupling
2.784"
[71 mm]
18000 psi
[1170 bar]
Coupling to Generator
2.283"
[58 mm]
20500 psi
[1240 bar]
12.0 Frequently Asked Questions
This section contains some frequently asked questions and problems. If the steps listed here do
not solve your problem, contact the Riverhawk Company thru our website, email, or phone call.
Q
:
A tensioner has pulled itself out of the stud's conical threads. Can I continue using a
tensioner on this stud?
A
:
No. Both the tensioner and the stud may have been damaged. If the stud is tensioned, a
Nut Buster repair kit, from Riverhawk, must be used to remove the damaged stud by
drilling out the nut. Riverhawk can supply a replacement stud and nut based on the
initial weight certification supplied with the hardware set (see section 4.2). The
damaged tensioner should also be returned to Riverhawk for inspection and repair.
Q
:
The hydraulic tensioner has been taken up to its final pressure. The final stretch length
is short of the final stretch target. What is the next step?
A
:
Do not increase the hydraulic pressure. Check if the hydraulic pump is set to the right
pressure. Install the tensioner and re‐pressurize the tensioner to the final pressure then
recheck the stretch measurement. If the stretch value is still short, remove the stud
from the hole and re‐measure the stud's initial length then try to install the stud again.


