background image

Check for parts online at 

www.HuntRiversEdge.com

 or call 800-450-EDGE (3343) M-F 8-5

36

Operator's Manual

Rivers Edge® One-Man Ladder Stands

 SETUP AND USE INSTRUCTIONS  

(FOR ALL LADDERS INCLUDED IN THIS MANUAL)


During installation and removal of ladder treestands, you must always 

and properly use the included Full Body Harness (Fall Arrest System). 

Refer to the Full Body Harness instructions included with this product 

for proper use. 

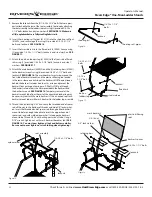
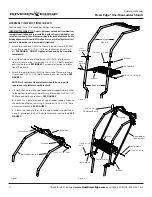
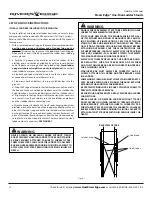
1.   With assembled product lying on the ground in assembled position, 

position one person at bottom end of ladder lying on the 

ground.

 This person has to prevent the ladder end from tilting up 

when platform end is lifted and prevent the ladder from skidding 

across ground.

2.   a. Position (2) people at the platform end of the ladder, lift the 

platform end, and continue uprighting by walking toward bottom 

end of ladder and moving hands along ladder legs. 

Stand ladder 

up against chosen straight tree on dry, level ground.

 Use caution 

when ladder comes over center against tree.


b. Step back and look at the ladder top to see that it is level. Adjust 

as needed to achieve a level platform at top.

  c. Step down hard on bottom step to push ladder legs into the 

ground.

 d.


Wrap the 9' rope attached to the stabilizer bar around tree and tie 

the free end to the link welded on stabilizer bar at the stabilizer bar 

height location. Secure the ladder tight so that the stabilizer bar is 

at a right angle to the tree. Adjust stabilizer bar length as necessary 

so it contacts tree.  Be absolutely sure the tree blades on platform 

and the stabilizer bar are contacting tree.  


e. Wrap the previously attached 15’ tie-off ropes hanging down from 

platform, around the back side of tree in opposite directions of each 

other. Pull the ropes snug and tie them to the ladder at the stabilizer 

bar height location. This ground level ladder-to-tree attachment will 

prevent the ladder from pulling away from the tree while ascending 

to top for final ratchet strap attachment. The same holds true when 

ladder removal is necessary. 

SEE FIGURE 1. 

 WARNING

DOUBLE CHECK ASSEMBLY STEPS TO BE CERTAIN YOU HAVE 

CORRECTLY ASSEMBLED THIS PRODUCT. 
STUDY YOUR NEW STAND TO BECOME FAMILIAR WITH ALL 

OF ITS FEATURES AND DESIGN. AT GROUND LEVEL, FOLLOW-

ING PROVIDED USE INSTRUCTIONS, PRACTICE ATTACHING 

STAND TO TREE AND REMOVING STAND FROM TREE. PRAC-

TICE SITTING, STANDING, AND USING THIS PRODUCT BEFORE 

ATTACHING OVERHEAD. SAVE THESE INSTRUCTIONS FOR 

FUTURE REFERENCE. YOU MUST ALWAYS USE THE PROVIDED 

FULL BODY HARNESS (FALL ARREST SYSTEM) THAT MEETS 

TMA STANDARDS WHILE USING THIS PRODUCT. 
ALWAYS USE THREE PEOPLE FOR SET-UP AND TAKE-DOWN.
BE ABSOLUTELY SURE THE TREE BLADES ON PLATFORM 

AND THE STABILIZER BAR ARE BOTH CONTACTING TREE BE-

FORE CLIMBING LADDER.
STABILIZER BAR MUST ALWAYS BE CORRECTLY AND SE-

CURELY ATTACHED TO LADDER AND TREE BEFORE CLIMB-

ING LADDER.
SOME MODELS INCLUDE A MULTI-PIECE STABILIZER BAR SYS-

TEM.  BE SURE SPRING LOCK PIN GOES THROUGH BOTH THE 

EXTENSION TUBE AND THE STABILIZER BAR.
BE CERTAIN SPRING LOCK PINS ARE LATCHED SECURELY TO 

PREVENT ACCIDENTAL REMOVAL. 
BE SURE YOUR DOUBLE KNOTS ARE ALL SECURE ON ALL ROPE 

CONNECTIONS.
NEVER ASCEND OR DESCEND LADDER WITHOUT TIE-OFF 

ROPES SECURELY HOLDING LADDER TO TREE AND STABILIZ-

ER BAR SECURELY ATTACHED. FAILURE TO CORRECTLY PER-

FORM THESE STEPS CAN CAUSE THE LADDER TO COLLAPSE/

BUCKLE-OVER BACKWARDS DURING THE INITIAL ASCENT TO 

ATTACH RATCHET STRAP RESULTING IN SERIOUS INJURY OR 

DEATH.

tie-off ropes

BACK VIEW OF TREE

tree blade

ratchet strap

Figure 1

 WARNING

NEVER ASCEND OR DESCEND LADDER WITHOUT TIE-OFF 

ROPES SECURELY HOLDING LADDER TO TREE AND STABILIZ-

ER BAR SECURELY ATTACHED. FAILURE TO CORRECTLY PER-

FORM THESE STEPS CAN CAUSE THE LADDER TO COLLAPSE/

BUCKLE-OVER BACKWARDS DURING THE INITIAL ASCENT TO 

ATTACH RATCHET STRAP RESULTING IN SERIOUS INJURY OR 

DEATH.
Summary of Contents for JUMBO JACK RE628

Page 1: ...RELD001 REV3 02 17 15 2015 RETI All Rights Reserved Get parts online at www HuntRiversEdge com PACK N STACK Model RE622 JUMBO JACK Model RE628 RELAX WIDE Model RE631 Wear Your Harness INCLUDES MODEL s...

Page 2: ...ended usage RETI is not responsible for any injuries sustained due to failure to read and adhere to the instructions for use Any misunderstanding or questions regarding the products of their use shoul...

Page 3: ...E BACK DO NOT EXCEED THE TOTAL FIELD RATING 300 LBS NEVERUSEANYPRODUCTTHATHASNOTBEENMAINTAINED OR INSPECTED PROPERLY YOUR LIFE DEPENDS ON IT WHEN HUNTING FROM A TREESTAND FALLS CAN OCCUR ANY TIME AFTE...

Page 4: ...tandards immediately upon reaching foot platform Be fully aware of foot placement Recommended for adult use only Inspect ladder for missing parts all hardware condition and damage before every applica...

Page 5: ...RE 1 3 Attach sling seat 48066 to assembled top sitting section by sliding each siderailthroughwebbingloopsofseat 3oneachsideofseat Seatshould be orientated with seat straps on bottom side of seat for...

Page 6: ...1 provided spring lock pin SEE FIGURE 4 b Slide the stabilizer bar L29 into the extension tube and attach the two pieces together using 1 provided spring lock pin Spring lock pin must go through both...

Page 7: ...gether 3 Attach backpacking straps 48067 on packed ladder Fold strap in half Feed folded strap through foot platform mesh and around platform frame OR around the ladder rung located directly under nea...

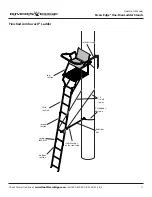
Page 8: ...E 3343 M F 8 5 8 Operator s Manual Rivers Edge One Man Ladder Stands FINISHED PACK N STACK LADDER fourth section ratchet strap stabilizer bar extension tube 15 tie off ropes 9 stabilizer bar rope spri...

Page 9: ...61 FOOT PLATFORM 1 7 AL7 SIDE SUPPORT FOOT PLATFORM 2 8 L29 STABILIZER BAR 18 1 9 SL62 SWEDGED LADDER 38 2 10 SL63 SWEDGED LADDER W VAM 38 1 11 SL64 SWEDGED LADDER W VAM 38 1 12 SL67 TREE BLADE LADDER...

Page 10: ...rm 410050 and the rear platform 410058 together using 2 provided 1 4 20 x 2 bolts locknuts and steel washers SEE FIGURE 1 DO NOT tighten all nut and bolt assem blies completely NOTE Mesh surface of fo...

Page 11: ...10062L right armrest 410062R and 2 backrest mounts 410082 to the previously assembled ladder side rails and platform support rails using 2 provided 1 4 20 x 2 bolts 4 1 4 20 x 2 1 4 bolts 2 1 4 20 x 3...

Page 12: ...nger tighten locknut rear fixed brace locknuts will need to be removed in order to attach finished seat to treestand later in assembly instructions SEE FIGURE 7 NOTE The rear fixed brace is meant to b...

Page 13: ...id in assembly SEE FIGURE 10 f Insert 2 1 4 20 x 1 1 4 bolts through the front hinged brace and each side rail and finger tighten locknuts SEE FIGURE 11 Brace should remain hinged g Rotate the front h...

Page 14: ...nd secure together using 2 provided 1 4 20 x 1 1 4 bolts and locknuts SEE FIGURE 16 11 Insert the two side rails into the flared rails 410054 Secure using 2 provided 1 4 20 x 1 1 2 bolts locknuts and...

Page 15: ...tion 410068 3 step ladder with stabilizer bar mount third section 410069 3 step ladder w mounting holes top section assembled top platform section SEE FINISHED 17 OASIS LADDER 16 With all sections ass...

Page 16: ...tach the two pieces together using 1 provided spring lock pin Spring lock pin must go through both the extension tube and stabilizer bar at appropriate hole to achieve desired distance from tree Ad ju...

Page 17: ...EDGE 3343 M F 8 5 17 Operator s Manual Rivers Edge One Man Ladder Stands Finished Oasis Ladder bottom section second section third section top section ratchet strap 15 tie off ropes 9 stabilizer bar r...

Page 18: ...Manual Rivers Edge One Man Ladder Stands RE627 PARTS EXPLOSION 1 17 34 18 4 26 5 28 27 8 26 27 30 30 9 7 25 6 11 25 30 13 28 3 24 10 28 28 26 19 20 22 15 33 14 35 12 21 33 32 27 29 1 36 2 37 23 16 31...

Page 19: ...ELDMENT SPACER BACKREST 1 24 410122 WELDMENT SEAT SPACER REAR 1 RE627 PARTS LIST KEY PART DESCRIPTION QTY 25 48153B BOLT 1 4 20 X 2 HHCS GR5 BLK ZN 6 26 48240B BOLT 1 4 20 X 1 1 2 HHCS GR5 BLK ZN 16 2...

Page 20: ...of a wrench only This will temporarily hold the lock nut on the bolt while helping alignment of all parts After all parts are assembled together all nut bolt combinations must be completely tightened...

Page 21: ...ont of the ladder side rails 410053 to the front plat form using 2 provided 1 4 20 x 2 bolts 2 locknuts 4 and steel washers SEE FIGURE 3 5 Attach the left armrest 410062L right armrest 410062R and 2 b...

Page 22: ...nger tighten locknut rear fixed brace locknuts will need to be removed in order to attach finished seat to treestand later in assembly instructions SEE FIGURE 7 NOTE The rear fixed brace is meant to b...

Page 23: ...id in assembly SEE FIGURE 10 f Insert 2 1 4 20 x 1 1 4 bolts through the front hinged brace and each side rail and finger tighten locknuts SEE FIGURE 11 Brace should remain hinged g Rotate the front h...

Page 24: ...MUST be positioned behind the backrest retainer bars to act as a stop and prevent the backrest from pulling out during use All bolts MUST go through the backrest retainer bars the holes provided in th...

Page 25: ...tach the 2 support braces 410024 to the inside of platform support rails and outside of top ladder section w mounting holes using 4 provided 1 4 20 x 1 1 2 bolts and locknuts SEE FIGURE 20 Tighten sec...

Page 26: ...ust go through both the extension tube and stabilizer bar at appropriate hole to achieve desired distance from tree Ad justment in length may be needed when ladder is uprighted later in instructions S...

Page 27: ...E 3343 M F 8 5 27 Operator s Manual Rivers Edge One Man Ladder Stands Finished Jumbo Jack Ladder bottom section second section third section top section ratchet strap 15 tie off ropes 9 stabilizer bar...

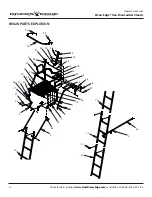
Page 28: ...perator s Manual Rivers Edge One Man Ladder Stands RE628 PARTS EXPLOSION 31 11 2 34 12 4 26 5 28 27 17 26 27 30 30 7 6 25 15 16 25 30 8 28 3 24 18 28 28 26 13 14 21 20 33 9 35 1 19 22 33 23 29 27 32 3...

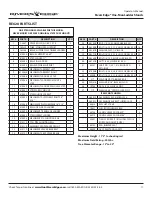
Page 29: ...23 410119 WELDMENT SPACER BACKREST 1 24 410127 WELDMENT SEAT SPACER REAR 1 KEY PART DESCRIPTION QTY 25 48153B BOLT 1 4 20 X 2 HHCS GR5 BLK ZN 6 26 48240B BOLT 1 4 20 X 1 1 2 HHCS GR5 BLK ZN 16 27 4826...

Page 30: ...tion of flared rails 3 Attach the foot platform 10370 to the inside of flared rails using 2 provided 1 4 20 x 2 1 4 bolts locknuts and steel washers SEE FIGURE 2 NOTE Mesh surface of foot platforms s...

Page 31: ...teel washers attach the upper portion of each seat rail to the main side rails SEE FIGURE 7 It is important to have the bolt head on the seat rail side and the locknut on the main side rail side for e...

Page 32: ...ing rail by wrapping around tubing and attaching Velcro together 13 a Attach the stabilizer bar extension tube 1ML23 to the second ladder section mounting bracket using 1 provided spring lock pin SEE...

Page 33: ...M F 8 5 33 Operator s Manual Rivers Edge One Man Ladder Stands second section third section fourth section top section ratchet strap 15 tie off ropes 9 stabilizer bar rope stabilizer bar stabilizer ba...

Page 34: ...w HuntRiversEdge com or call 800 450 EDGE 3343 M F 8 5 34 Operator s Manual Rivers Edge One Man Ladder Stands 23 12 10 11 10 14 22 5 21 3 2 19 24 21 1 20 19 17 7 20 21 6 20 22 13 19 20 4 17 15 8 18 17...

Page 35: ...ENSION 1 15 410113 FTS J PIPE SHOOTING RAIL 2 16 48153B BOLT 1 4 20 X 2 HHCS GR5 BLK ZN 2 17 48240B BOLT 1 4 20 X 1 1 2 HHCS GR5 BLK ZN 8 18 48250B BOLT 1 4 20 X 1 3 4 HHCS GR5 BLK ZN 4 19 48261B WASH...

Page 36: ...his ground level ladder to tree attachment will prevent the ladder from pulling away from the tree while ascending to top for final ratchet strap attachment The same holds true when ladder removal is...

Page 37: ...slowly climb the ladder and carefully keep a constant hand grip on the ladder at all times Always lean forward toward tree to keep top section tree blades against the tree Be certain ladder bottom is...

Page 38: ...5 hex head bolt 1 4 20 x 1 1 2 grade 5 hex head bolt 1 4 20 x 1 3 4 grade 5 hex head bolt 1 4 20 x 2 grade 5 hex head bolt 1 4 20 x 2 1 4 grade 5 hex head bolt 1 4 20 x 2 1 2 grade 5 hex head bolt 1 4...

Page 39: ...Check for parts online at www HuntRiversEdge com or call 800 450 EDGE 3343 M F 8 5 39 Operator s Manual Rivers Edge One Man Ladder Stands NOTES...

Page 40: ...sedge com All weights specifications and features are approximate and are subject to change without notice Due to continuous product improvements product images may not be exact Warning labels in some...

Reviews: