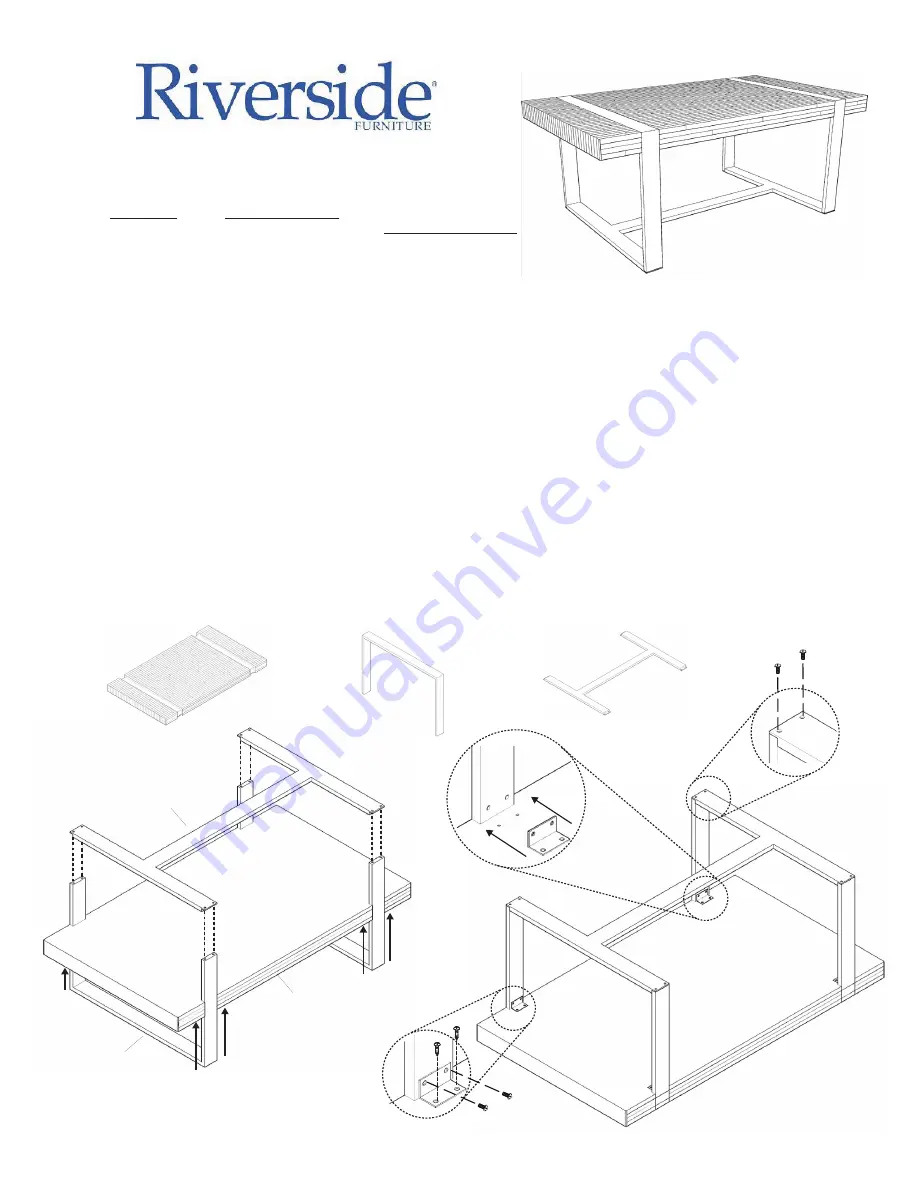
2 Leg Assembly
1 Stretcher
16 Bolts 3/16 x 1/2
P
pS Screwdriver (NOT INCLUDED)
It is strongly recommended that this table be assembled by
TWO PERSONS
to avoid marking or scratching the finish.
It is easier to assemble this product upside down.
It is recommended that you periodically check and tighten all parts during the lifetime of the product.
Clean with a damp cloth and buff dry with a soft cloth. Use of commercial polishes or waxes is not recommended.
Use coasters under beverages and articles that may scratch. Do not place hot items directly on the surface.
LEG ASSEMBLY (2)
WOOD TOP
1 Wood Top
67802 / 67809 / 67812 / 67815
STRETCHER
8 Screws #10 x 3/4
ASSEMBLY INSTRUCTION
Thank you for purchasing this quality product. Be sure to check all packing material carefully for small parts which may
have come loose inside the carton during shipment. Identify and count all parts and compare with parts list below.
MADE IN MEXICO
TOOLS REQUIRED
BUT NOT PROVIDED
PART LIST
HARDWARE LIST
Philips Screwdriver
4 Angle Bracket
LEG ASSEMBLY
STRETCHER
WOOD TOP
BOLTS
(3/16 x1/2”)
BOLTS
(3/16 x1/2”)
SCREWS
(#10x3/4”)
Angle Bracket Detail
1. Locate and unpack all the parts and place them on a soft surface such as a blanket or carpet.
2. Match the numbers on the base to the numbers on top.
3. Place the Wood Top upside down on a soft surface and while lifting one end, insert one Leg Assembly into
the channel of the Wood Top.
4. Attach a Metal Bracket to the Leg Assembly using the 3/16” x 1/2” Bolts as shown. Leave Loose.
5. Repeat Steps 3 & 4 above for other Leg Assembly.
6. Screw the Angle Bracket to the Wood Top using the #10 x 3/4” Wood Screws as shown.
7. Attach the Stretchers to the bottom of the Leg Assembly using 3/16” x 1/2” Bolts as shown. Tighten all Bolts.
8. Turn the completed table upright.
NOTICE: 67815 Sofa Table includes an Anti-Tipping Restraint Kit (#HH510)


