ATTACHING THE INTERMEDIATE RAFTER EXTRUSION
2
3
Ridge Base
Ridge
Base
Flange
Rafter Extrusion
4
5
6
Intermediate Rafter
Extrusion
Tek-screw
Attaching
Ridge Base
Hip
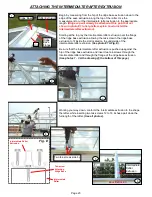
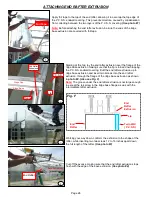
Begin by measuring from the hip of the ridge base extrusion down to the
edge of the eave extrusion along the top of the rafter. Use the
measurement to cut the intermediate rafter extrusion to the appropriate
length.
(Ridge cap will already be attached at this point but not
shown in photo #1 to help better explain how to install the
intermediate rafter extrusion).
Starting at the top, lay the Intermediate rafter extrusion over the flange
of the ridge base extrusion allowing the tek-screw in the ridge base
extrusion to fit inside the slot located on the underside of the
intermediate rafter extrusion.
(See photo #1 & Fig. E).
Be sure that the Intermediate rafter extrusion is pushed up against the
hip of the ridge base extrusion and insert two tek-screws through the
Intermediate rafter and through the flange of the ridge base extrusion.
(See photos 1 - 3 & the drawing @ the bottom of this page).
1
Working your way down, conform the Intermediate extrusion to the shape
the rafter, while inserting two tek-screws 12 to 16 inches apart down the
full length of the rafter.
(See all photos).
Eave Extrusion
Intermediate
Rafter
Extrusion
Two tek-screws side by
Intermediate
Rafter
Fig. E
Page 23
Summary of Contents for Thoreau Series
Page 2: ......

