background image


11


7. 

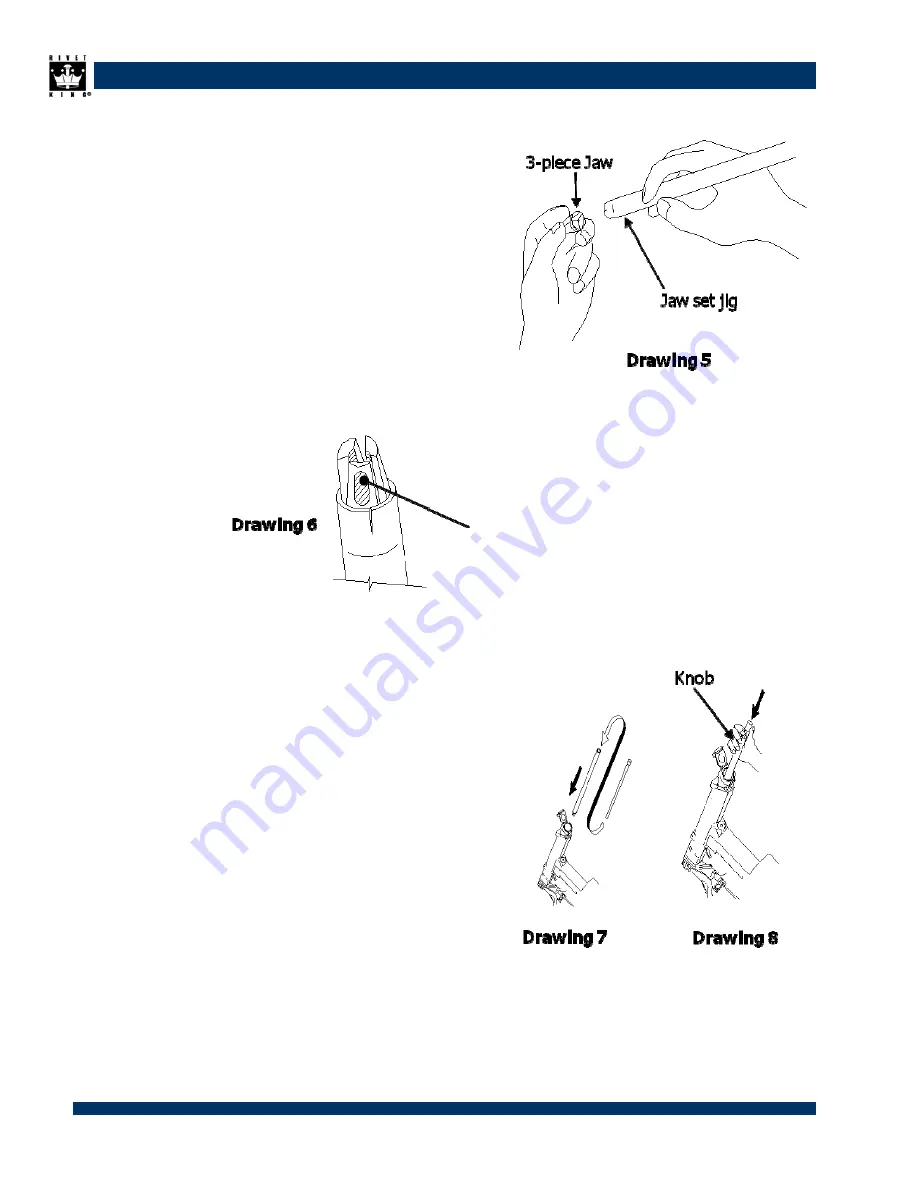
Insert 3 jaws into the tip of the tube on the 


the outside of the jaw Setting Jig. 
(Drawing 5, Drawing 6) 

As shown in Drawing 6, apply an  
over-the-counter Molybdenum grease. 
(Note that applying grease to the jaw 
 teeth will cause the teeth to slip on the 
 rivets, and may make riveting impossible ). 


Apply grease here 


8. 

Insert the jig, as shown in (Drawing 7).  


Stop it about 5mm before it touches the end, 
and press the knob on the inside of the tube. 
(Drawing 8 ) 


Summary of Contents for RK-4500

Page 1: ...FOR SALES SERVICE OR TECH SUPPORT CALL 1800 BUY RIVET OR 1 800 289 7483 Instruction Manual RK 4500 KS5 KS6 Automatic Hand Riveter Continuous Riveting Machine...

Page 2: ...pes of Connecting Tape Standard Accessories Page 6 Preparing the tool for service Page 7 8 Maintenance Page 9 14 Installing and removing connecting tape Page 15 16 Troubleshooting Page 17 18 Assembly...

Page 3: ...ARLY SCHEDULED INTERVALS INSPECT FOR DAMAGE AND FUNCTION BY TRAINED A PERSONAL THE PLASTIC BODY MUST BE CHANGED WHERNEVER THERE IS EVIDANEC OF IMPACT DAMAGE CHIPPING OR CRACKING WEAR SAFETY GLASSES AN...

Page 4: ...trial Rivet Fastener Co policy of continuous improvement SPECIFICATIONS FOR RK 4500 RIVET TOOL Operating Air Pressure 85 95 psi 5 6 6 BAR Recommended Air Pressure 90 PSI 6 BAR Size 14 1x11 9x5 7 358X3...

Page 5: ...a breaking force of greater than 658 kgf Dimensions A Suitable size mandrel side tape hole size 0 1mm Use the size of tape closest to the appropriate size B size 4 rivet 1 8 Inch size 5 rivet 5 32 Inc...

Page 6: ...Jig 1 set 12 Air Hose Assembly 1 pcs NOTE AN OPTIONAL TRAINING NOSE ADAPTOR IS SHIPPED WITH THE KINGSET TOOL FIG 2 THE TRAINING NOSE ADAPTOR MAY BE INSTALLED TO PREVENT ACCIDENTAL TOOL AND OR APPLICA...

Page 7: ...ts are present Keep the box and do not damage it You may wish to use it to send the tool back to us for scheduled maintenance or repair Check for visible damage to the hydraulic cylinder Mild abrasion...

Page 8: ...combination remove the water from the air filter regularly adjust the regulator air pressure and check the volume and flow of oil in the oiler Check for cracks in all parts looseness of screws and fa...

Page 9: ...the air hose to the tool If there is a filter drain it Check for proper nose piece which is dependent on the size of the rivet Remove the nose piece from the front nose assembly and inspect for crack...

Page 10: ...ing 5 Hold the machine upside down and take out the slide pipe Drawing 4 D jaw pusher spring Drawing 4 C jaw pusher Drawing 4 B and jaw Drawing 4 A If grease has caused the jaw to become stuck to the...

Page 11: ...ng 6 apply an over the counter Molybdenum grease Note that applying grease to the jaw teeth will cause the teeth to slip on the rivets and may make riveting impossible Apply grease here 8 Insert the j...

Page 12: ...damage to the head of the screwdriver 10 Connect the air coupler return the air cycle to its starting point and disconnect the air coupler Drawing 10 When doing this the nose will come forward keep t...

Page 13: ...een in the nose tip Drawing 1 A when disconnecting the air coupler 1 Remove any rivets still attached to the machine as well as all broken off mandrels Wipe off any dirt that may be adhering to part D...

Page 14: ...er the fuel inlet with the thumb and turn the riveter upside down to move the air in the hydraulic chamber into the booster cylinder Drawing 4 7 Bring the fuel inlet slowly back to the top again and r...

Page 15: ...ll the finished tape and put it in the magazine upwards 3 Feed the tip of the tape 3 After removing the tape under the plate spring release the trigger and hook the first guide hole on the back of the...

Page 16: ...air fitting supplied with the KingSet tools has an On Off flow valve built into it To operate the valve do the following 1 Push the female Quick connect hose fitting over the male fitting on the King...

Page 17: ...17 TROUBLESHOOTING RK 4500 Trouble Countermeasures...

Page 18: ...e and refilling as described in step 5 and check that the gap in Drawing 1 A has disappeared The grease around the 3 part jaw has dried so the jaw has become stuck to the jaw case Clean the jaw apply...

Page 19: ...8 Diffuser Pin MCS 1 1 RK4500 104 Cap Bolt SUS M5x20 4 4 RK4500 29 Centering Spring 2 2 RK4500 105 Torx Head Cap Bolt SUS M5x25 2 2 RK4500 30 Alarm Valve Screw 1 1 RK4500 106 Button Head Cap Bolt SUS...

Page 20: ...Cap Bolt SUS M3x12 2 2 RK4500 409 Inline Hook 1 1 RK4500 151 Mandrel Collector Housing 1 1 RK4500 410 Retaining Ring E Ring 1 1 RK4500 162 Magazine Latch 1 1 RK4500 421 Vacuum Tube Support 1 1 Exclusi...

Page 21: ...RK4500 646 Booster Cylinder Sub Assmbly 1 1 RK4500 617 Magazine Assembly 6 1 RK4500 649 Filter Assembly 1 1 RK4500 618 3 piece Jaw Set 5 1 RK4500 651 Centering Finger Sub Assembly 2 2 RK4500 619 3 pie...

Page 22: ...00 641 KS5 Nose Sub Assembly 5 1 Kit 604 Part RK4500 604 KS5 Alarm Valve Ass y KCK Part IRF Part Part Name Q ty 11 RK4500 011 KS5 Valve Block 5 1 20 RK4500 020 KS Relief Valve Spring 1 21 RK4500 021 K...

Page 23: ...640 RK4500 640 KS Trigger Valve Sub Assmbly 1 Kit 610 Part RK4500 610 KS5 Casing Ass y KCK Part IRF Part Part Name Q ty 87 RK4500 087 KS Mini Y packing 24 1 89 RK4500 089 KS Penta Seal 24 1 96 RK4500...

Page 24: ...atch Box 1 41 RK4500 041 KS Cap Shaft MCS 1 78 RK4500 078 KS O ring S40 1 80 RK4500 080 KS O ring S4 1 98 RK4500 098 KS SUS E Ring E2 2 130 RK4500 130 KS O ring P28 1 132 RK4500 132 KS Socket Head Cap...

Page 25: ...500 025 KS Centering Shaft 2 29 RK4500 029 KS Centering Spring 2 114 RK4500 114 KS Socket Set Screw SUS M3x6 Flat Point 2 205 RK4500 205 KS6 Centering Finger Base 6 1 651 RK4500 651 KS Centering Finge...

Page 26: ...13 RK4500 013 KS Ejector Nozzle 1 14 RK4500 014 KS Diffuser 1 28 RK4500 028 KS Diffuser Pin MCS 1 116 RK4500 116 KS O ring S6 1 133 RK4500 133 KS Steel Ball 3mm 2 151 RK4500 151 KS Mandrel Collector H...

Page 27: ...27...

Page 28: ...28...

Page 29: ...Aid SKIN Remove contaminated clothing and shoes and wipe excess from skin Flush skin with water and then wash with soap and water If irritation occurs get medical attention Do not reuse clothing unti...

Page 30: ...failure including without limitation evidence of the date of purchase and date of installation This warranty is in lieu of all other warranties expressed or implied including merchantability or fitnes...

Reviews: