RIX Industries
040910-01
Page 16
4.
Install the valve seat into the 2
nd
stage head valve pocket, aligned with the pin and pushing
down squarely to engage the O-ring properly.
5.
Install pin and O-ring in the installed valve seat.
6.
Install the suction reed, aligned with the pin. Ensure the free end of the reed flap will sit
over the 4 round blind holes on the valve seat. Installing the reed upside down will result in
improper valve operation.
7.
Install valve stop and final O-ring in the 2
nd
stage valve pocket.
8.
Install the head per
Section 7.3.
7.5
Compression Cylinders
The compression cylinders must be removed to service the rings and pistons. The 2
nd
stage has a
removable liner. There is no scheduled maintenance required on the cylinder or liner.
Remove the 1
st
and 2
nd
stage compression cylinders referencing
Figure 2
and using the following
procedure:
1.
Remove the head per
Section 7.3
2.
Rotate the flywheel to position the 1
st
stage piston at bottom dead center.
3.
Slide 1
st
stage cylinder off piston, using caution to prevent side loading the piston/rod
assembly and damage to the shims. It may be necessary to either lean back or elevate the
compressor to complete this task.
4.
Remove 2
nd
stage guide cylinder and liner.
5.
Clean and inspect the cylinder bore for wear or damage (see
Section 5.8
). Wear must be
within the tolerance specified in
Section 7.10
.
Reinstall the compression cylinder and liner in the reverse sequence of removal.
7.6
Compression Rings
To replace the compression rings, reference
Figure 2
and follow the instructions below:
1.
Remove the heads and cylinders per
Sections 7.3
and
7.5
. The 2
nd
stage piston will be lifted
out with the 2
nd
stage liner; remove the piston from the liner with a soft punch.
2.
Remove and discard the used compression rings, expanders, and rider rings. An O-ring pick
(P/N 88-5812) is helpful for removing used rings.
To reinstall the piston, follow the instructions below:
Summary of Contents for 2PS-15-115
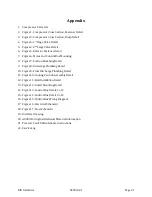
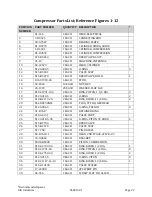
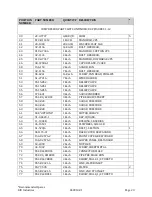
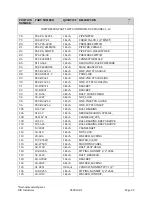
Page 37: ...RIX Industries 040910 01 Page 28 FIGURE 1 COMPRESSOR CROSS SECTION FASTENER DETAIL ...
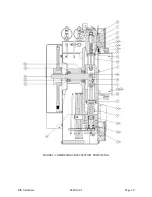
Page 38: ...RIX Industries 040910 01 Page 29 FIGURE 2 COMPRESSOR CROSS SECTION PUMP DETAIL ...
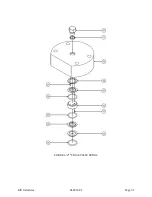
Page 39: ...RIX Industries 040910 01 Page 30 FIGURE 3 1ST STAGE VALVE DETAIL ...
Page 40: ...RIX Industries 040910 01 Page 31 FIGURE 4 2ND STAGE VALVE DETAIL ...
Page 41: ...RIX Industries 040910 01 Page 32 FIGURE 5 EXTERIOR FASTENER DETAIL ...
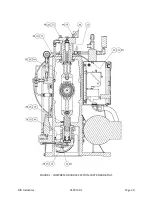
Page 42: ...RIX Industries 040910 01 Page 33 FIGURE 6 MOTOR AND CONTROL BOX MOUNTING ...
Page 43: ...RIX Industries 040910 01 Page 34 FIGURE 7 SUCTION PLUMBING DETAIL ...
Page 44: ...RIX Industries 040910 01 Page 35 FIGURE 8 INTERSTAGE PLUMBING DETAIL ...
Page 45: ...RIX Industries 040910 01 Page 36 FIGURE 9 FINAL DISCHARGE PLUMBING DETAIL ...
Page 46: ...RIX Industries 040910 01 Page 37 FIGURE 10 COOLING FAN SUB ASSEMBLY DETAIL ...
Page 47: ...RIX Industries 040910 01 Page 38 FIGURE 11 BELT INSTALLATION DETAIL ...
Page 48: ...RIX Industries 040910 01 Page 39 FIGURE 12 GUARD MOUNTING DETAIL ...
Page 49: ...RIX Industries 040910 01 Page 40 FIGURE 13 CONTROL BOX DETAIL 1 OF 2 ...
Page 50: ...RIX Industries 040910 01 Page 41 FIGURE 14 CONTROL BOX DETAIL 2 OF 2 ...
Page 51: ...RIX Industries 040910 01 Page 42 FIGURE 15 CONTROL BOX WIRING DIAGRAM ...
Page 52: ...RIX Industries 040910 01 Page 43 FIGURE 16 ELECTRICAL SCHEMATIC ...
Page 53: ...RIX Industries 040910 01 Page 44 FIGURE 17 FLOW SCHEMATIC ...
Page 57: ......
Page 58: ......


