background image

IMS01P06-E2


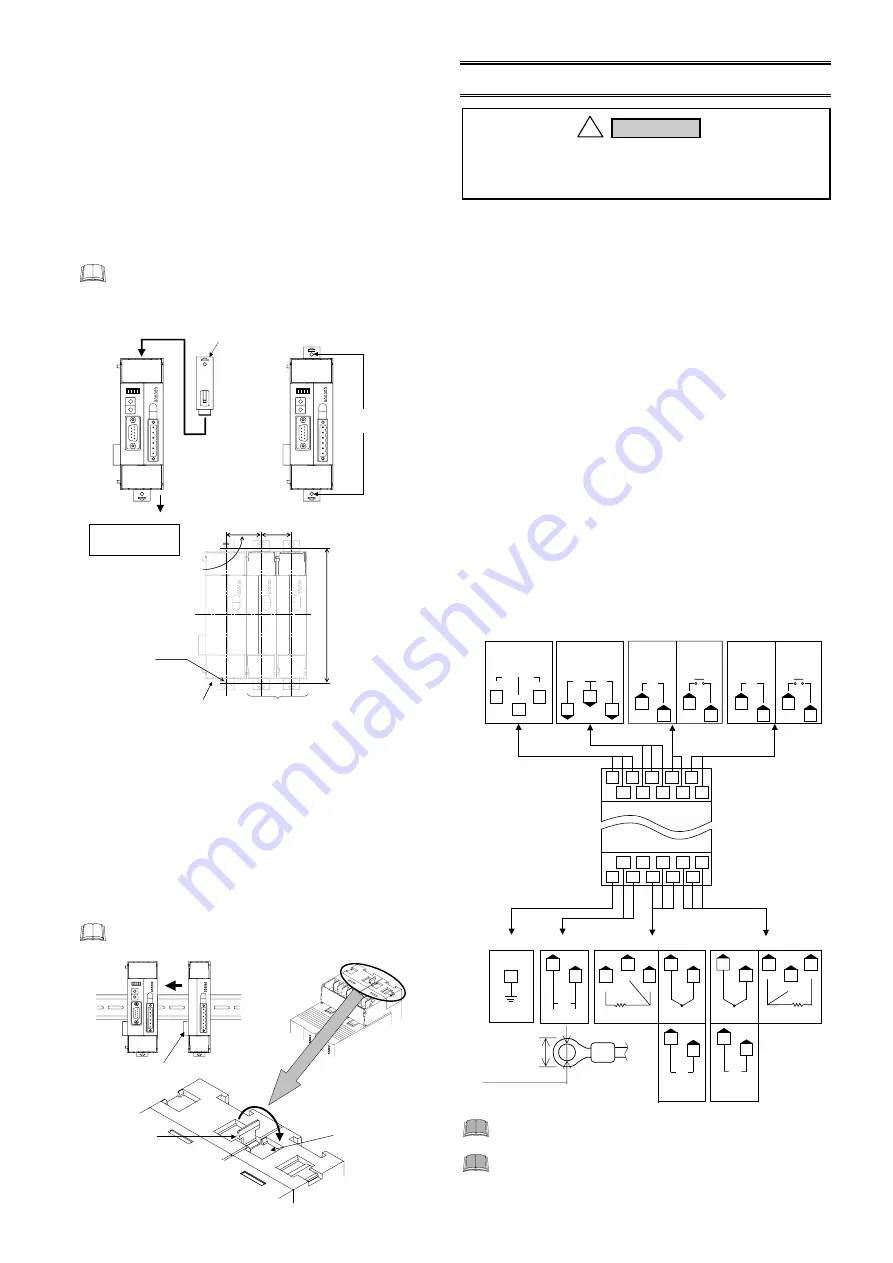
5.4 Panel Mounting 


Mounting procedures 

1. 

Pull down the mounting bracket (A) until locked and that a 
mounting hole appears. 

2. 

Prepare one mounting bracket per module (B) sold 
separately (KSRX-55) and then insert it in the rear of the 
terminal board at top of the module until locked but a 
mounting hole does not disappear. 

3. 

Mount each module directly on the panel with screws which 
are inserted in the mounting holes of the top and bottom 
mounting brackets. 

Recommended tightening torque: 0.3 N

m (3 kgf

cm) 

The customer needs to provide the M3 size screws. 
Select the screw length that matches the mounting 
panel. 


Mounting bracket 

(Sold separately) 

(A) Pull down 

(B) Insert 

(KSRX-55) 

Mounting 

holes 


130.

±

 0.

35.25 

±

 0.2 

30 

±

 0.2 

M3 

Module of 40.5 mm wide 

Module of 30 mm wide 


5.5 Jointing Each Module 

Up to 30 modules (V-TIO-A, V-TIO-B, V-TIO-C or V-TIO-D) can 
be connected to one module (V-TIO-G or V-TIO-H).


Joint these 

modules according to the following procedure. 


Jointing procedure 

1. 

Mount the modules on the DIN rail and then joint these 
modules together with the joint connector while sliding the 
relevant module. 

2. 

Lift each of the joint tabs located at the top and bottom of the 
module and then insert it in the slot of the adjacent module to 
fix these two modules. 


For panel mounting, first joint each module and then 
mount it on the panel.


Joint tab

When viewed 
from top 

There is one joint tab at each 
of the top and bottom of on 
module. Therefore, fix two 
adjacent modules with these 
two joint tabs. 

Joint tab 
insertion slot

Joint connector


6. WIRING 


6.1 Wiring Cautions 


For thermocouple input, use the appropriate compensation 
wire.


For RTD input, use low resistance lead wire with no 
difference in resistance between the three lead wires.


To avoid noise induction, keep input signal wire away from 
instrument power line, load lines and power lines of other 
electric equipment.


If there is electrical noise in the vicinity of the instrument that 
could affect operation, use a noise filter.


- Shorten the distance between the twisted power supply wire 

pitches to achieve the most effective noise reduction.


- Always install the noise filter on a grounded panel.  

Minimize the wiring distance between the noise filter output 
and the instrument power supply terminals to achieve the 
most effective noise reduction.


- Do not connect fuses or switches to the noise filter output 

wiring as this will reduce the effectiveness of the noise filter.


Power supply wiring must be twisted and have a low voltage 
drop.


For an instrument with 24 V power supply, supply power from 
a SELV circuit.


6.2 Terminal Configuration 


CT1

T/R(B)

SG

T/R(A)

RS-485

Internal communication

or 

Host communication 

CT input 

Control output 1 

Control output 2

15

Relay contact 

NO 

OUT1 

Voltage pulse/ 

Current/ 

Voltage 

OUT1 

+


3

6

7

16

17

+

24 V

DC

Power supply

Ground

Thermocouple 

TC1 

+


Input channel 1 

Voltage/ 

Current 

IN1 

+


RTD 

RTD1

B

A

NO

OUT2

OUT2

+

4

1

4

1

10

13

10

14

13

13

10

TC2

+


IN2

+


12

8

12

12

RTD2

B

B

A

9

Input channel 2

19

18

20

FG

16 15  3 

17

20 19  14  13  12 

18 11  10  9 

Upper-side terminal

CT2

Relay contact

Voltage pulse/

Current/ 

Voltage 

Lower-side terminal

Thermocouple

RTD

Voltage/ 

Current 

Voltage/ 

Current


For heat/cool PID control (V-TIO-H), Input channel 2 
becomes unused. 


For heat/cool PID control (V-TIO-H), Control output 1 
corresponds to the heating output and Control 
output 2 corresponds to the cooling output. 


Mounting 
dimensions 


To prevent electric shock or instrument failure, do not  
turn on the power until all the wiring is completed. 

!

WARNING 

5.9 mm or less

3.2 mm or more

Recommended tightening torque: 
 0.4 

N

m (4 kgf

cm) 

Summary of Contents for V-TIO-G

Page 1: ...nals must be enclosed in the instrumentation panel to avoid electric shock by operating personnel All precautions described in this manual should be taken to avoid damage to the instrument or equipment All wiring must be in accordance with local codes and regulations All wiring must be completed before power is turned on to prevent electric shock instrument failure or incorrect action The power mu...

Page 2: ...mon code Thermocouple input Type Code Range Code Range K K02 0 to 400 C KB9 32 to 752 F K04 0 to 800 C KB8 32 to 1472 F K16 200 to 1372 C KB7 328 to 2501 F K09 0 0 to 400 0 C KC2 32 0 to 752 0 F K35 200 0 to 400 0 C KC1 328 0 to 752 0 F J J02 0 to 400 C JC2 32 to 752 F J04 0 to 800 C JC1 32 to 1472 F J15 200 to 1200 C JB9 328 to 2192 F J09 0 0 to 400 0 C JC4 32 0 to 752 0 F J27 200 0 to 400 0 C JC...

Page 3: ... A green lamp turns on RX TX for PROFIBUS communication During data send and receive A green lamp turns on 4 COMMUNICATION SETTING Set communication setting before mounting and wiring of SRV Do not separate the module mainframe from the terminal base with the power turned on If separated adjusted data may be destroyed control be stopped and no return can be made 4 1 Address Setting PROFIBUS addres...

Page 4: ...protocol Modbus Factory set value of the dip switch 1 No 1 OFF No 5 OFF No 2 OFF No 6 OFF No 3 OFF No 7 OFF No 4 OFF No 8 OFF For host communication Modbus see the Module Type Controller SRV Communication Instruction Manual IMS01P01 E 4 3 Host Communication Setting With the dip switch 2 which there is on the right side of module select communication speed for host communication When host communica...

Page 5: ... connector but the same also when not provided with the connector Depth in connector mounting Conduct installation in consideration of the sizes of the connector and cable when connector connected Unit mm Provide space in consideration of the sizes of using the connector and cable when connector connected 110 5 3 DIN rail Mounting Mounting procedures 1 Pull down the mounting bracket at the bottom ...

Page 6: ...sistance between the three lead wires To avoid noise induction keep input signal wire away from instrument power line load lines and power lines of other electric equipment If there is electrical noise in the vicinity of the instrument that could affect operation use a noise filter Shorten the distance between the twisted power supply wire pitches to achieve the most effective noise reduction Alwa...

Page 7: ...or the event output option Event connector socket 1 6 Circuit configuration 24 V DC 1 2 3 DI 4 5 6 Load DO1 DO2 Load Attention in connector plug wiring Use the following connector plug as that connected to the event connector Connector plug is sold separately SRVP 01 Front screw type SRVP 02 Side screw type The lead wires use the stranded wire Use the stranded wire from size 0 2 to 2 5 mm2 AWG 24 ...

Page 8: ...Autotuning function Events Number of events 2 points channel Event type Temperature event Deviation high Deviation low Deviation high low Band Process high Process low Heater break alarm Control loop break alarm Burnout Temperature rise completion Heater break alarm HBA function Number of HBA 2 points Setting range 0 0 to 100 0 A 0 0 A OFF Additional function Number of event delay times 1 to 255 t...

Reviews: