background image

EAGLE 2 Operator’s Manual

Maintenance • 193

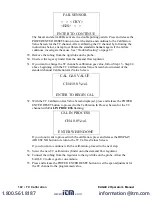
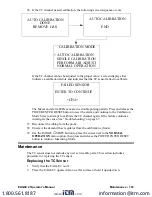
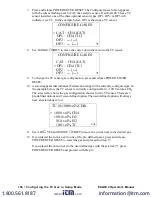
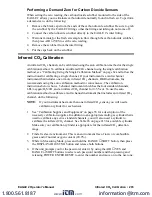
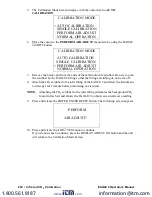
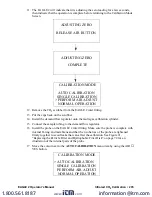
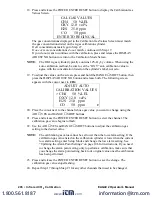
36. If the TC channel passed calibration, the following screen sequence occurs.

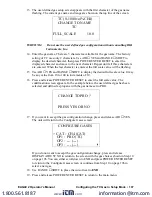
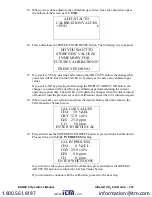
If the TC channel cannot be adjusted to the proper value, a screen displays that 

indicates a calibration failure and indicates that the TC sensor failed to calibrate.

The buzzer and alarm LEDs activate in a double pulsing pattern. Press and release the 

POWER ENTER RESET button to reset the alarm and continue to the Calibration 

Mode Screen. Attempt to calibrate the TC channel again. If the failure continues, 

investigate the cause. See “Troubleshooting” on page 67.

37. Disconnect the tubing from the probe.
38. Unscrew the demand flow regulator from the calibration cylinder.
39. Use the RANGE 

 SHIFT button to place the cursor next to the 

NORMAL 

OPERATION

 menu option, then press and release the POWER ENTER RESET 

button to return to Measuring Mode.

Maintenance

The TC sensor does not include any user serviceable parts. This section includes a 

procedure for replacing the TC sensor.

Replacing the TC Sensor

1. Verify that the EAGLE 2 is off.
2. Place the EAGLE 2 upside down on a flat surface or hold it upside down.

AUTO CALIBRATION

DONE 

REMOVE GAS 


AUTO CALIBRATION

END  


CALIBRATION MODE

> AUTO CALIBRATION  

  SINGLE CALIBRATION

  PERFORM AIR ADJUST

NORMAL OPERATION

FAILED SENSOR 

 ENTER TO CONTINUE  

 <CH4>          

www.

.com

information@itm.com

1.800.561.8187

Summary of Contents for EAGLE 2

Page 1: ...EAGLE 2 Operator s Manual Part Number 71 0154RK Revision CC Released 3 12 19 www com information itm com 1 800 561 8187...

Page 2: ...ance of the gas monitor is essential for proper operation and correct readings Please calibrate and maintain this instrument regularly Frequency of calibration depends upon the type of use you have an...

Page 3: ...1 Optional Accessories 23 Rechargeable Ni MH Batteries 23 Battery Chargers 23 Optional Probes 24 External Dilution Fittings 26 Chapter 3 Operation 27 Overview 27 Start Up 27 Turning On the EAGLE 2 27...

Page 4: ...t in Auto Calibration 58 Calibrating Using the Single Calibration Method 62 Setting the Fresh Air Reading 62 Performing a Span Adjustment in Single Calibration 63 Chapter 5 Maintenance 67 Overview 67...

Page 5: ...lay Setting 110 Updating the Auto Fresh Air Setting 110 Updating the Data Log Interval Setting 111 Updating the Data Log Overwrite Setting 111 Updating the Data Log Memory Setting 112 Updating the LCD...

Page 6: ...nsor 156 Configuring the PID Gas in Setup Mode 157 Parts List 162 Appendix E ESM 01 Toxic Sensors 164 Overview 164 Description 164 ESM 01 Sensor 165 ESM 01 Sub PCB 165 Start Up and Normal Operation 16...

Page 7: ...15 Infrared Sub PCB 216 Start Up and Normal Operation 216 Detection Ranges 216 Catalytic LEL Sensor Screen 216 Infrared Methane Calibration 217 Maintenance 224 Replacing the IR Methane Sensor 224 Part...

Page 8: ...Off the EAGLE 2 Leak Check Mode 255 Appendix M EAGLE 2 Tank Tester Model 256 Description 256 Float Probe Assembly 257 Dilution Fitting 1 1 257 Start Up 258 Alarms 259 Calibration 260 Parts List 260 A...

Page 9: ...ts NOTE RKI Instruments Inc recommends that you refer to ISA RP12 13 Part II 1987 or an equivalent international recommended practice for guidance in the use of combustible gas detection instruments w...

Page 10: ...ne to six gases The standard configuration includes four sensors for combustible gas LEL ppm and volume oxygen carbon monoxide CO and hydrogen sulfide H2S Choice of three operating modes Normal Mode f...

Page 11: ...threatening When using the EAGLE 2 you must follow the instructions and warnings in this manual to assure proper and safe operation of the unit and to minimize the risk of personal injury Be sure to m...

Page 12: ...ration method the calibration gas value must be equal to or higher than the alarm 1 setting See Updating the Alarm Point Settings on page 106 for instructions to change the alarm points if necessary f...

Page 13: ...arged Ni MH Batteries 18 Hours Non Alarm Operation Fully Charged Case High impact Plastic RF Shielded Dust and Weather Proof Standard Accessories 5 foot hose Hydrophobic probe Shoulder Strap Optional...

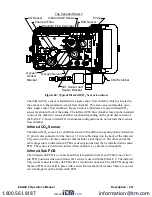
Page 14: ...EAGLE 2 includes the case sensors LCD control buttons printed circuit boards alarm LEDs infrared communication port buzzer battery case and batteries and flow system Figure 1 Component Location Top V...

Page 15: ...t Location Side View Figure 3 Component Location Front Back Top Case Bottom Case Strap Case Foot 6X Handle Case Screw 3X Hidden From view Buzzer Inlet Fitting Exhaust Fitting Battery Case Thumbscrew C...

Page 16: ...on Dioxide Sensors for a description of the IR CO2 sensors Appendix H Infrared Methane Sensor for a description of the IR methane sensors and Appendix I Infrared Hydrocarbon Sensor for a description o...

Page 17: ...still appear on the channels that are programmed for those gases LCD A digital LCD liquid crystal display is visible through a clear plastic window in the top case The LCD simultaneously shows the gas...

Page 18: ...e but it is involved in the replacement of sensors so it is described below RANGE SHIFT changes the detection units of the combustible gas channel when Catalytic Units is set to CHANGE OK in Setup Mod...

Page 19: ...D one above the left corner and one above the right corner The alarm LEDs alert you to gas low battery and failure alarms Infrared Communications Port An infrared IR communications port is located on...

Page 20: ...The Ni MH batteries can be recharged by using the EAGLE 2 charger see Replacing or Recharging the Batteries on page 69 NOTE Use of batteries or battery chargers not specified by RKI Instruments Inc w...

Page 21: ...readings are noticed especially in the presence of H2S change the charcoal filter The charcoal inside the filter cannot be replaced the entire filter must be replaced Exhaust Fitting The exhaust fitt...

Page 22: ...n and increased response time Consult RKI Instruments Inc for hose lengths longer than 125 feet The probe includes a replaceable particle filter and hydrophobic filter disk that prevent particulates a...

Page 23: ...s See General Parts List on page 79 for ordering information Battery Chargers Three battery chargers are available for the EAGLE 2 to charge the optional Ni MH batteries the standard AC charger a DC c...

Page 24: ...ailable for the EAGLE 2 They include the following 30 inch aluminum probe Figure 9 30 Inch Aluminum Probe This probe is designed for applications where it is necessary to put the probe tip in areas th...

Page 25: ...be Figure 12 Barhole Probe This probe is designed specifically for barhole testing See Appendix K Using the EAGLE 2 in Bar Hole Mode for an in depth discussion of using the EAGLE 2 in Bar Hole Mode 10...

Page 26: ...t fitting and accept a sample hose or probe The fittings are made with brass and nickel plated brass and are appropriate for use with the four standard gases The 1 1 fitting is normally used when it i...

Page 27: ...he EAGLE 2 get it ready for operation and turn it off NOTE The screens illustrated in this section are for a standard 4 gas unit The screens displayed by your EAGLE 2 may be slightly different Turning...

Page 28: ...or allow the countdown to reach 0 If you do not press the AIR YES button within the 5 second countdown the EAGLE 2 automatically resumes accumulating the peak and TWA readings The EAGLE 2 will also co...

Page 29: ...LE 2 will enter Calibration Mode and the LCD will show the Calibration Mode main menu See Chapter 4 Calibration Mode on page 54 for instructions to calibrate the EAGLE 2 When you are done with the cal...

Page 30: ...calibration and exit Calibration Mode the unit will begin the startup sequence If the calibration was successful the screen above will not appear again until the unit is due for calibration If the ca...

Page 31: ...rrent gas reading for each target gas Performing a Demand Zero Before using the EAGLE 2 it is recommended to set the fresh air readings for the target gases by performing a demand zero This will set t...

Page 32: ...r s continuous operation mode to power the EAGLE 2 only if NiMH batteries are installed in the EAGLE 2 or if no batteries are installed in the EAGLE 2 Do not use the charger for continuous operation i...

Page 33: ...ring area Put the probe tip in the area to be monitored NOTE If the particle filter or hydrophobic filter become dirty or clogged replace them If water enters the probe dry out or replace the particle...

Page 34: ...nsult RKI Instruments Inc for exhaust tubing lengths longer than 20 feet Combustible Gas Detection There are three issues to keep in mind when monitoring for combustible gas The catalytic combustible...

Page 35: ...combustible gas reading on the catalytic combustible channel followed by a declining or erratic reading may indicate a gas concentration above the LEL which may be hazardous Table 5 Full Response Mod...

Page 36: ...ble this capability and set the EAGLE 2 to display only one of the detection units by using the Catalytic Units menu item in Setup Mode See Setting the Catalytic Detection Units on page 105 for instru...

Page 37: ...nit readings will still increase up to 100 LEL and 15 volume respectively which are equivalent to 150 000 ppm The catalytic combustible sensor is slightly affected by humidity This is not apparent whe...

Page 38: ...are in Display Mode the EAGLE 2 will automatically bring up the alarm screen instead When a failure condition occurs such as a sensor failure low flow or dead battery condition the unit will also soun...

Page 39: ...an set latching alarms with or without the alarm silence feature see Updating the Alarm Silence Setting on page 108 Over Range OVER appears next to gas reading Gas reading indicates full scale Alarm L...

Page 40: ...e gas reading falls below or rises above for an oxygen low alarm an alarm setpoint the alarm will automatically reset The LED arrays turn off and the EAGLE 2 alarm indications on the display turn off...

Page 41: ...ensor Failure Alarms 1 Determine which sensor has triggered the sensor failure alarm 2 Try calibrating the sensor first as described in Chapter 4 Calibration Mode on page 54 before replacing it 3 If t...

Page 42: ...r 20 seconds If you do not press a button within 20 seconds the EAGLE 2 automatically returns to Measuring Mode Peak Screen The peak screen displays the highest lowest for oxygen concentrations detect...

Page 43: ...e with automatic scrolling or one at time with manual scrolling The factory setting displays all of the active channels at the same time To select how to display the active channels do the following 1...

Page 44: ...d press and release the AIR YES or RANGE SHIFT button to toggle to the desired setting ENABLED or DISABLED 2 Press and release the POWER ENTER RESET button The unit will save the setting and proceed t...

Page 45: ...ible channel to the desired target gas 1 With the Relative Response Screen displayed press and release AIR YES A list of gases will appear on the screen with EXIT at the top of the list There are mult...

Page 46: ...STEL Screen displays the short term exposure limit STEL readings for H2S and CO only The STEL reading is the average reading over the last 15 minutes TWA Screen The TWA Screen displays the time weigh...

Page 47: ...f alarm settings is too many to display on one screen a down arrow will appear in the lower right corner of the display indicating that there are additional alarm points Press and release the RANGE SH...

Page 48: ...ration and have each user ID that was used during an operating session saved for the corresponding data See the Eagle 2 Data Logger Management Program Operator s Manual for a detailed description of d...

Page 49: ...without saving a change press and release the DISPLAY ADJUST NO button You will return to the Select User ID screen without saving the user ID change 4 The unit will save the selected user ID as the c...

Page 50: ...shown as dashes 2 Use the AIR YES and RANGE SHIFT buttons to move the cursor up and down the screen and scroll through the available station IDs to find the desired station ID 3 When the desired stat...

Page 51: ...ry is full and asks if you want to clear the data logger memory To return to Measuring Mode while at the Data Logging Screen press and release the DISPLAY ADJUST NO button To clear the data logger mem...

Page 52: ...downloadable data will be logged while it is in either of these two modes The EAGLE 2 features the ability to log data to its internal memory and download it to a computer via the infrared communicati...

Page 53: ...a Log Interval Setting on page 111 for instructions on setting the data logging interval time For a complete description of the Data Logger Management Program and procedures for downloading data to a...

Page 54: ...ONCENTRATION the LEL full scale is 100 LEL ACCURACY MUST BE WITHIN 0 to 20 OF ACTUAL ACCURACY MAY BE CORRECTED BY FOLLOWING THE CALIBRATION INSTRUCTIONS FOR THE COMBUSTIBLE CHANNEL BELOW If the combus...

Page 55: ...in the range of 10 16 oxygen A demand flow regulator to provide adequate sample gas flow WARNING RKI Instruments Inc recommends that you dedicate a regulator for use with chlorine Cl2 gas and that you...

Page 56: ...cursor next to AUTO CALIBRATION NOTE The following screens illustrate a four gas EAGLE 2 for detection of CH4 LEL using catalytic sensor oxygen H2S and CO Your EAGLE 2 may display slightly different s...

Page 57: ...UST NO button and the unit will return to the Calibration Mode Screen 4 The EAGLE 2 will indicate that it is adjusting the zero reading for a few seconds then indicate that the operation is complete b...

Page 58: ...on Gas Values Screen must match the gas concentrations listed on the 4 gas calibration cylinder If all concentrations match go to Step 16 If one or more concentrations do not match continue with Step...

Page 59: ...bration has been performed 10 Press and release the POWER ENTER RESET button to save the change The calibration gas value stops flashing 11 Repeat Step 7 through Step 10 for any other channels that ne...

Page 60: ...bration proceed to the next step 17 Connect the tubing from the demand flow regulator to the rigid tube on the probe Allow the EAGLE 2 to draw gas for one minute NOTE If you are calibrating the cataly...

Page 61: ...ease the POWER ENTER RESET button to reset the alarm and return to the Calibration Mode Screen Attempt to calibrate again If the failure continues investigate the cause See Troubleshooting on page 67...

Page 62: ...ration Mode Screen move the cursor to the PERFORM AIR ADJUST menu item by using the RANGE SHIFT button 2 Press and release the POWER ENTER RESET button The following screen appears 3 Press and release...

Page 63: ...e sure the probe is complete with internal O ring and membrane and that the two halves of the probe are tightened firmly together to avoid leaks that can affect the calibration See Figure 21 Replacing...

Page 64: ...Value Screen for the selected channel The calibration gas value is flashing 8 If necessary adjust the calibration gas value to match the cylinder concentration with the AIR YES and RANGE SHIFT buttons...

Page 65: ...tion of the sensor If the calibration gas value is in the adjustment range the span adjustment will pass If the calibration gas value is out of the adjustment range the span adjustment will fail If th...

Page 66: ...of oxygen listed on the cylinder s label For oxygen free samples 100 nitrogen for example set the oxygen calibration value to 0 0 15 After the last channel is calibrated disconnect the calibration tu...

Page 67: ...batteries or recharge the Ni MH batteries 3 If the difficulties continue contact RKI Instruments Inc for further instruction The LCD shows abnormally high or low readings but other gas detection inst...

Page 68: ...ains an adequate supply of fresh test sample 5 If the fail condition continues replace the sensor s 6 If the difficulties continue contact RKI Instruments Inc for further instruction Display indicates...

Page 69: ...Ni MH batteries to maintain the CSA classification of the EAGLE 2 Use of other batteries or mixing alkaline and rechargeable batteries will void the CSA classification and may void the warranty 1 Tur...

Page 70: ...2176RK or 49 2177RK Use of other rechargeable batteries or chargers or charging of other rechargeable batteries in the EAGLE 2 will void the warranty WARNING Do not plug the charger cable into a batte...

Page 71: ...ries are charging the green indicator LED will be off and the amber one will be on 7 The charging module has an internal timeout feature set at 9 5 hours A full charge should be reached in less than 9...

Page 72: ...ings in the probe if either of them appears damaged 1 Grasp each end of the clear probe body firmly and unscrew the two halves from each other One half includes a plastic tube fitting and the probe tu...

Page 73: ...ow flow alarm occurs when you cover the end of the probe tube with your finger if a low flow alarm does not occur hand tighten the probe further if a low flow alarm still does not occur when you cover...

Page 74: ...y onto the filter s hose barbs 9 Confirm that the main PCB is seated in its slots and that its bottom edge is resting on the bottom of the bottom case If the main PCB is not seated properly then it ma...

Page 75: ...e flow system 6 Locate the charcoal filter It is next to the CO sensor at the front of the flow chamber Figure 23 Replacing the Charcoal Filter 7 Grasp the black charcoal filter endcap and pull it off...

Page 76: ...span adjustment note the adjustment range on the result screen as described in Step 12 and Step on page 65 3 A new sensor can typically be adjusted to more than twice the calibration gas concentration...

Page 77: ...nsor stayed in the flow chamber grasp the sensor and pull it out of the flow chamber 8 To remove the oxygen sensor do the following Unscrew the two screws that hold the oxygen sensor bracket a few tur...

Page 78: ...om the main PCB to disconnect it from the main PCB 10 Install the new sensor 11 To install the LEL sensor do the following Plug the replacement sensor into the sensor connector on the LEL sensor cable...

Page 79: ...1 General Parts List Part Number Description 06 1248RK 03 Calibration kit tubing 3 foot length 07 7210RK O ring for inlet fitting half of probe 07 7304RK O ring for tube half of probe 13 1061RK Panel...

Page 80: ...xygen sensor 65 2005RK Carbon monoxide CO sensor 71 0154RK Operator s Manual EAGLE 2 this document 71 0170RK Operator s Manual Eagle 2 Data Logger Management Program 71 8003RK EAGLE 2 Product CD inclu...

Page 81: ...cylinder 34 liter aluminum four gas CH4 O2 H2S CO 81 1054RK Regulator demand flow type for 34 liter aluminum 58 liter 103 liter calibration cylinders cylinders with internal threads 81 1055RK Regulat...

Page 82: ...low regulator kit This appendix describes how to use a sample bag calibration kit to calibrate the EAGLE 2 A parts list at the end of this appendix lists spare parts for the calibration kit Calibratio...

Page 83: ...ispensing valve WARNING RKI Instruments Inc recommends that you dedicate a regulator for use with chlorine Cl2 gas and that you do not use that dedicated regulator for any other gases particularly hyd...

Page 84: ...libration cylinder and is the quickest and most convenient method to calibrate the EAGLE 2 Setting the Fresh Air Reading 1 While in the Calibration Mode Screen move the cursor to the PERFORM AIR ADJUS...

Page 85: ...Make sure the probe is complete with internal O ring and membrane and that the two halves of the probe are tightened firmly together to avoid leaks that can affect the calibration See Figure 21 Replac...

Page 86: ...to the channel whose gas value you want to change using the AIR YES and RANGE SHIFT buttons 7 Press and release the POWER ENTER RESET button to select the channel The calibration gas value begins to f...

Page 87: ...is turned off and will load the previous set of auto calibration values when it is turned on again 14 When you make your selection and press the desired button the unit returns to the Calibration Gas...

Page 88: ...ubing from the regulator or dispensing valve 21 Open the hose clamp on the gas bag tubing 22 Connect the tubing from the gas bag to the rigid tube on the probe Allow the gas to flow for one minute NOT...

Page 89: ...the cursor next to the NORMAL OPERATION menu option then press and release the POWER ENTER RESET button to return to Measuring Mode Calibrating Using the Single Calibration Method Single Calibration a...

Page 90: ...e other end of the tubing to the regulator s or dispensing valve s hose barb fitting 3 Install the probe on the EAGLE 2 inlet fitting Make sure the probe is complete with internal O ring and membrane...

Page 91: ...elease the DISPLAY ADJUST NO button or place the cursor next to ESCAPE and press and release POWER ENTER RESET to return to the Calibration Mode Screen If you do want to continue with the calibration...

Page 92: ...ttle over half full 12 Turn the knob clockwise to stop the gas flow clamp down the hose clamp and remove the regulator or dispensing valve from the cylinder 13 Disconnect the tubing from the regulator...

Page 93: ...If the failure continues investigate the cause See Troubleshooting on page 67 NOTE The adjustment range will only appear in the calibration results screen if the Span Factor item in Setup Mode is set...

Page 94: ...ibration kit tubing 3 foot length 81 0090RK 01 Calibration cylinder 3 gas mix LEL Oxygen CO 34 liter steel 81 0154RK 04 Calibration cylinder 4 gas mix LEL Oxygen CO H2S 34 liter aluminum 81 1001RK Dis...

Page 95: ...djust feature on or off set the data logging interval time turn the data logger overwrite feature on or off turn the data log memory clear feature on or off adjust the display contrast turn the calibr...

Page 96: ...by pressing and releasing the RANGE SHIFT button in the case of the down arrow or the AIR YES button in the case of the up arrow The example below illustrates a down arrow in the lower right corner U...

Page 97: ...AIR YES or RANGE SHIFT button to move the cursor up and down the menu items and to view additional menu items A down arrow in the lower right corner of the LCD or an up arrow in the upper right corner...

Page 98: ...e the setting and return to the main menu Setting the Battery Type This menu item allows you to select between alkaline and Ni MH batteries Since the discharge characteristics of alkaline and Ni MH ba...

Page 99: ...nd that its construction and flow system are appropriate for the installed sensors Operation of the EAGLE 2 with a flow system or construction not compatible with the installed sensors will result in...

Page 100: ...se optional sensors the target gas will appear instead of See Appendix C Sub PCBs on page 121 for a description of this optional hardware and how it affects CHANNEL CONFIGURATION 6 Press and release P...

Page 101: ...Appendix C Sub PCBs on page 121 for a description of this optional hardware and how it affects CONFIGURE GASES 3 To change the catalytic sensor gas configuration press and release POWER ENTER RESET 4...

Page 102: ...he detector voltage is set to 1 1 volts the catalytic sensor will not respond significantly to methane and many other combustible gases but will respond to hydrogen WARNING Do not configure the cataly...

Page 103: ...ination feature is active and the Methane Elimination Mode Screen is accessible in Display Mode See Methane Elimination Mode Screen on page 44 for a description of the Methane Elimination Mode Screen...

Page 104: ...or a description of the relative response feature and how to use it See Combustible Gas Detection on page 34 for a list of response factors for several common hydrocarbon gases that have already been...

Page 105: ...to the main menu 17 Be sure to perform a calibration on the catalytic combustible channel using an appropriate calibration cylinder for the target gas Setting the Catalytic Detection Units This menu...

Page 106: ...TIVE RESPONSE Press and release POWER ENTER RESET The Catalytic Sensor Relative Response screen appears with the current setting flashing 2 Use AIR YES or RANGE SHIFT to display the desired setting ON...

Page 107: ...gen alarm points you can also select one of the following operation modes low alarm decreasing and high alarm increasing FALLING AND RISING low and high alarm decreasing BOTH FALLING low and high alar...

Page 108: ...ars all alarm indications for that alarm If an alarm condition occurs you may still enter Display Mode by pressing the DISPLAY button The buzzer will be silenced but the LEDs will continue to flash If...

Page 109: ...tion cylinder that contains all required target gases for example the RKI 4 gas calibration cylinder The EAGLE 2 includes default auto calibration settings for most target gases For gases without a de...

Page 110: ...appears 3 Use AIR YES and RANGE SHIFT to adjust the time to the desired setting 4 Press and release POWER ENTER RESET to save the setting and return to the main menu Updating the Auto Fresh Air Setti...

Page 111: ...play the desired setting 4 Press and release POWER ENTER RESET to save the setting and return to the main menu Updating the Data Log Overwrite Setting With DATA LOG OVERWRITE set to ON factory setting...

Page 112: ...splay the desired setting 4 Press and release POWER ENTER RESET to save the setting and return to the main menu Updating the LCD Contrast Setting The contrast setting controls the LCD contrast Select...

Page 113: ...GLE 2 without calibrating Press and release DISPLAY ADJUST NO to continue without calibrating or AIR YES to perform a calibration With CAL PAST DUE ACT set to MUST CALIBRATE if the unit is due for cal...

Page 114: ...ct Screen appears when the unit is turned on You are able to select from Normal Mode Leak Check Mode and Bar Hole Mode With LC BH MODE SELECT set to BAR HOLE ONLY the Mode Select Screen appears when t...

Page 115: ...LLOWER setting is not intended for field adjustment The default setting for most target gases is ON The default setting for carbon dioxide channels and some configurations of non standard toxic gas ch...

Page 116: ...r Setup Mode NOTE If a calibration is due and CAL REMINDER is set to ON and CAL PAST DUE ACT is set to MUST CALIBRATE no password will be required to perform a calibration during startup With CHANGE P...

Page 117: ...LE 2 to its default configuration can be useful if various setup parameters have been changed in the field and you want to return the EAGLE 2 to its original configuration as shipped from the factory...

Page 118: ...cally starts new TWA and PEAK reading collection and resets the time in operation at startup With LUNCH BREAK set to ON the Resume Measurements Screen displays during startup From this screen you can...

Page 119: ...ces are English factory setting Spanish French Italian and German 1 From the main menu place the cursor next to SELECT LANGUAGE 2 Press and release POWER ENTER RESET The Select Language Screen appears...

Page 120: ...lease DISPLAY ADJUST NO The unit will begin its startup sequence without saving the changes If you do want to save the changes press and release AIR YES and continue with the next step 5 A confirmatio...

Page 121: ...n EAGLE 2 with three sub PCBs installed can theoretically support seven sensors if you include the standard four sensors the EAGLE 2 is only capable of having six active channels Description The main...

Page 122: ...ional sensor type supported by a sub PCB is indicated by OP1 OP2 or OP3 specifying which sub PCB position is mapped to that channel OP1 indicates a channel supported by the SUB1 PCB OP2 indicates a ch...

Page 123: ...he SUB1 PCB supports the sensor OP2 indicates that the SUB2 PCB supports the sensor and OP3 indicates that the SUB3 PCB supports the sensor The OP1 OP2 and OP3 identifiers also indicate that the senso...

Page 124: ...If you select an ESM 01 toxic or IR type of sensor to configure in this menu item a message will appear indicating that the gas configuration for this sensor is automatically detected by the EAGLE 2 a...

Page 125: ...ee Table 13 for specifications The PID sensor is installed in a single sensor flow chamber which is located in the area next to the standard 4 sensor flow chamber This area can accommodate up to three...

Page 126: ...nsor adapter is held in the PID flow chamber with two O rings which also seal around the sensor adapter PID Sub PCB The PID sub PCB is a circuit board that is installed on the main PCB in one of the 3...

Page 127: ...Start Up and Normal Operation For instructions to startup and use an EAGLE 2 that includes a PID sensor reference Start Up on page 27 Measuring Mode Normal Operation on page 33 and Measuring Mode Ala...

Page 128: ...a low range PID sensor installed It is possible to temporarily configure a PID channel for a target gas other than the factory setting in Display Mode See the next section PID Relative Response Featu...

Page 129: ...ntil you arrive at the PID Sensor Relative Response Screen 2 With the PID Sensor Relative Response Screen displayed press and release AIR YES A list of gases will appear on the screen with EXIT at the...

Page 130: ...00 00 1 0 5 0 5 0 1 0 PID 0 50 00 OFF OFF OFF OFF Target Gas Detection Range ppm Alarm 1 Factory Setting ppm Alarm 2 Factory Setting ppm STEL ppm TWA ppm Acetone 0 1000 500 750 750 500 Benzene 0 1000...

Page 131: ...e auto calibration method for convenience The calibration instructions below show a 5 channel instrument which has the four standard channels LEL oxygen H2S CO and a high range PID channel calibrated...

Page 132: ...n displays with the cursor next to AUTO CALIBRATION 6 Move the cursor to the PERFORM AIR ADJUST menu item by using the RANGE SHIFT button 7 Press and release the POWER ENTER RESET button The following...

Page 133: ...internal O ring and membrane and that the two halves of the probe are tightened firmly together to avoid leaks that can affect the calibration See Figure 21 Replacing the Particle Filter and Hydrophob...

Page 134: ...whose gas value you want to change using the AIR YES and RANGE SHIFT buttons 17 Press and release the POWER ENTER RESET button to select the channel The calibration gas value begins to flash 18 Use t...

Page 135: ...f and will load the previous set of auto calibration values when it is turned on again 24 When you make your selection and press the desired button the unit returns to the Calibration Gas Values Scree...

Page 136: ...e oxygen and H2S channels failed calibration The other sensors calibrated normally The buzzer and alarm LEDs activate in a double pulsing pattern Press and release the POWER ENTER RESET button to rese...

Page 137: ...ing If you do not want to proceed with the calibration press and release the DISPLAY ADJUST NO button to return to the PID Cal Gas Values Screen If you do want to continue with the calibration proceed...

Page 138: ...libration Mode Screen Attempt to calibrate the PID channel again If the failure continues investigate the cause See Troubleshooting on page 67 37 Disconnect the tubing from the probe 38 Unscrew the de...

Page 139: ...result in an inaccurate calibration 2 Find a fresh air environment This is an environment free of toxic or combustible gases and of normal oxygen content 20 9 3 While in Measuring Mode press and hold...

Page 140: ...lti gas calibration cylinder 11 Connect the sample tubing to the demand flow regulator 12 Install the probe on the EAGLE 2 inlet fitting Make sure the probe is complete with internal O ring and membra...

Page 141: ...volume When using the auto calibration method be sure to set the OXY auto calibration value to agree with the concentration listed on the cylinder s label not zero 15 To adjust the values on the scree...

Page 142: ...ou are done adjusting the calibration gas values move the cursor down past the bottom of the screen next to END 22 Press and release the POWER ENTER RESET button The following screen appears 23 If you...

Page 143: ...h channel to the programmed values 28 If all channels passed calibration the following screen sequence occurs If any of the sensors cannot be adjusted to the proper value a screen displays that indica...

Page 144: ...OWER ENTER RESET button to proceed to the Calibration In Process Screen for the PID channel with CAL IN PROCESS flashing If you do not want to proceed with the calibration press and release the DISPLA...

Page 145: ...libration Mode Screen Attempt to calibrate the PID channel again If the failure continues investigate the cause See Troubleshooting on page 67 34 Disconnect the tubing from the probe 35 Unscrew the de...

Page 146: ...rify that the EAGLE 2 is off Symptoms Probable Causes Recommended Action PID channel doesn t exit its warm up state and the reading continues to scroll through 200 100 and 0 for a high range sensor an...

Page 147: ...necessary to pull it out Take care not to pull the cable connector from the PID sub PCB 8 The PID sensor protrudes from one end of the sensor adapter Grasp the PID sensor firmly and pull it out of the...

Page 148: ...applying light pressure to clean the lamp window Do not touch the lamp window with your fingers Figure 31 Polishing the Electrode Lamp Window 17 Continue polishing until you can hear a squeaking soun...

Page 149: ...wer the sensor into the adapter until you feel it contact the bottom 25 Do not attempt to push the sensor in farther once it makes contact with the bottom of the adapter until you are sure that the se...

Page 150: ...or you need to a Pull the PID sensor out of the socket and look at the pins on the underside of the sensor b Look at the label near the pins Some sensors have an L in the lower lefthand corner of this...

Page 151: ...ow access to the flow system 6 Locate the PID sensor adapter It has a five wire cable and is normally located next to the pump The cable has a connector that mates to a PID sub PCB that is installed o...

Page 152: ...6 Twisting the lamp slightly during insertion will help to ensure the lamp window is snug against the stack s front electrode The lamp should be supported by the O ring 17 Continuing to hold the elect...

Page 153: ...g or replacing the lamp NOTE Do not touch the new lamp window the flat end with your fingers as this may contaminate the window with finger oil 1 Verify that the EAGLE 2 is off 2 Place the EAGLE 2 ups...

Page 154: ...ack and lamp are released 12 Carefully lift the PID sensor body away from the electrode stack and lamp If the lamp remains lodged in the sensor body carefully remove it with tweezers 13 If the spring...

Page 155: ...tom of the adapter until you are sure that the sensor s pins are engaged with the sockets If you feel that the pins did not engage the sockets slightly rotate the sensor back and forth without putting...

Page 156: ...or adapter 9 Carefully line up the new PID sensor s pins with the sockets in the bottom of the sensor adapter and gently lower the sensor into the adapter until you feel it contact the bottom 10 Do no...

Page 157: ...R RESET When you hear a beep release the buttons 3 The LCD will show the following screen for a few seconds with the S in the lower right corner indicating the unit is entering Setup Mode 4 The S will...

Page 158: ...detection range for the currently configured gas In the example below the PID sensor is currently configured as a high range sensor for 0 2 000 ppm isobutylene 11 Use AIR YES and RANGE SHIFT to set th...

Page 159: ...Gasoline GSL 50 00 ppm 2000 ppm Isobutylene IBL Standard Factory Gas Configuration 50 00 ppm 2000 ppm Isopropanol IPA 200 0 ppm 5000 ppm JP 5 Fuel JP5 30 00 ppm 1000 ppm Methyl Ethyl Ketone MEK 40 00...

Page 160: ...to the first gas configuration choice screen with the gas configuration unchanged Select a different gas and go to Step 13 or press and release DISPLAY ADJUST NO to return to the Gas Configuration sc...

Page 161: ...without saving the changes If you do want to save the changes press and release AIR YES and continue with the next step 21 A confirmation screen appears asking if you are sure you want to save the ch...

Page 162: ...mproved type 80 0131RK 20 PID probe particle filter removed 80 0605RK Teflon lined sample hose 5 feet 80 0610RK Teflon lined sample hose 10 feet 80 0615RK Teflon lined sample hose 15 feet 80 0620RK Te...

Page 163: ...steel and 34 liter aluminum cylinder 81 1055RK Regulator demand flow type for 17 and 34 liter steel cylinder 82 0003RK Electrode stack removal tool 82 0300RK Lamp cleaning kit with electrode stack re...

Page 164: ...the sensor s valid calibration period which is typically 3 months In addition you can change an existing ESM 01 channel from one type of ESM 01 sensor to another and the EAGLE 2 will automatically loa...

Page 165: ...or The ESM 01 sensor is a cylindrical sensor with a diffusion opening on the front and a 12 pin circular connector on the back A 12 wire cable plugs into the back of the ESM 01 sensor with a circular...

Page 166: ...on Method on page 62 and follow the instructions for calibrating a single channel If your instrument is a multi channel instrument that includes one or more ESM 01 channels RKI Instruments Inc recomme...

Page 167: ...uttons to select each password number and then pressing and releasing POWER ENTER RESET to enter the number and move on to the next one 5 The Calibration Mode Screen displays with the cursor next to A...

Page 168: ...re the probe is complete with internal O ring and membrane and that the two halves of the probe are tightened firmly together to avoid leaks that can affect the calibration See Figure 21 on page 72 fo...

Page 169: ...l whose gas value you want to change using the AIR YES and RANGE SHIFT buttons 17 Press and release the POWER ENTER RESET button to select the channel The calibration gas value begins to flash 18 Use...

Page 170: ...off and will load the previous set of auto calibration values when it is turned on again 24 When you make your selection and press the desired button the unit returns to the Calibration Gas Values Scr...

Page 171: ...n and H2S channels failed calibration The other sensors calibrated normally The buzzer and alarm LEDs activate in a double pulsing pattern Press and release the POWER ENTER RESET button to reset the a...

Page 172: ...ease the DISPLAY ADJUST NO button to return to the ESM 01 Cal Gas Values Screen If you do want to continue with the calibration proceed to the next step 33 Screw the ESM 01 calibration cylinder onto t...

Page 173: ...e Calibration Mode Screen Attempt to calibrate the ESM 01 channel again If the failure continues investigate the cause See Troubleshooting on page 67 37 Disconnect the tubing from the probe 38 Unscrew...

Page 174: ...s an environment free of toxic or combustible gases and of normal oxygen content 20 9 3 While in Measuring Mode press and hold the RANGE SHIFT button then press the DISPLAY ADJUST NO button and releas...

Page 175: ...to the demand flow regulator 12 Install the probe on the EAGLE 2 inlet fitting Make sure the probe is complete with internal O ring and membrane and that the two halves of the probe are tightened fir...

Page 176: ...l whose gas value you want to change using the AIR YES and RANGE SHIFT buttons 17 Press and release the POWER ENTER RESET button to select the channel The calibration gas value begins to flash 18 Use...

Page 177: ...off and will load the previous set of auto calibration values when it is turned on again 24 When you make your selection and press the desired button the unit returns to the Calibration Gas Values Scr...

Page 178: ...ly The buzzer and alarm LEDs activate in a double pulsing pattern Press and release the POWER ENTER RESET button to reset the alarm and continue to the Calibration Value Screen for the ESM 01 channel...

Page 179: ...he other channels were being calibrated the ESM 01 sensor reading should be stable and ready for adjustment 32 Press and release the POWER ENTER RESET button to set the span adjustment for the ESM 01...

Page 180: ...nscrew the three case screws until they disengage from the top case They are captive screws so they will not fall off of the bottom case 4 Turn the EAGLE 2 right side up and carefully lift the top cas...

Page 181: ...til they disengage from the top case They are captive screws so they will not fall off of the bottom case 4 Turn the EAGLE 2 right side up and carefully lift the top case away from the bottom case Be...

Page 182: ...on the electrolyte reservoir assembly line up with the grooves inside the sensor body CAUTION Verify that the electrolyte reservoir assembly is properly aligned before inserting it into the sensor bod...

Page 183: ...ppm ESM 01DH D HCN Hydrogen cyanide sensor 0 15 0 ppm ESM 01DH PH3 Phosphine sensor 0 1 00 ppm ESM 01DH F SO2 Sulfur dioxide sensor 0 6 00 ppm ESM K01 CL2 Chlorine sensor 0 3 00 ppm 81 0142RK 02 Cali...

Page 184: ...r flow chamber This area can accommodate up to three single sensor flow chambers Figure 39 below illustrates a typical TC sensor location in front of the pump The TC flow chamber may also be installed...

Page 185: ...he sensor bracket is installed over the TC sensor to keep it seated in place NOTE The LEL and TC sensors and sensor cables are identical in appearance Take care not to plug the LEL sensor cable into t...

Page 186: ...off exposure to high levels of combustible gas can still stress the catalytic LEL sensor The catalytic LEL sensor can be enabled or disabled in the Catalytic LEL Sensor screen in Display Mode The def...

Page 187: ...ndard channels you will also need a cylinder to calibrate the TC channel See Table 22 on page 199 for available cylinders Make sure your calibration cylinder is appropriate for the TC detection range...

Page 188: ...d the unit will return to the Calibration Mode Screen 9 The EAGLE 2 will indicate that it is adjusting the zero reading for a few seconds then indicate that the operation is complete before returning...

Page 189: ...he gas concentrations listed on the 4 gas calibration cylinder If all concentrations match go to Step 25 If one or more concentrations do not match continue with Step 15 If you do not want to continue...

Page 190: ...en performed 19 Press and release the POWER ENTER RESET button to save the change The calibration gas value stops flashing 20 Repeat Step 16 through Step 19 for any other channels that need to be chan...

Page 191: ...LE 2 to draw gas for one minute 27 Press and release the POWER ENTER RESET button to set the span adjustment for each channel to the programmed values 28 If all channels passed calibration the followi...

Page 192: ...hannel Calibration Gas Value Screen 32 With the TC Calibration Gas Value Screen displayed press and release the POWER ENTER RESET button to proceed to the Calibration In Process Screen for the TC chan...

Page 193: ...page 67 37 Disconnect the tubing from the probe 38 Unscrew the demand flow regulator from the calibration cylinder 39 Use the RANGE SHIFT button to place the cursor next to the NORMAL OPERATION menu o...

Page 194: ...e the sensor from the connector 10 If the sensor stayed in the flow chamber grasp the sensor and pull it out of the flow chamber 11 Plug the replacement sensor into the sensor connector on the TC sens...

Page 195: ...T When you hear a beep release the buttons 3 The LCD will show the following screen for a few seconds with the S in the lower right corner indicating the unit is entering Setup Mode 4 The S will then...

Page 196: ...example below the TC sensor is currently configured for 0 100 volume CH4 The screen also shows the gas configuration choices for the TC sensor There are 3 pre defined options and 1 user defined optio...

Page 197: ...ny value from 10 to 100 in increments of 10 16 Press and release POWER ENTER RESET to enter the full scale value The confirmation screen appears In the example below the user defined gas has been sele...

Page 198: ...nd release DISPLAY ADJUST NO The unit will begin its startup sequence without saving the changes If you do want to save the changes press and release AIR YES and continue with the next step 24 A confi...

Page 199: ...r 50 vol CH4 in N2 34 liter steel 81 0013RK 05 Calibration cylinder 50 vol CH4 in N2 58 liter steel 81 0023RK 01 Calibration cylinder H2 8 volume in nitrogen 34 liter steel 81 0024RK 01 Calibration cy...

Page 200: ...r that stores sensor parameters including the target gas and detection range So you can change an existing infrared CO2 channel from one range to another and the EAGLE 2 will automatically load all th...

Page 201: ...or on the back A 12 wire cable plugs into the back of the infrared CO2 sensor with a circular connector that includes a locking lever The other end of the cable plugs into an infrared sub PCB see desc...

Page 202: ...udes an infrared CO2 sensor reference Start Up on page 27 Measuring Mode Normal Operation on page 33 and Measuring Mode Alarms on page 38 Follow these instructions keeping the following special consid...

Page 203: ...s Inc recommends using the auto calibration method for convenience The calibration instructions below show a 5 channel instrument which has the four standard channels LEL oxygen H2S CO and an infrared...

Page 204: ...1 minute before performing an air adjust NOTE Attaching the CO2 scrubber to the inlet fitting eliminates the background CO2 found in fresh air and allows the EAGLE 2 to obtain an accurate zero reading...

Page 205: ...inlet fitting Make sure the probe is complete with internal O ring and membrane and that the two halves of the probe are tightened firmly together to avoid leaks that can affect the calibration See F...

Page 206: ...nnel whose gas value you want to change using the AIR YES and RANGE SHIFT buttons 21 Press and release the POWER ENTER RESET button to select the channel The calibration gas value begins to flash 22 U...

Page 207: ...ed off and will load the previous set of auto calibration values when it is turned on again 28 When you make your selection and press the desired button the unit returns to the Calibration Gas Values...

Page 208: ...d H2S channels failed calibration The other sensors calibrated normally The buzzer and alarm LEDs activate in a double pulsing pattern Press and release the POWER ENTER RESET button to reset the alarm...

Page 209: ...e DISPLAY ADJUST NO button to return to the infrared CO2 Cal Gas Values Screen If you do want to continue with the calibration proceed to the next step 37 Screw the infrared CO2 calibration cylinder o...

Page 210: ...infrared CO2 channel passed calibration the following screen sequence occurs AUTO CALIBRATION DONE REMOVE GAS AUTO CALIBRATION END CALIBRATION MODE AUTO CALIBRATION SINGLE CALIBRATION PERFORM AIR ADJ...

Page 211: ...hold it upside down 3 Unscrew the three case screws until they disengage from the top case They are captive screws so they will not fall off of the bottom case 4 Turn the EAGLE 2 right side up and car...

Page 212: ...that its bottom edge is resting on the bottom of the bottom case If the main PCB is not seated properly it may be damaged when the top case is re installed 16 Make sure that the top case gasket is ful...

Page 213: ...frared CO2 sensor 0 60 vol 81 0071RK 01 Calibration cylinder 5000 ppm CO2 in nitrogen 34 liter 81 0071RK 03 Calibration cylinder 5000 ppm CO2 in nitrogen 103 liter 81 0072RK 01 Calibration cylinder 2...

Page 214: ...thane sensor will not detect or respond to Lists of the gases falling in each of these respective categories can be found below Consult RKI Instruments Inc for combustible gases not listed below The i...

Page 215: ...the other two sensor chamber locations depending on the particular version of the EAGLE 2 Some infrared methane instrument configurations do not include the 4 sensor flow chamber Infrared Methane Sens...

Page 216: ...for the LEL range but do not exist for the vol range Catalytic LEL Sensor Screen When either a TC sensor or an infrared combustible sensor is installed in an EAGLE 2 along with a catalytic combustibl...

Page 217: ...cy in the vol range the sensor may be calibrated to 50 vol To use the auto calibration method to calibrate a multi channel instrument that includes an infrared methane channel do the following 1 See C...

Page 218: ...tton and the unit will return to the Calibration Mode Screen 9 The EAGLE 2 will indicate that it is adjusting the zero reading for a few seconds then indicate that the operation is complete before ret...

Page 219: ...on cylinder If all concentrations match go to Step 25 If one or more concentrations do not match continue with Step 15 If you do not want to continue with the calibration press and release the DISPLAY...

Page 220: ...SET button to save the change The calibration gas value stops flashing 20 Repeat Step 16 through Step 19 for any other channels that need to be changed 21 When you are done adjusting the calibration g...

Page 221: ...the EAGLE 2 to draw gas for one minute 27 Press and release the POWER ENTER RESET button to set the span adjustment for each channel to the programmed values 28 If all channels passed calibration the...

Page 222: ...rd channel Calibration Gas Value Screen 32 With the infrared methane Calibration Gas Value Screen displayed press and release the POWER ENTER RESET button to proceed to the Calibration In Process Scre...

Page 223: ...continue to the Calibration Mode Screen Attempt to calibrate the infrared methane channel again If the failure continues investigate the cause See Troubleshooting on page 67 37 Disconnect the tubing...

Page 224: ...tly if necessary to pull it out Take care not to pull the cable from the sub PCB 9 Rotate the locking lever counterclockwise on the cable connector that mates to the infrared methane sensor to unlock...

Page 225: ...d CH4 sensor 0 100 LEL or 0 100 LEL 5 0 100 0 vol autoranging 81 0012RK 01 Calibration cylinder 50 LEL CH4 in air 34 liter steel 81 0012RK 03 Calibration cylinder 50 LEL CH4 in air 103 liter steel 81...

Page 226: ...ne Description Table 31 and Table 32 above list the available infrared hydrocarbon sensor configurations The infrared hydrocarbon sensor is a smart sensor that stores the target gas The infrared hydro...

Page 227: ...ared hydrocarbon sensor is used with the EAGLE 2 The infrared hydrocarbon sensor connects to the sub PCB with a 12 position connector The sub PCB plugs into the main PCB and is held in place with a sc...

Page 228: ...always ENABLED 1 Use the DISPLAY ADJUST NO button to enter Display Mode and scroll to the Catalytic LEL Sensor screen The current setting will be flashing 2 Use the AIR YES or RANGE SHIFT button to to...

Page 229: ...easuring Mode press and hold the RANGE SHIFT button then press the DISPLAY ADJUST NO button and release both buttons 4 If the unit prompts you for the password enter it by using the AIR YES and RANGE...

Page 230: ...te with internal O ring and membrane and that the two halves of the probe are tightened firmly together to avoid leaks that can affect the calibration See Figure 21 Replacing the Particle Filter and H...

Page 231: ...channel whose gas value you want to change using the AIR YES and RANGE SHIFT buttons 17 Press and release the POWER ENTER RESET button to select the channel The calibration gas value begins to flash...

Page 232: ...turned off and will load the previous set of auto calibration values when it is turned on again 24 When you make your selection and press the desired button the unit returns to the Calibration Gas Val...

Page 233: ...2S channels failed calibration The other sensors calibrated normally The buzzer and alarm LEDs activate in a double pulsing pattern Press and release the POWER ENTER RESET button to reset the alarm an...

Page 234: ...n to return to the infrared hydrocarbon Cal Gas Values Screen If you do want to continue with the calibration proceed to the next step 33 Screw the infrared hydrocarbon calibration cylinder onto the d...

Page 235: ...wn 3 Unscrew the three case screws until they disengage from the top case They are captive screws so they will not fall off of the bottom case 4 Turn the EAGLE 2 right side up and carefully lift the t...

Page 236: ...is fully seated in its groove and carefully put the top case back on the bottom case If you have any difficulty mating the top and bottom cases inspect the placement of the main PCB and the placement...

Page 237: ...d a procedure to select one see Configuring the Combustible Gas on page 101 A common target gas is hexane Once a gas that allows for methane elimination is selected for the catalytic combustible chann...

Page 238: ...hat gas For example if you are using the EAGLE 2 in methane elimination mode to detect isobutane and the display reads 10 LEL the actual isobutane reading is 10 x 0 59 5 9 LEL isobutane Table 34 Metha...

Page 239: ...xt to the catalytic combustible channel reading indicating that the unit is measuring in full response mode 15 Allow 2 minutes for the combustible sensor to stabilize before monitoring the target gas...

Page 240: ...setup the catalytic combustible channel gas CAUTION The EAGLE 2 catalytic combustible sensor experiences a significant gas response drop when it is changed from full response mode to methane eliminat...

Page 241: ...Mode The following description of the EAGLE 2 start up sequence assumes that the following menu items in Setup Mode are turned on CAL REMINDER and USER STATION ID If either of these items is turned of...

Page 242: ...ith Bar Hole Mode selected press and release the POWER ENTER RESET button to begin the Bar Hole Mode startup sequence NOTE If no button is pressed for 20 seconds the unit will proceed into whichever m...

Page 243: ...GLE 2 will enter Calibration Mode and the LCD will show the Calibration Mode main menu See Chapter 4 Calibration Mode on page 54 for instructions to calibrate the EAGLE 2 When you are done with the ca...

Page 244: ...alibration If the calibration was not successful the screen above will again appear in the startup sequence If the unit is due for calibration and CAL PAST DUE ACT is set to NOTIFICATION ONLY then the...

Page 245: ...ed sensor s as soon as possible for use in Normal Mode 15 The EAGLE 2 is now operating in Bar Hole Mode The pump is off and the following screen appears Only the methane and oxygen channels are displa...

Page 246: ...e the RANGE SHIFT button to turn on the display backlight Although the backlight will turn on when any button is pressed other buttons may initiate an undesired operation sequence See Updating the Bac...

Page 247: ...vol the CH4 channel will automatically begin displaying in the units you selected earlier Since performing a fresh air purge draws fresh air the display units should always switch to the previously s...

Page 248: ...he unit will initiate a bar hole measurement Keep holding the POWER ENTER button The buzzer will sound and the LCD back light will flash for about five seconds 3 Release the button when GOODBYE appear...

Page 249: ...n the EAGLE 2 Leak Check Mode CAUTION If one or more sensors other than a catalytic combustible sensor is installed these sensors will not be active while the EAGLE 2 is in Leak Check Mode The followi...

Page 250: ...lected press and release the POWER ENTER RESET button to begin the Leak Check Mode startup sequence NOTE If no button is pressed for 20 seconds the unit will proceed into whichever mode has the cursor...

Page 251: ...LE 2 will enter Calibration Mode and the LCD will show the Calibration Mode main menu See Chapter 4 Calibration Mode on page 54 for instructions to calibrate the EAGLE 2 When you are done with the cal...

Page 252: ...with the calibration and exit Calibration Mode the unit will begin the startup sequence If the calibration was successful the screen above will not appear again until the unit is due for calibration...

Page 253: ...ENTER RESET button to acknowledge the failure and return to the Mode Select Screen Replace the failed sensor If any other sensor that is installed fails press and release the POWER ENTER RESET button...

Page 254: ...rom 200 ppm to 1 000 ppm 50 ppm increments from 1 000 ppm to 10 000 ppm 250 ppm increments from 10 000 ppm to 50 000 ppm As the gas concentration increases from 0 ppm the alarm LEDs begin to blink in...

Page 255: ...ck Mode it remembers the buzzer setting So when the EAGLE 2 is turned on again or you return to Leak Check Mode after operating in Normal Mode or Bar Hole Mode the buzzer has the same setting it did t...

Page 256: ...probe and selection Normal Mode in the Inert Mode Selection Screen Description The tank tester model has an additional socket on the front on the housing to accommodate connection of the float probe a...

Page 257: ...1 CAUTION When measuring oxygen readings remove the dilution fitting or use your finger to seal the small dilution hole on the side of the dilution fitting The catalytic combustible gas sensor requir...

Page 258: ...at the float probe s plug is connected to the EAGLE 2 Make sure that the float probe assembly is hanging vertically and that the float device is located at the bottom of the probe 4 The Battery Voltag...

Page 259: ...he combustible gas reading by 2 When monitoring for oxygen in an inerted tank remove the dilution fitting or seal the dilution hole with your finger Alarms The EAGLE 2 Tank Tester model has two sets o...

Page 260: ...54 The instructions in that section call for calibrating the EAGLE 2 with methane When following these instructions be sure to calibrate with hexane rather than methane NOTE Do not calibrate the EAGLE...

Page 261: ...o the sample Alarms The oxygen channel alarm points in Inert Mode are different from those in Normal Mode All other alarm point settings remain unchanged Since the application for Inert Mode is to det...

Page 262: ...cursor to the ALARM POINTS menu item 7 Press and release POWER ENTER RESET The Change Alarm Point Settings Screen appears and all detection channels are displayed 8 Move the cursor next to the oxygen...

Page 263: ...he change press and release POWER ENTER RESET to accept the setting If you want to exit this screen without saving any change to the alarms press and release DISPLAY ADJUST NO until you return to the...

Page 264: ...e warm up sequence will continue as described in Start Up on page 27 unless Leak Check or Bar Hole Mode is active If Leak Check or Bar Hole Mode is active the Leak Check Bar Hole Mode Select Screen wi...

Page 265: ...Normal Operation on page 33 for operating instructions keeping in mind that the Inert Mode oxygen alarm settings are different You can access the Inert Mode Selection Screen while in Inert Mode or No...

Page 266: ...ient air before entering the instrument which provides sufficient oxygen for the sensor to work The instrument is also supplied with a sample bag Operation 1 Turn the instrument on and allow it to war...

Page 267: ...the gas alarms on the Transformer Gas Tester are set to OFF Part List Table 37 Parts List Eagle Tank Tester Model Part Number Description 80 0405RK Dilution fitting 1 1 81 1126RK Sample bag 9 x 9 ted...

Page 268: ...diluted sample while all other installed sensors see normal undiluted sample A vent is installed on the right side of the bottom case when viewing the instrument from the front This equalizes the pre...

Page 269: ...manual This warranty indicates the full extent of our liability and we are not responsible for removal or replacement costs local repair costs transportation costs or contingent expenses incurred with...

Reviews: