Chapter 4: Program Setup • 29
Defining New Cylinders
If your GX-3R (Pro) configuration requires the use of a cylinder that is not in the predefined list, you
can add that cylinder by either typing in the information for the cylinder or by editing the information
for an existing cylinder.
1.
Click
Cylinders
along the top of the main program window.
2.
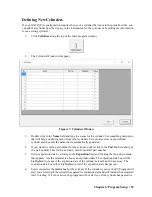
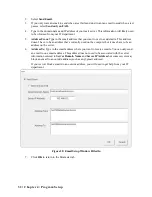
The Cylinders Window will appear.
Figure 17: Cylinders Window
3.
Double click in the
Name
field and type in a name for the cylinder. Use something descriptive
that will help you distinguish it from other cylinders. You can also select a pre-defined
cylinder and then edit the name that is automatically generated.
4.
If you want to enter a part number for the cylinder, double click in the
Part No
field and type
in a part number. This field is normally used for an RKI part number.
5.
Set the expiration date by clicking in the
Expiration
field and clicking the drop down menu
that appears. Use the calendar to choose an expiration date. The expiration date box will be
highlighted in orange if the expiration date of the cylinder is less than 10 days away. The
expiration date box will be highlighted in red if the expiration date has passed.
6.
Select or deselect the
Active
box for the cylinder. If the cylinder is active, the PC Program will
alert you at start up if the cylinder has passed its expiration date and will include the associated
inlet in testing. If it is not active, the program will not alert you if the cylinder has passed its


