
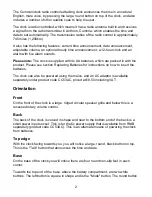

3
on the right is the "Set" button.
Please note:
both buttons are housed in a square
recess although the "Set" button is round.
The majority of the base is the battery compartment and there is a clip at the bottom
end of the compartment, which, when lifted, opens to reveal where the batteries are
fitted.
To the right of the battery compartment clip is a very small recessed button. This is the
"Reset" button.
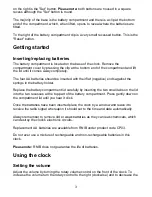
Getting started
Inserting/replacing batteries
The battery compartment is located on the base of the clock. Remove the
compartment cover by pressing the clip at the bottom end of the compartment and lift
the lid until it comes away completely.
The four AA batteries should be inserted with their flat (negative) ends against the
springs in the battery holder.
Replace the battery compartment lid carefully by inserting the two small tabs on the lid
into the two recesses at the top part of the battery compartment. Press gently down on
the compartment lid until you hear it click.
Once the batteries have been inserted place the clock by a window and leave it to
receive the radio signal whereupon it should set to the time and date automatically.
Always remember to remove old or weak batteries as they can leak chemicals, which
can destroy the clock's electronic circuits.
Replacement AA batteries are available from RNIB under product code CP03.
Do not ever use a mixture of rechargeable and non-rechargeable batteries in this
clock.
Please note:
RNIB does not guarantee the life of batteries.
Using the clock
Setting the volume
Adjust the volume by turning the rotary volume control on the front of the clock. To
increase the volume turn the rotary control to the right (clockwise) and to decrease the


