1
English
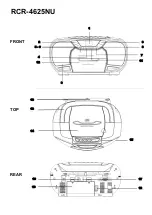
LOCATION OF CONTROLS
1.
LCD DISPLAY
2.
POWER / FUNCTION
3.
PLAY
-
PAUSE / CLOCK
4.
STOP/PRESET/FOLDER
5.
BACK / TUNE
-
6.
NEXT / TUNE +
7.
VOLUME
-
8.
9.
SPEAKER GRILL
10.
BATTERY COMPARTMENT
11.
SCAN/MODE
12.
CASSETTE DOOR
13.
ANTENNA
14.
CD DOOR
15.
CASSETTE CONTROLS (FROM LEFT TO RIGHT)
1. PAUSE
2. STOP / EJECT
3. FAST FORWARD
4. REWIND
5. PLAY
16.
USB SOCKET
17.
AUX
-
IN SOCKET
18.
HANDLE
19.
AC
POWER SOURCES
AC POWER:
You can power your portable stereo system by plugging the AC power
cord into the AC plug (19) at the back of the unit and into a wall AC power outlet.
Check that the rated voltage of your appliance matches your local voltage.
Make sure that the AC power cord is fully inserted into the appliance.
BATTERY POWER:
To use the radio with batteries, disconnect the AC power cord
and insert 6 ×
“
LR14
”
batteries into the compartment (10).
Be sure that the batteries are inserted correctly to avoid damage to the appliance.
Remove the batteries when the radio will not be used for a long period of time, as this
will cause leakage to the batteries and subsequently damage to your radio.
POWER ON/OFF
Press the
[POWER/FUNTION]
button (2) to turn on the unit.
Press and hold
[POWER/FUNTION]
button (2) pressed for approx 3 seconds to turn
off the unit.
In CD/USB/TAPE mode, the unit will enter STANDBY mode automatically when there
is no audio output for around 10 minutes.

