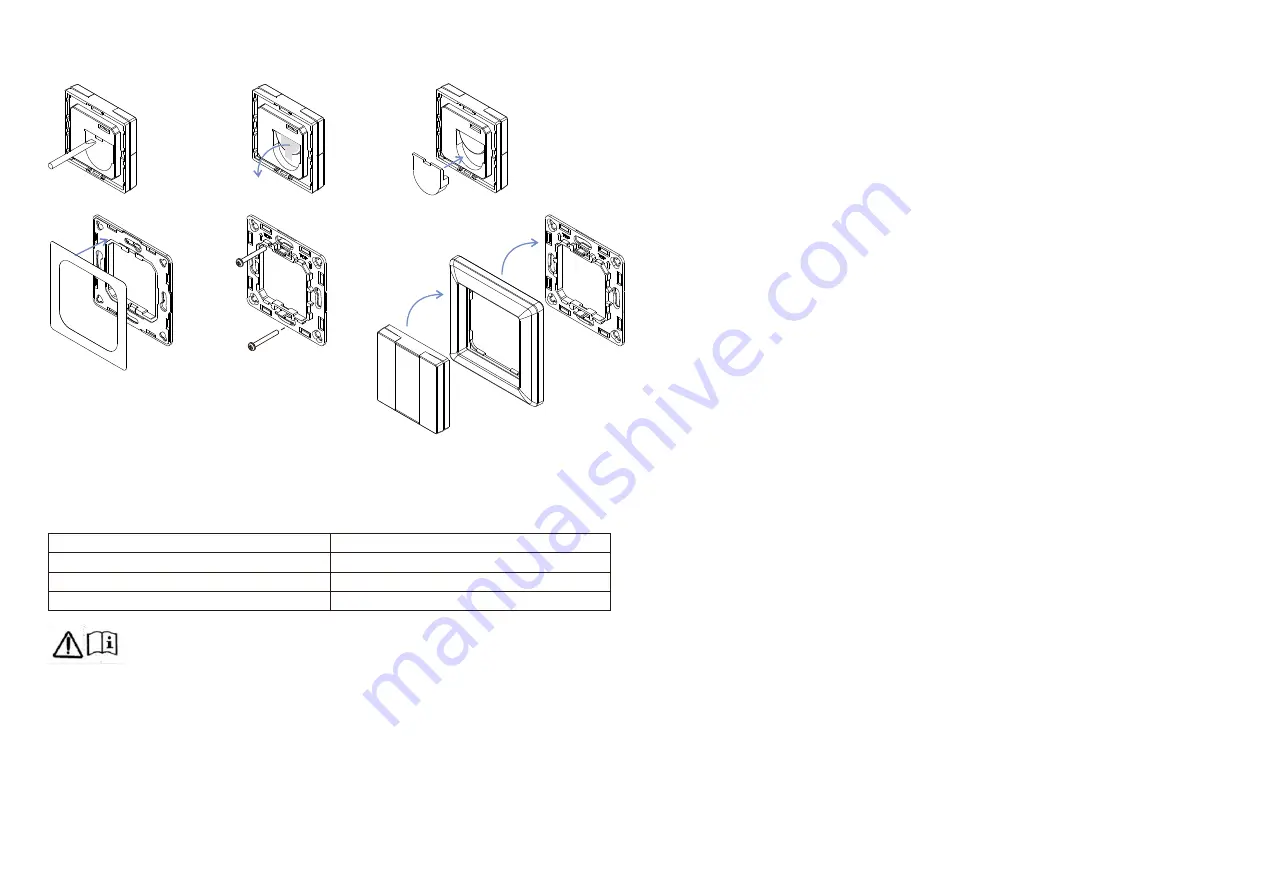
background image

Mounting

The key part of this controller is an universal one, especially rotary standard switch element that can be 

integrated in numerous frames by different manufactures as below list:

BERKER

S1, B1, B3, B7 glass

GIRA

Standard55, E2, Event, Esprit

JUNG

A500, Aplus

MERTEN

M-smart, M-Arc, M-Plan

2.Install the controller to wall(2 methods)

Method 1:

Stick 3M glue on the

back of the bracket and then stick
the bracket to the wall 

Method 2:

Screw the bracket

to the wall

After the bracket is fixed,clip
the frame and control part to the
bracket


in sequence

① 

Use tool to open the

silicone gel battery cover

1.Remove battery insulator

Pull out the

battery insulator

Install the silicone

battery cover back

Installation

– leaving a battery in an extremely high temperature surrounding environment that can result in an explosion or
the leakage of flammable liquid or gas;

liquid or gas.

- a battery subjected to extremely low air pressure that may result in an explosion or the leakage of flammable

– disposal of a battery into fire or a hot oven, or mechanically crushing or cutting of a battery, that can result in

Risk of explosion if the battery is replaced by an incorrect type

an explosion;

CAUTION

– replacement of a battery with an incorrect type that can defeat a safeguard (for example, in the case of some
lithium battery types);

Summary of Contents for Smarrt

Page 1: ...Bee Gateway products Identify Group On off Level control Ota ZigBee Clusters Supported by This Remote Are As Follows Input clusters Basic Power Configuration Identify Diagnostics Output clusters Network pairing mode click both buttons 3 times to set the remote into network pairing mode the remote should not belong to any gateway network Factory reset click both buttons 3 times to reset the remote ...

Page 2: ...irst linked device is always powered on when touchlink the remote with 2nd device and more devices Note 1 Directly TouchLink both not added to a ZigBee network please first factory reset both the 3 To control by both remote and hub add both remote and device to network first then TouchLink 2 TouchLink after both added to a ZigBee network each device can link with max 30 remotes LED indicator Step ...

Page 3: ...ally 13 OTA The remote supports firmware updating through OTA and will acquire new firmware from zigbee controller or 15 Battery Power Monitor Function The remote will report battery power value to the coordinator under following situations When powered on When short pressing both and buttons of group 2 simultaneously When operating the switch to send data packets over 4 hours since last operation...

Page 4: ...to open the silicone gel battery cover 1 Remove battery insulator Pull out the battery insulator Install the silicone battery cover back Installation leaving a battery in an extremely high temperature surrounding environment that can result in an explosion or the leakage of flammable liquid or gas liquid or gas a battery subjected to extremely low air pressure that may result in an explosion or th...

Reviews: