background image

ENGLISH

7

Instructions and User Manual

1. 

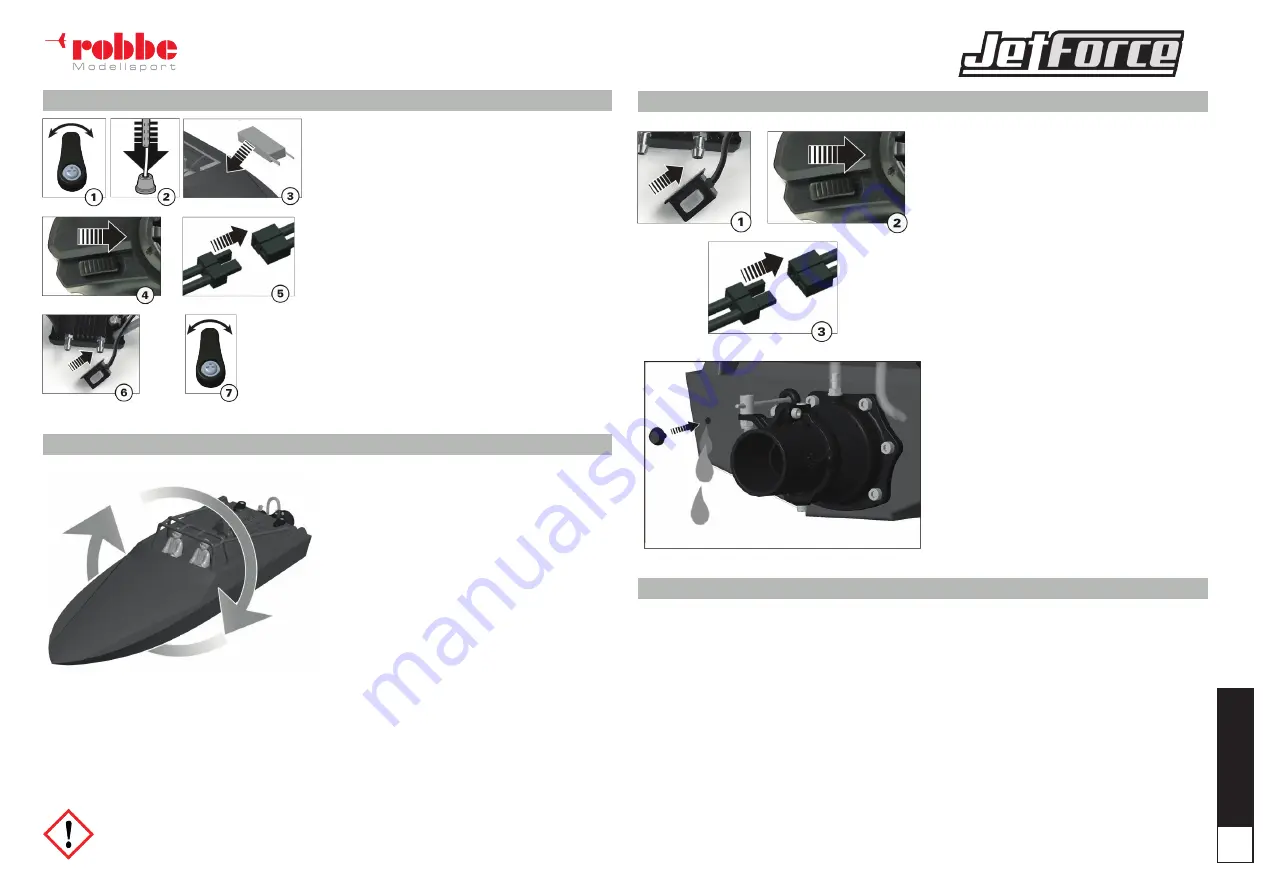
Remove the canopy from the hull.

2. 

Install the receiver antenna in the antenna tube.

3. 

Install the fully charged battery in the compartment 

and secure it with the hook and loop straps.

4. 

Power on the transmitter. Ensure the throttle is not 

reversed and the throttle trim is neutral.

5. 

Connect the battery to the ESC.

6. 

Keep the throttle at neutral and power on the ESC by 

pushing and holding the power switch for 2 seconds.


Once armed, the ESC will beep and the LED will 

flash, indicating the number of battery cells it has 

detected.


1 short beep will sound and the LED will turn solid 

when the ESC is ready to run.

NOTICE:


Pressing and holding the ESC SET button for 3 seconds 

allows you to change the battery chemistry from LiPo to 

NiMH. Refer to Electronic Speed Control (ESC) Programing 

for more information.

7. 

Install the canopy on the hull.

If the boat turns over, release the throttle until the boat 

comes to a stop. Return the boat to upright by applying a 

short throttle burst.

The boat sitting in the water normally leans to the battery 

side. Apply throttle to level the boat. No weight adjust-

ment is necessary.

NOTICE:


The included weighted motor coupler aids self-righting 

after the boat has flipped and full throttle is applied. This 

coupler is intended for use with the included battery or 

other batteries with a 4000mAh maximum capacity.

1. 

Power off the receiver by pressing the power 

button for 2 seconds.

2. 

Power off the transmitter.

3. 

Disconnect and remove the battery from the 

boat.

Tip:

 Always remove the canopy before storage or 

moisture may allow mold and mildew to grow in 

the boat. Drain water from inside the hull using the 

drain plug.

• 

Fully dry the inside and outside of the boat, 

including the water cooling lines and jacket 

around the motor

• 

Remove the hatch before storing your boat

• 

Repair any damage or wear to the boat

• 

Make note of lessons learned from the trimming 

of your boat, including water and wind condi-

tions

Tip: 

The hook and loop strips in the boat retain 

water. To dry them, press on them with a dry cloth.

When running your boat for the first time, we recommend calm wind and water conditions so that you can learn 

how the boat responds to your control.

Maximum speeds are only achieved when the water conditions are smooth and there is little wind. A sharp turn, 

wind or waves can turn over a boat when it is moving quickly. Always pilot your boat for the wind and water con-

ditions so that the boat does not turn over.

Consult local laws and ordinances before choosing a location to pilot your boat.

Avoid boating near:

• 

watercraft

• 

people (swimming areas, fishing areas)

• 

stationary objects

• 

waves, wakes

• 

rapidly moving water

• 

wildlife

• 

floating debris

• 

overhanging trees

• 

vegetation

NOTICE:

 The boat may not self right in extremely 

rough water. Proceed to calmer water and follow 

the selfrighting steps.

Tip:

 The boat will be easier to self-right when 

powered by a 14.8V battery.

To self-right the boat in calm water:

1. 

Apply a burst of reverse.

2. 

Apply a burst of full throttle. The boat should rock 

and right itself.

To self-right the boat in rough water:

1. 

Release the throttle.

2. 

Apply a burst of forward, reverse and forward 

throttle. The boat should rock and right itself.

CAUTION:


Repeated failed attempts to self-right may cause the electronics to overheat.

NOTICE: 

When you are finished boating, never leave the 

boat in direct sunlight or in a hot, enclosed area 

such as a car. Doing so can damage the boat.

B O AT I N G   T I P S

W H E N  YO U   A R E   F I N I S H E D

S E L F - R I G H T I N G

G E T T I N G   S TA R T E D

Summary of Contents for ARTR 1205

Page 1: ...www robbe com ARTR Version Nr 1205 Instructions and User Manual V1_03 2019 ...

Page 2: ...ll or package the regulator so that it cannot come into contact with grease oil or water Ensure adequate air circulation Never reach into the turning circle of the ship propeller during start up Risk of injury Important information If the receiving system is supplied with power by the built in BEC system of the controller For commissioning always move the throttle stick to the Motor off position a...

Page 3: ...able insurance if neces sary DISCLAIMER Modellbau Lindinger GmbH cannot monitor compliance with the assembly and operating instructions or the conditions and methods for installation operation use and maintenance of the model components Therefore we accept no liability for losses damage or costs arising from or in any way connected with incorrect use and operation To the extent permitted by law th...

Page 4: ...ter model SI 2TEE Power supply range 4 6V Transmitting frequency 2 4G FHSS Transmit power 100mW Remote control distance 120m Power supply 4 AA batteries Adjustment method knob adjustment Weight 205g without battery Receiver model SI 2REE Forward continuous current peak current 80A 330A Reverse continuous current peak current 80A 330A Working voltage 2 3S lithium battery Mainly applicable model shi...

Page 5: ...ically recognized at power on and the drop sound will be used for prompting The number of drop sounds indicates the number of series lithium battery Out of control protection The receiver has built in out of control protection When the receiver and transmitter are out of contact the ESC will stop output and the steering channel output will remain in the final state Installation and use points This...

Page 6: ...boat in the water Remote control failure processing Fault phenomenon possible reason Solution Theindicator does not light after power on The battery is not installed correct ly and the battery is low Reinstall the battery or replace the battery ESC fault handling Fault phenomenon possible reason Solution The indicator does not light after power on No working power supply the ESC switch is damaged ...

Page 7: ...e hull using the drain plug Fully dry the inside and outside of the boat including the water cooling lines and jacket around the motor Remove the hatch before storing your boat Repair any damage or wear to the boat Make note of lessons learned from the trimming of your boat including water and wind condi tions Tip The hook and loop strips in the boat retain water To dry them press on them with a d...

Page 8: ...ive wear or damage and replace them when necessary A discolo red drive shaft indicates a lack of lubrication Increase the amount of marine grease you are using If you replace the drive shaft you must also replace the stuffing tube See Replacing the Stuffing Tube for more information OPTIONAL TRIM ADJUSTMENT SER VO You can install a servo that allows you to adjust the boat s trim via a 3 channel ra...

Page 9: ...sure the impeller does not touch the jet pump housing by spinning the motor or flywheel by hand If the drive shaft and impeller housing are touching loosen the set screw and pull the drive shaft out just enough to provide the appropriate amount of clearance 16 Install the jet pump nozzle on the hull Once all the screws are loosely in place tighten the screws down in a crisscross pattern Do not ove...

Page 10: ... your battery The included ESC protects the boat battery from over discharge using Low Voltage Cutoff LVC Before the battery charge decreases too much LVC removes power supplied to the motor Power to the motor decreases showing some power is reserved for the boat to return safely to shore Disconnect and remove the LiPo battery from the boat after use to prevent trickle discharge Charge your LiPo b...

Page 11: ...itter a few feet from boat disconnect and reconnect battery to boat Boat or transmitter is too close to large etal object wireless source or another transmitter Move the boat and transmitter to another location and attempt binding again Another compatible transmitter is powered on within range of the receiver Power off all compatible transmitters except the one you are trying to bind Boat battery ...

Page 12: ...ellsport is a registered Trademark by Modellbau Lindinger GmbH Errors misprints and technical changes reserved Copyright 2019 Modellbau Lindinger 2019 Copy and reprint only with our permission Service Address Contact your Dealer or Modellbau Lindinger GmbH Industriestraße 10 4565 Inzersdorf im Kremstal service robbe com 43 0 7582 81313 0 www robbe com ...

Reviews: