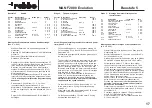
Baustufe 9:
Zusammenbau Fahrerhaus, Tank
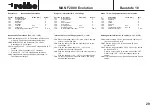
Pos.-Nr.
Bezeichnung
Maße (mm)
Anzahl
9.1
Tankhälfte mit Stutzen
1
9.2
Tankhälfte ohne Stutzen
1
9.3
Inbusschraube
M3 x 10
2
9.4
U-Scheibe
ø 3,2 innen
2
9.5
Sechskantmutter
M3
2
9.6
Fahrerhaus
1
9.7
Kotflügelsegment, rechts
1
9.8
Kotflügelsegment, links
1
9.9
Eckblende
2
9.10
Kühlergrill
1
9.11
Karosseriehalter vorn
1
9.12
Einpressmutter
M2,5
3
9.13
Karosseriehalter rechts
1
9.14
Karosseriehalter links
1
9.15
Stabantenne
ø 0,5 x 500
1
9.16
Antennen-Steckverbindung 1 n. e.
Vorbereitende Arbeiten
-
Tankhälften 9.1 und 9.2 verkleben, grundieren, lackieren
und trocknen lassen. Eckblenden 9.9 sowie Kühlergrill
9.10 grundieren, lackieren und trocknen lassen.
Montage Tank, Fahrerhaus (Pos. 9.1 - 9.16)
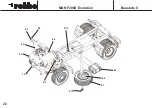
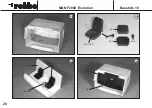
9a
Tank 9.1 - 9.2 mit Inbusschrauben 9.3, U-Scheiben 9.4
und Sechskantmuttern 9.5 am Leiterrahmen 1.1
verschrauben.
9b
Am Fahrerhaus 9.6 die Kotflügelsegmente 9.7 und 9.8
innen bündig ankleben.
-
Fahrerhaus grundieren, lackieren und trocknen lassen
-
Eckblenden 9.9 in das Fahrerhaus einstecken und
von innen verkleben.
-
Lack von den Klebeflächen entfernen, Kühlergrill 9.10
am Fahrerhaus ankleben!
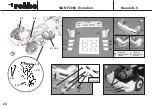
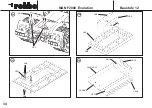
9c
Position für den vorderen Karosseriehalter 9.11 gemäß
Abbildung im Fahrerhaus markieren. Einpressmutter
9.12 in den Karosseriehalter 9.11 eindrücken, mit
Sekundenkleber sichern und Halterung im Fahrerhaus
verkleben.
9d
Die hinteren Karosseriehalter 9.13 und 9.14 (mit
Einpressmuttern) fluchtend zur Kante „A“ verkleben.
Auf spaltfreien Sitz in den Ecken achten.
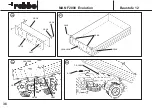
9e
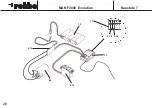
Stabantenne 9.15 auf 450 mm ablängen, gemäß
Zeichnung 9f biegen und in das Fahrerhaus einschie-
ben.
9g
Litzenantenne des Empfängers um 450 mm
kürzen, abisolieren, Stecker der Antennen-
Steckverbindung 9.16 anlöten und Isolierung
aufschieben.
-
Buchse der Antennen-Steckverbindung 9.16 an das
Ende der Stabantenne 9.15 löten, Isolierung
aufschieben. Stabantenne im Fahrerhaus positionieren
und mit Zweikomponentenkleber verkleben.
-
Stabantenne mit Empfänger verbinden.
MAN F2000
Evolution
Baustufe 9
27
Stade 9: assemblage de la cabine, réservoir
n°
désignation
cotes (mm)
nbre
9.1
demi-réservoir avec raccords
1
9.2
demi-réservoir sans raccord
1
9.3
vis six pans creux
M3 x 10
2
9.4
rondelle
ø 3,2 intér.
2
9.5
écrou six pans
M3
2
9.6
cabine
1
9.7
segment d’aile, droit
1
9.8
segment d’aile, gauche
1
9.9
panneau angulaire
2
9.10
calandre
1
9.11
porte-carrosserie avant
1
9.12
écrou noyé
M2,5
3
9.13
porte-carrosserie, droit
1
9.14
porte-carrosserie, gauche
1
9.15
antenne rigide
ø 0,5 x 500
1
9.16
connecteur d’antenne
1 n.c.
Travaux préparatoires:
-
Coller, apprêter et peindre les parties 9.1 et 9.2 du réser-
voir et laisser sécher. Apprêter les panneaux angulaires
9.9 et la calandre 9.10 avant de le peindre et de les lais-
ser sécher.
Montage du réservoir, de la cabine (n° 9.1 à 9.16)
9a
Visser le réservoir 9.1-9.2 au châssis 1.1 avec les vis six
pans creux 9.3, les rondelles 9.4 et les écrous six pans
9.5.
9b
Coller à l’intérieur, à fleur de cabine 9.6 les segments
d’aile 9.7 et 9.8.
-
Apprêter, peindre et laisser sécher la cabine.
-
Planter les panneaux angulaires 9.9 dans la cabine et les
coller de l’intérieur.
-
Retirer la peinture des emplacements où est appliquée la
colle. Coller la calandre 9.10 sur la cabine.
9c
Selon les indications du schéma, marquer dans la cabine
la position des porte-carrosserie avant 9.11. Engager
l’écrou noyé 9.12 dans les porte-carrosserie, les y fixer
avec de la colle cyanoacrylate et coller le support dans la
cabine.
9d
Coller les porte-carrosserie arrière 9.13 et 9.14 (avec les
écrous noyés) en ligne avec l’arête „A“. Veiller à ce qu’ils
ne présentent pas de jour dans les coins.
9e
Raccourcir l’antenne rigide 9.15 de manière à ce qu’elle
mesure encore 450 mm, la couder selon les indications
du schéma 9f et la glisser dans la cabine.
9g
Raccourcir l’antenne souple du récepteur de 450 mm et
enfiler la gaine isolante. Souder le connecteur d’antenne
9.16 et mettre la gaine isolante en place.
-
Souder la douille du connecteur d’antenne 9.16 sur l’ex-
trémité de l’antenne rigide 9.15. Mettre la gaine isolante
en place. Positionner l’antenne rigide dans la cabine et
l’y coller avec une colle deux-composants. Raccorder
l’antenne rigide au récepteur.
Stage 9: assembling the driver’s cab, fueltank
Part No. Description Dimensions (mm)
No. off
9.1
Fueltank shell with stub
1
9.2
Fueltank shell without stub
1
9.3
Socket-head cap screw
M3 x 10
2
9.4
Washer
3.2 I.D.
2
9.5
Hexagon nut
M3
2
9.6
Driver’s cab
1
9.7
R.H. mudguard section
1
9.8
L.H. mudguard section
1
9.9
Corner fairing
2
9.10
Radiator grille
1
9.11
Front bodywork holder
1
9.12
Captive nut
M2.5
3
9.13
R.H. bodywork holder
1
9.14
L.H. bodywork holder
1
9.15
Whip aerial
0.5 Ø x 500
1
9.16
Aerial connector
1 N.I.
Preparation
-
Glue the fueltank shells 9.1 and 9.2 together, prime
and paint the tank, and allow to dry. Prime and paint
the corner fairings 9.9 and the radiator grille 9.10, and
allow them to dry.
Assembling the fueltank and driver’s cab (parts 9.1 -
9.16)
9a
Fix the fueltank 9.1 / 9.2 to the ladder frame 1.1 using
the socket-head cap screws 9.3, washers 9.4 and
hexagon nuts 9.5.
9b
Glue the mudguard sections 9.7 and 9.8 to the driver’s
cab; they should end flush on the inside.
-
Prime and paint the driver’s cab and allow it to dry.
-
Insert the corner fairings 9.9 in the driver’s cab and
secure them with a drop of glue on the inside.
-
Remove the paint from the joint surfaces before gluing!
Glue the radiator grille 9.10 to the driver’s cab.
9c
Mark the position of the front bodywork holder 9.11 in
the driver’s cab as shown in the illustration. Press the
captive nut 9.12 into the bodywork holder 9.11, secure
it with a drop of cyano and glue the holder in the dri-
ver’s cab.
9d
Glue the rear bodywork holders 9.13 and 9.14 (with
captive nuts) in place, flush with edge „A“. Check that
there are no gaps in the corners.
9e
Cut down the whip aerial 9.15 to a length of 450 mm,
bend it to shape as shown in drawing 9f and push it
into the driver’s cab.
9g
Cut down the flexible aerial attached to the receiver by
450 mm, and strip the insulation from the cut end.
Solder the plug of the aerial connector 9.18 to the bare
end and push the insulating sleeve into place.
-
Solder the socket of the aerial connector 9.16 to the
end of the whip aerial 9.15, push the insulator over it,
and install the whip aerial in the driver’s cab.
-
Connect the whip aerial to the receiver.


