-
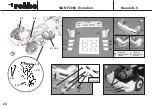
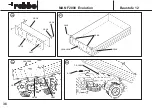
La nervure étroite de la plaque de renfort se trouve
systématiquement en bas.
-
Coller la plaque de tête 12.12 à la plaque de renfort
avant 12.13.
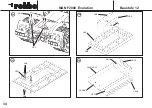
12e Lors du collage de la plaque arrière 12.14 à la plaque
de renfort 12.15 veiller à la coïncidence des alésages.
-
Visser les charnières 12.16 avec les vis 12.17 et les
écrous 12.16 à la plaque arrière.
12f Coller la plaque de tête à l'avant à angle droit sur le
châssis/cuve de la benne.
-
Coller les montants latéraux à la cuve et à la plaque
de tête. Pour ce faire, maintenir la plaque arrière entre
les montants sans la coller toutefois.
-
Peindre maintenant la benne et la plaque arrière.
-
Monter la plaque arrière terminée entre les parois avec
les vis 12.19 et les écrous 12.20 de manière à ce
qu'elle soit en mesure de pivoter.
12g Visser un écrou autobloquant 12.21 sur la tige filetée
12.22.
-
Installer la benne terminée sur la châssis. Planter la
tige filetée dans les porte-palier et l'y fixer avec un
autre écrou autobloquant 12.21.
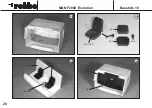
12h Amener le cordon de connexion du variateur hors de
la cabine, vers l'arrière.
-
Munir l'accu d'entraînement 7.2 de morceaux de ruban
adhésif double face 12.23 et l'installer dans le châssis
sans l'y presser pour l'instant. Descendre la benne en
positionnant l'accu entre les longerons. Presser l'accu
sur le châssis.
MAN F2000
Evolution
Baustufe 12
37
-
Note that the narrow lug on the reinforcing plates must
be at the bottom.
-
Glue the front panel 12.12 to the front reinforcing plate
12.13.
12e Glue the rear panel 12.14 to the reinforcing plate
12.15, checking that the holes line up correctly.
-
Attach the hinges 12.16 to the rear panel using the
screws 12.17 and nuts 12.18.
12f Glue the front panel assembly to the front of the frame
/ base plate; check that the parts are at right-angles.
-
Glue the side panels to the floor and the front panel.
Hold the rear panel between the rear end of the side
panels to set the correct spacing, but don’t glue it in
place.
-
The tipper body and rear panel can now be painted.
-
Mount the completed rear panel between the side
panels using the screws 12.19 and nuts 12.20; it must
be free to rotate.
12g Fit one self-locking nut 12.21 on the threaded rod
12.22.
-
Place the completed tipper body on the chassis, slip
the threaded rod through the brackets, and secure it
with the second self-locking nut 12.21.
12h Locate the battery lead attached to the speed control-
ler and route it out of the driver’s cab to the rear.
-
Apply a strip of double-sided foam tape12.23 to the
drive battery 7.2, and place it on the chassis without
pressing it down. Hinge the tipper body down, and
position the battery correctly between the longitudinal
members. Press the battery down onto the chassis in
this position.
-
Der schmale Steg der Verstärkungsplatte befindet sich
jeweils unten.
-
Die Kopfplatte 12.12 mit der vorderen
Verstärkungsplatte 12.13 verkleben.
12e Beim Verkleben der Heckplatte 12.14 mit der
Verstärkungsplatte 12.15 auf deckungsgleiche
Bohrungen achten.
-
Die Scharniere 12.16 mit den Schrauben 12.17 und
den Muttern 12.18 an der Heckplatte verschrauben.
12f Die Kopfplatte vorn rechtwinklig auf den
Rahmen/Muldenboden kleben.
-
Die Seitenplatten am Boden und der Kopfplatte verkle-
ben. Dabei die Heckplatte hinten zwischen die
Seitenplatten halten, ohne sie mitzuverkleben.
-
Mulde und Heckplatte jetzt lackieren.
-
Die fertige Heckplatte mit Schrauben 12.19 und
Muttern 12.20 zwischen den Seitenwänden drehbar
montieren.
12g Eine Stoppmutter 12.21 auf die Gewindestange 12.22
aufdrehen.
-
Die fertige Mulde auf das Chassis setzen.
Gewindestange durch die Lagerböcke stecken und mit
der zweiten Stoppmutter 12.21 sichern.
12h Das Akkuanschlußkabel des Fahrtreglers aus dem
Fahrerhaus nach hinten führen.
-
Den Fahrakku 7.2 mit einem Doppelklebebandstreifen
12.23 versehen und auf das Chassis legen, jedoch
noch nicht andrücken. Mulde herunterklappen, dabei
den Akku zwischen den Längstraversen positionieren.
Akku auf das Chassis drücken.


