background image

29

The option contains identification code (1-9999)  for the fixture, which is used for the master/slave  operation.

 - Adjusting the default positions of the CMY wheels

By this function you can adjust the colour wheels and the dimmer unit to their right positions. Use the [Up] and
[Down] buttons to browse through the adjusting menu -  the display shows step by step these messages: "CYAn,
MAGE,YELL,dimr"
 by which you can adjust the effects to the required positions (0-255) before the function
calibration.Then when the positioning is finished use the last "FCAL" function (Fixture calibration).

1. Calibration via the control board
Press [Enter] and the [Up] and [Down] buttons in order to display the following messages: "CYAn, MAGE,YELL,"
for very smooth function calibration. Select one of them, press [Enter] and use the [Up] and [Down] buttons in
order to adjust their right value from 0 to 255. Then press [Enter] to confirm or [Mode] to cancel and return to the
menu. This can be repeated for each calibration parameter if it is required. When the calibration is finished, it is
necessary to use the "A.rES." function in order to write the calibration values to the memory (EPROM) and to
make a reset in order to check the newly adjusted positions of the CMY-colours. When the reset of the fixture is
finished, the display will show the "F.CAL." message. Press [Enter] to repeat the calibration or [Mode] to return
to the "AdJ" menu.
2. Calibration via the external controller
Connect the DMX controller to the fixture.Press [Enter] and the [Up] and [Down] buttons in order to display the
following messages: "CYAn, MAGE,YELL" - calibration parameters. Select one of them and press [Enter].
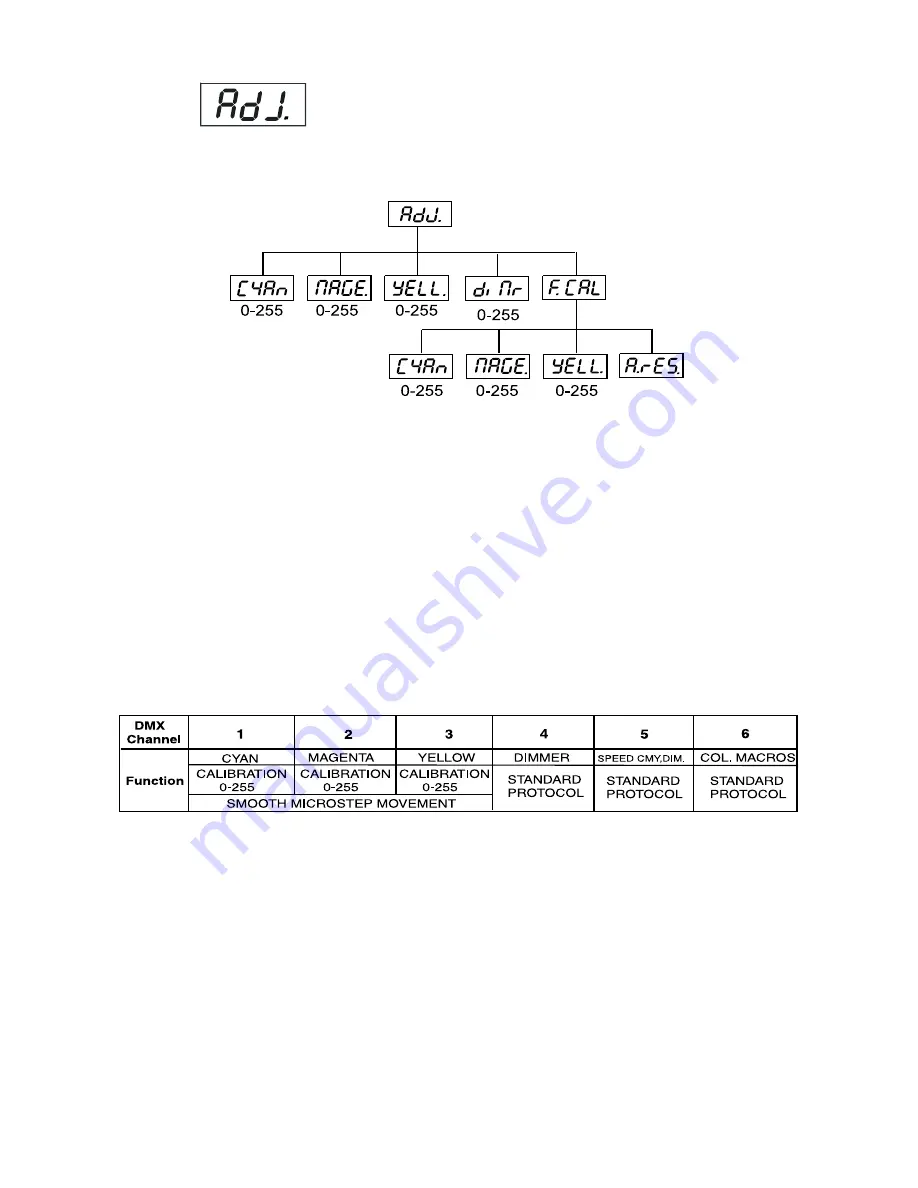
Now you can calibrate the CMY-colours by your controller. The DMX calibration protocol is described in the table
mentioned below.

DMX Calibration protocol:

After having calibrated required functions press [Enter] to confirm (or [Mode] to cancel and return to the menu
without reset by the "A.rES." function) and use the "A.rES." function in order  to write the calibration values to the
memory (EEPROM) and to make a reset in order to check the new adjusted positions of the CMY-colours .

Summary of Contents for ECOLOR 250 XT

Page 1: ......

Page 2: ... master slave connection 13 5 DMX PROTOCOL 14 6 Control of the fixture 15 7 Controller mode 15 7 1 DMX addressing 15 7 2 Remotely and manually controllable functions 16 8 Stand alone mode 16 9 Functions of the control panel 18 9 1 Addressing 18 9 2 Slave control 19 9 3 Fixture informations 19 9 4 Personality options 20 9 5 Switching On Off the lamp 23 9 6 Test sequences 23 9 7 Stand alone setting ...

Page 3: ...amage your device Leave the device switched off until it has reached room temperature This device falls under protection class I The power plug must only be plugged into a protection class I outlet Never let the power cord come into contact with other cables Handle the power cord and all connections with the mains with particular caution Make sure that the power cord is never crimped or damaged by...

Page 4: ...ver be ignited if the objective lens or any housing cover is open as discharge lamps may explose and emit a high ultraviolet radiation which may cause burns The maximum ambient temperature ta 40 C must never be exceeded CAUTION The lens has to be replaced when it is obviously damaged so that its function is impaired e g due to cracks or deep scratches Operate the device only after having familiari...

Page 5: ...cription of the device 1 Front cover of the head 2 Rear cover of the head 3 Bracket bolts 4 Head bracket 5 Base Front side Rear side 6 Lamp cover 7 Patchcord 8 DMX input 9 DMX output 10 Powercord 11 Patchcord ...

Page 6: ... Up button 19 Down button 20 Infra red transmitter 21 Lamp On button 22 Mode button 23 Blackout lamp off button 24 Enter button Display board 12 Green LED 13 Red LED 14 Infra red transceiver 15 Light sensor 16 Display ...

Page 7: ...cturer s notes Do not touch the glass bulb with bare hands during the installation Make sure that the lamp is installed tightly into the lampholder system Reinsert the lamp assembly and tighten the 4 screws V X Y Z Close the small lamp cover with the seal by cross tighten the 4 fastening screws with a torque of 6 7Nm Before striking the lamp reset the LAti rSEt and LASt rSEt counter in the InFO me...

Page 8: ... adjustment of the effects Zoom The lens system can be configured in the range between 8 and 22 beam angles To set the desired beam angle open the front cover by loosening the 8 screws remove the rubber seal loose the 2 adjusting screws on the fresnel lens unit and adjust the required beam angle Tighten the adjusting screws again and fix the front cover with the rubber seal Cross tighten all screw...

Page 9: ...g screws fastening screws 4 5Connection to the mains Verify the power supply settings before applying power If you wish to change the power supply settings see next chapter Connect the fixture to the mains with the protected and weatherproof power plug The earth has to be connected The occupation of the connection cables is as follows Cable EU Cable US Pin International Brown Black Live L Light bl...

Page 10: ...ons 1 Disconnect the fixture from AC power 2 Open the plate cover of the base by loosening the 12 screws and remove the rubber seal 3 Move the wire 1 on the transformer connection block to the position according to the desired voltage 4 Move the wire 2 on the ballast connection block to the position according to the desired frequency voltage 5 Close the base before applying AC power To ensure a we...

Page 11: ...TANT OVERHEAD RIGGING REQUIRES EXTENSIVE EXPERIENCE including but not limited to calculating working load limits installation material being used and periodic safety inspection of all installation material and the fixture If you lack these qualifications do not attempt the installation yourself but instead use a professional structural rigger Improper installation can result in bodily injury and o...

Page 12: ...ixtures is secure Before rigging make sure that the installation area can hold a minimum point load of 10 times the projector s weight Install the fixture away from accidental public contact The fixture is rated to IP65 and may be mounted in any orientation without altering its operation characteristics see the drawing The fixture s head can be adjusted in a vertical range 130 Allow the fixture to...

Page 13: ...apter cables Connect the DMX output of the first fixture in the DMX chain with the DMX input of the next fixture Always connect output with the input of the next fixture until all fixtures are connected Caution At the last fixture the DMX cable has to be terminated with a terminator A termination plug is an XLR connector with a 120 ohm resistor soldered across pins and Building a master slave chai...

Page 14: ... CMY and dimmer 0 255 From max speed to min speed proportional 6 Colour macros Lamp On Off Reset 0 7 Off step 8 15 Macro 1 step 16 23 Macro 2 step 24 31 Macro 3 step 32 39 Macro 4 step 40 47 Macro 5 step 48 55 Macro 6 step 56 63 Macro 7 step 64 71 Macro 8 step 72 79 Macro 9 step 80 87 Macro 10 step 88 95 Macro 11 step 96 103 Macro 12 step 104 111 Macro 13 step 112 119 Macro 14 step 120 127 Macro 1...

Page 15: ...without the controller in stand alone mode Both modes are described in the texts below 7 Controller mode The fixtures are individually addressed 001 507 on a data link and connected to the controller The fixtures respond to the DMX signal from the controller 7 1 DMX addressing The remote control allows you to assign the DMX fixture address which is defined as the first channel from which the ECOLO...

Page 16: ...0 XT If the ignition of the lamp is seven times unsuccessful on the display will appear LA Er meaning that the lamp could be damaged or even missed or there could be a failure on the ignitor or ballast Avoid turning on several lamps at once CMY colors mixing system The CMY color mixing system is based on graduated cyan magenta and yellow color filters A continuous range of colours may be achived b...

Page 17: ...ht sensor are active operation starts within the set times or if it is darker than the light level setting Operation stops at the stop times or if that the ambient light is brighter than the set light level If the time periods overlap each other or if the time period overlaps the light level period the fixture will respond to the events according to their rank For example The played program is the...

Page 18: ...ct dM Ad menu 3 Press Enter button the letter A flashes and by Up and down buttons select required address 001 507 press Enter button to confirm 4 Select MA SL menu press Enter button and use Up and down buttons to select d AbL no master or slave press Enter to confirm 5 Press the Mode button Choosen address is shown on the display If message A001 with actually stored address flashes no DMX data r...

Page 19: ... connected to its input the fixture will respond to DMX signal from the controller in dependence on the fixture s DMX address 9 2 Slave control This function allows you to control the slaves from the master s control panel in a master slave operation Select this function from the main menu and press Enter button Browse the list of all connected slaves SL C 1 SL C 9 by pressing Up and Down bottons ...

Page 20: ...u can read the total number of the lamp strikes since the ECOLOR 250 XT has been fabricated Press Enter or Mode to return to the menu The number of the lamp strikes since the counter was last reset Press Enter or Mode to return to the menu In order to reset the counter to 0 you have to hold the Up and Down button and press the Enter button DMX values Readout DMX values of each channel received by ...

Page 21: ...o hot the fixture will try to ignite the lamp after next 26 s This process will repeat until the lamp lights Use the Up and Down buttons to select On if you want to strike the lamp or Off if you don t want to strike the lamp and press Enter to confirm or Mode to cancel and return to the menu Lamp Off if DMX is missing This function allows you to switch Off the lamp automatically after 2 minutes if...

Page 22: ...ity from 20 to 100 Use the Up or Down buttons to select the level of the display intensity and press Enter to confirm or Mode to cancel and return to the menu Display reverse With this function you can rotate the display by 180 Use the Up or Down buttons to select normal display or display turned by 180 and press Enter to confirm or Mode to cancel and return to the menu Display On This function al...

Page 23: ...e Up and Down buttons until the display shows LAMP Confirm by pressing Enter button Use the Up and Down buttons to select On to switch On the lamp and Off to switch Off the lamp and press Enter to confirm or Mode to cancel 9 6 Test sequences Personality Display Default values SHADED Lamp On after switch the fixture On Display intensity Display reverse Display On Lamp Off if DMX is missing Lamp Off...

Page 24: ...s to select desired program tESt bilt in program or OFF if you don t want to trigger any program and press Enter to confirm or Mode to cancel and return to the menu Selected program will be played continuously in a loop as long as it appears on the display This option should be set OFF for all slaves in the master slave chain by reason of the right program starts For example You have selected prog...

Page 25: ...d 2 Use the Up or Down buttons to specify the start hour and press the Enter button Use the Up or Down buttons to specify the start minute and press Enter Timer 2 stop This function sets the finish of the time period 2 Use the Up or Down buttons to specify the stop hour and press the Enter button Use the Up or Down buttons to specify the stop minute and press Enter If you wish to deactivate theTim...

Page 26: ...254 255 do not affect the state of the fixture Light level stop Use the Up and Down buttons to select the required light level when the operation is to be finished 3 251 and press Enter to confirm or Mode to cancel and return to the menu Important The values 0 1 2 252 253 254 255 do not affect the state of the fixture If you wish to deactivate the light level trigger set the OnL 0 and OFFL 255 Exa...

Page 27: ...trol panels if the master fixture is switched on and connected to the slaves editing is possible by the master control panel only Procedure 1 Press Up or Down button to select the program you want to edit PrG 1 PrG 3 and press Enter 2 Press Up or Down button to select the desired fixture MASt SLA 9 and press Enter button 3 Press Up or Down button to select the desired program step St 01 St 99 and ...

Page 28: ...to select desired function and press Enter to adjust the effect or Mode to cancel and return to the menu Lamp adjustment This function can be used when you make the fine adjustment of the lamp If you select LAAd pressing by Enter button all effects will be canceled shutter will be opened and the dimmer intensity will be set onto 100 By using the options CYAn MAGE YELL dimr you can focus the light ...

Page 29: ...epeated for each calibration parameter if it is required When the calibration is finished it is necessary to use the A rES function in order to write the calibration values to the memory EPROM and to make a reset in order to check the newly adjusted positions of the CMY colours When the reset of the fixture is finished the display will show the F CAL message Press Enter to repeat the calibration o...

Page 30: ... the situation was not caused by the lamp Caution The message is disabled if the lamp light sensor function En Sn is switched Off SnEr This message appears if the lamp lighting sensor is failed Please contact your dealer Caution The message is disabled if the lamp light sensor function En Sn is switched Off MA Er Master error The message informs you that the fixture was addressed as a master and D...

Page 31: ...am manually adjustable Colour temperature correction filter 3200K manually adjustable Beampath Dimmer Smooth dimmer from 0 100 Fan Axial fan in the fixture head Motor 4 high quality stepping motors controlled by microprocessors Electronics Digital serial input DMX 512 6 control channels 8 bit protocol Channel 1 Cyan Channel 2 Magenta Channel 3 Yellow Channel 4 Dimmer intensity ...

Page 32: ...or has to make sure that safety relating and machine technical installations are inspected by an expert after every four years in the course of an acceptance test The operator has to make sure that safety relating and machine technical installations are inspected by a skilled person once a year The following points have to be considered during the inspection 1 All screws used for installing the de...

Page 33: ...l Maintenance and service operations are only to be carried out by authorized dealers Please refer to the instructions under Fitting Exchanging the lamp Should you need any spare parts please use genuine parts If the power supply cable of this device will be damaged cable firmly connected with the device it has to be replaced by authorized dealers only in order to avoid hazards IMPORTANT To ensure...

Page 34: ...se from the fuseholder Step 3 Install the new fuse in the fuseholder Step 4 Reinsert the seal and the plate cover of the base and cross tighten all screws with a torque of 6 7 Nm Replacing the batteries in the remote control Pull off the botton cover of the remote control and take the batteries out Replace the exhausted batteries with a new ones check the voltage and the polarity Push the bottom c...

Reviews: