Cleaning
35
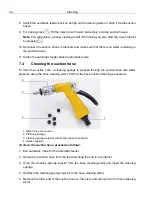
6. Connect the hose cleaning pistol to the water hose and press the cleaning sponge through
the suction hose with water pressure by actuating the hose cleaning pistol.
7. Drain the cleaning water from the suction hose.
8. Reattach one end of the suction hose to the teat and the other end to the mixer.
9. Remove the cleaning sponge from the container.
Note:
Thoroughly clean the cleaning sponge after use and store it in a dry place.
10. Switch the automatic feeder back to automatic mode.
7.5
Cleaning the powder discharge opening
The powder discharge opening must be checked
daily
for milk powder remnants and manually
cleaned if necessary.
WARNING!
Risk of injury due to automatic start-up!
The powder dosing can start up automatically at any time, crushing or cutting off your fingers.
►
Never reach into the danger area of the indicated points as long as parts are able to move
there.
1. Switch off the automatic feeder.
2. Clean the powder discharge with the tool supplied in the delivery. Catch the loosened de-
posits and milk powder and dispose of them.
3. Switch the automatic feeder on again and put it into automatic mode.
7.6
Thorough cleaning of the powder container with the dosing
unit
A thorough cleaning of the powder container with dosing unit is done as needed, but no later
than when the automatic feeder is temporarily taken out of service, for example, for seasonal
lambing. When this is done, milk deposits in the inside of the powder container and the dosing
unit are removed.
NOTICE!
Never use a high-pressure cleaner or similar, since this can damage the automatic feed-
er.
1. Switch off the automatic feeder.
2. Remove the screws holding the safety grid on the powder container. Remove the safety grid.
3. Drain the milk powder container and remove the dosing tongue.
4. Clean the dosing tongue and dry it if need be.
5. Use a dry brush and the cleaning scraper to remove the milk powder deposits in the powder
container and at the powder discharge opening.


