background image

2

Part no. CB-209-1350 10/27/20

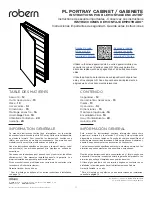
PL Portray Cabinet

© 2020 Robern, Inc. 701 N. Wilson Ave. Bristol, PA  19007  U.S.A.

800.877.2376      

www.robern.com


Installation instructions 

SAFETY

IMPORTANT SAFETY INSTRUCTIONS

DANGER:

 Read all instructions before using this cabinet. 

CAUTION:

 Maximum shelf load 34lbs/15.4kg

When using an electrical furnishing, basic precautions should always be followed, including the following:

WARNING:

 To reduce the risk of burns, fire, electric shock, or injury to persons:

Use this furnishing only for its intended use as described in these instructions. 

Do not use attachments not recommended by the manufacturer. 


Never drop or insert any object into any opening.

Do not use outdoors.

WARNING:

 Risk of electric shock. Connect this furnishing to a properly grounded circuit only. See Grounding instructions.

GROUNDING INSTRUCTIONS 

This product must be connected to a grounded metal, permanent wiring system, or an equipment-grounding conductor must be run with 

the circuit conductors and connected to the equipment-grounding terminal or lead on the product.

WARNING:

 Electrical option cabinet must be wired to a Class A 20 Amp GFCI (Ground Fault Circuit Interrupter) protected circuit when 

used in bathrooms and all other locations required by the National Electric Code.

SAVE THESE INSTRUCTIONS

Summary of Contents for PL PORTRAY Series

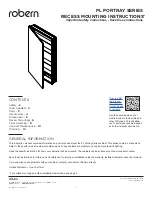
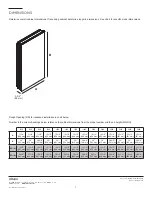
Page 1: ...ers for dimensions These cabinets are modular and can be mounted with lighting Read the specific instruction for how your cabinet s will be mounted The cabinets can be surface mounted or recess mounte...

Page 2: ...instructions Do not use attachments not recommended by the manufacturer Never drop or insert any object into any opening Do not use outdoors WARNING Risk of electric shock Connect this furnishing to...

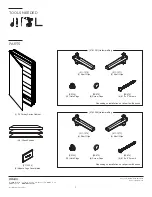
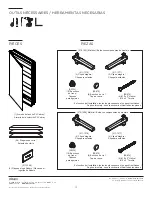
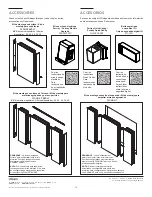
Page 3: ...parts will be used Depending on installation not all parts will be used 3 4 Glass Shelves SS134 10 Hole Plugs SS134 10 Hole Plugs 211 1329 2 Robern Logo Coverplates SS672 6 Screw Caps SS672 6 Screw C...

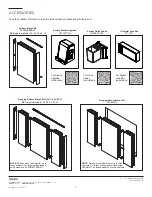
Page 4: ...ount Kit P2SMG KITXXD4P XX Heights available 20 26 30 36 40 IQ Digital Lock Box 211 1331 Ganging Recess Mount Kit P2RMGKIT Portray Electric Upgrade P2ELECTRIC Portray Quick Caddy QUICKCADDY NOTE Reces...

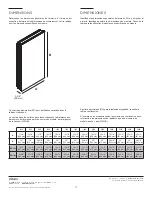
Page 5: ...4 489 mm 23 1 4 591 mm 23 1 4 591 mm 23 1 4 591 mm B 30 762 mm 36 915 mm 39 3 8 1001 mm 20 508 mm 26 661 mm 30 762 mm 36 915 mm 39 3 8 1001 mm 30 762 mm 36 915 mm 39 3 8 1001 mm 30 762 mm 36 915 mm 39...

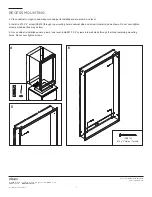
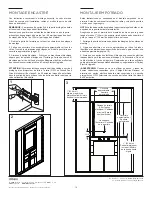
Page 6: ...r from cabinet by taking the hinges off of the mounting plates 2 Make rough opening and frame on all sides Find the specific model dimensions to make rough opening page 5 3 Electrical Option Cabinets...

Page 7: ...n and make sure cabinet is installed square plumb and level 5 Install a 10 X 2 screw SS674 through top mounting hole in cabinet side and screw into wall stud as shown Do not over tighten screws or cab...

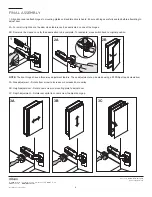
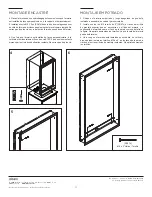
Page 8: ...screw to increase or decrease door overlay 3B Height adjustment Rotate cam screw on mounting plate to adjust door 3C Depth adjustment Rotate rear spiral tech cam screw to adjust door gap 1 Align door...

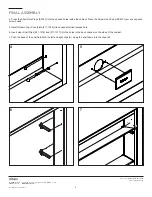
Page 9: ...3 into the unused holes inside the cabinet Place the Screw Head Caps SS672 over any exposed screw heads 5 Install Robern Logo Coverplate 211 1329 into unused electrical access hole 6 Insert clear Shel...

Page 10: ...ucts Some states do not allow limitations on how long an implied warranty lasts or do not allow the exclusion or limitation of incidental or consequential damages so the above limitation or exclusion...

Page 11: ...i n sobre c mo empotrar el armario de la colecci n PL Portray Esta colecci n est disponible en muchos tama os Consulte los c digos espec ficos del modelo para conocer las dimensiones Estos armarios so...

Page 12: ...e A de 20 amp res lorsqu elle est utilis e dans les salles de bain et dans tous les autres endroits requis par le code national de l lectricit ENREGISTREZ CES INSTRUCTIONS INSTRUCCIONES IMPORTANTES DE...

Page 13: ...Mat riel Bolsa con componentes de montaje 211 1376 3 Clips d tag re Clips para estantes 211 1377 3 Clips d tag re Clips para estantes SS674 6 10 x 2 H lice 10 x 2 Tornillo 1 Armoire de la s rie PL Po...

Page 14: ...s P2RMGKIT Mise niveau lectrique Portray Portray Electric Upgrade P2ELECTRIC Portray Quick Caddy Portray Quick Caddy QUICKCADDY REMARQUE Le kit d encastrement permet de monter jusqu trois armoires Pou...

Page 15: ...2 mm RO B 29 1 4 743 mm 35 1 4 896 mm 38 5 8 982 mm 19 1 4 489 mm 25 1 4 642 mm 29 1 4 743 mm 35 1 4 896 mm 38 5 8 982 mm 29 1 4 743 mm 35 1 4 896 mm 38 5 8 982 mm 29 1 4 743 mm 35 1 4 896 mm 38 5 8 9...

Page 16: ...r le code national de l lectricit Estas instrucciones se corresponden al montaje empotrado de su armario Antes de comenzar la instalaci n retire y coloque la puerta a un lado en un lugar seguro NOTA L...

Page 17: ...re est install e de fa on perpendiculaire la verticale et horizontalement fixez des vis 10 X 2 po dans les montants muraux par les trois trous de fixation restants Ne serrez pas trop les vis 4 Coloque...

Page 18: ...e couvre porte 3B R glage de la hauteur Faites tourner la vis de la plaque de montage pour ajuster la position de la porte 3C R glage de la profondeur Faites tourner la vis de la plaque de la spirale...

Page 19: ...s trous du panneau arri re sur les c t s de l armoire 7 Poussez l arri re de l tag re dans les clips gauche et droit A Enfoncez l tag re dans les clips B 4 Presione los tapones de los orificios del es...

Page 20: ...ncorrectos o cuando se hayan hecho reparaciones que no hayan sido autorizadas por ROBERN Una vez haya finalizado el plazo de garant a de un a o ROBERN no estar obligada a cumplir con ning n tipo de ga...

Reviews: