SECTION 13: S
TARTING
T
HE
S
YSTEM
49
SECTION 13: STARTING THE SYSTEM
Start with the main gas valve closed and the electric
power off.
13.1 Checking the Gas Line
1. Open the main valve and verify that no gas is
flowing through the meter.
2. Purge the line if this was not done following
pressure testing with air.
3. Verify that the gas pressure is not above
14'' w.c. (1/2 PSIG).
4. Close the main gas valve.
13.2 Checking the Electrical System
1. See that all temperature setpoints are set below
room temperature.
2. Turn on power supply to system controls.
3. Check to see that no part of the system (i.e.
burners, pump or air supply blower) is powered.
4. Individually check each zone by raising the zone
temperature set points separately. Raising each
zone temperature set point above room
temperature should start the pump immediately.
After a 45 second delay, the burners will begin
their ignition sequence by sparking at the
electrode (visible through the burner window).
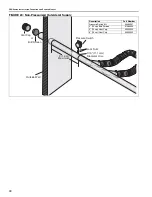
5. Make a preliminary vacuum check at burners in
branches that have an adjustable damper
coupling.
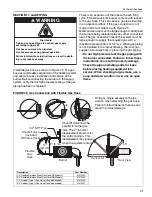
See Page 50, Figure 35
for manome-
ter hookup to check vacuum. This check is to
insure that all dampers are open before the
system is fired. Vacuum, as measured at the
end vents, should be approximately 3.5'' w.c. or
slightly above (cold).
13.3 Starting the System
NOTE:
During the initial firing, the protective oil on
the tubing may smoke for 30 to 60 minutes and
adequate ventilation should be provided.
1. Start with all temperature setpoints below room
temperature.
2. Open main gas valve.
3. Turn up temperature setpoints one zone at a
time, waiting to see that all burners in a zone
start. When the burner ignites, a blue flame will
be observed through the viewer window.
4. If any abnormal operation occurs, see the trou-
bleshooting section of the service instructions.
13.4 Setting the Vacuum
1. Set temperature setpoints above room tempera-
ture. See that all burners are operating properly.
2. Allow at least ½ hour operation for temperature
to normalize, then check system vacuum bal-
ance. Vacuum can be measured by inserting a
manometer hose into the end vent as shown
on
Page 50, Figure 35
. Normal end vent vacuum
should be set at approximately 2.5'' w.c. to 3.0''
w.c. (hot).
Vacuum adjustments are made by means of the
damper in the pump inlet and the adjustable
damper coupling(s) in the system. Check the
vacuum at all end vents and then adjust the
damper coupling to obtain equal vacuum
readings of 2.5'' w.c. to 3.0'' w.c. If end vent
vacuum exceeds 3.0" w.c., adjust the pump inlet
damper until vacuum readings are 2.5'' w.c. to
3.0'' w.c.
With systems designed to operate at maximum
vacuum, it may not be possible to obtain
vacuum differential readings at or slightly above
2.5'' w.c. If so, adjust the damper couplings to
maximum but equal vacuum reading. Be sure to
lock all dampers securely after adjustment.
3. Reset temperature setpoints to desired room
temperature.
4. If heat is not required, turn off main switch and
close the main gas valve.

