background image

9

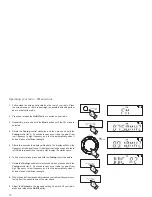
Finding new stations - DAB

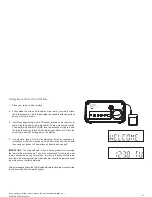
From time to time, new DAB radio stations may become available. Or you 
may have moved to a different part of the country. In this case you may 
need to cause your radio to scan for new stations.

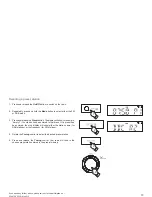
1.  Press and release the 

On/Off 

button to switch on your radio.

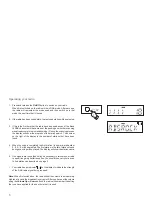
2.  If needed, repeatedly press and hold the 

Mode 

button until the DAB 

mode is selected.

3.  Press and release the 

Menu 

button. The advanced DAB menu will 

show on the display. 

4. Rotate 

the 

Tuning 

control until the display shows 

'SCAN'

.

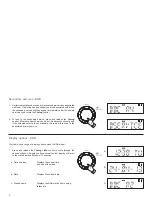
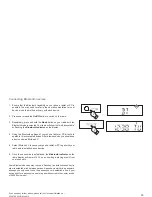
5.  Press and release the 

Tuning 

control. Your radio will perform a scan 

of the Band  III DAB channels. As new stations are found, the station 
counter on the right-hand side of the display will increase and stations 
will be added to the list.

1

2,3

4,5

Summary of Contents for Blutune 40

Page 1: ...Please read this manual before use ROBERTS DAB DAB FM Bluetooth digital radio Enjoy Listening ...

Page 2: ...Connecting Bluetooth devices 20 Playing audio files in Bluetooth mode 21 Disconnecting a Bluetooth device 22 Setting alarm times 23 25 Contents When the alarm sounds 26 Cancelling alarms 26 Snooze function 27 To view the alarm settings 27 Sleep function 28 Setting the clock format 29 Setting the clock manually 30 31 Automatically updating the clock 32 Clock display 33 Display backlight dimmer 33 S...

Page 3: ...line on 2 Controls Top 1 LCD display 2 Tuning Select Info control 3 Menu Mode Snooze button 4 Loudspeaker 1 5 4 2 3 6 8 7 5 Volume Down Alarm 1 button 6 On Off Sleep button 7 Preset Dimmer button 8 Volume Up Alarm 2 button Button operation Short press Long press ...

Page 4: ...3 Controls rear 9 DAB FM wire aerial 10 USB socket for software upgrades only 11 Auxiliary input socket 12 Headphone socket 13 DC input socket 14 Charging socket 9 10 11 12 13 14 ...

Page 5: ...dio is scanning to find a DAB radio signal After a short time the current time and day will appear on the display 4 If no signal is found 0 00 will be displayed It may be necessary to relocate your radio to a position giving better reception You should then carry out a scan to find stations as described on page 9 IMPORTANT The mains adaptor is used as the means of connecting the radio to the mains...

Page 6: ...ay is the number of stations that have been found 4 When the scan is completed the first station in numeric alpha order 0 9 A Z will be selected The first station in the list of stations found during scanning will be played The display will show the station name 5 If no signals are found then it may be necessary to relocate your radio to a position giving better reception You should then carry out...

Page 7: ...e radio station currently selected 3 Rotate the Tuning control to step through the list of available stations 4 When the desired station name appears on the display press and release the Tuning control to select the station The radio will select the new station 5 Adjust the Volume buttons to the required setting Note If after selecting a station the station does not connect it may be necessary to ...

Page 8: ...ces do not broadcast continually and if the selected service is not available the radio will re tune to the associated primary service Display options DAB Your radio has a range of display options when in DAB mode 1 Press and release the Tuning Info control to cycle through the various options All display options except the text display will revert to the clock display after about 10 seconds a Tim...

Page 9: ...tened to e g Pop Classic News etc f Multiplex Name Displays the name of the DAB multiplex to which the current station belongs g Frequency Displays the frequency for the currently tuned DAB station h Bit rate Displays the digital audio bit rate for the currently tuned DAB station i Signal strength Displays the signal strength for the station being listened to The minimum signal markershowstheminim...

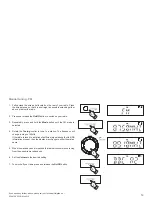
Page 10: ...adio 2 If needed repeatedly press and hold the Mode button until the DAB mode is selected 3 Press and release the Menu button The advanced DAB menu will show on the display 4 Rotate the Tuning control until the display shows SCAN 5 Press and release the Tuning control Your radio will perform a scan of the Band III DAB channels As new stations are found the station counter on the right hand side of...

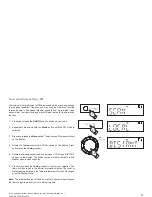
Page 11: ...advanced DAB menu will show on the display 2 Rotate the Tuning control until the display shows MANUAL Press and release the Tuning control to enter the manual tune mode 3 Rotate the Tuning control to select the desired DAB channel 4 Press and release the Tuning control to tune to the chosen frequency 5 If a signal is present this will be indicated on a signal strength display The minimum signal ma...

Page 12: ... selected 3 Press and release the Menu button The advanced DAB menu will show on the display 4 Rotate the Tuning control until DRC appears on the display Press and release the Tuning control The display will show the current DRC value 5 Rotate the Tuning control to select the required DRC setting default is 0 6 Press and release the Tuning control to confirm the setting After several seconds the d...

Page 13: ...o switch on your radio 2 Repeatedly press and hold the Mode button until the DAB mode is selected 3 Press and release the Menu button The advanced DAB menu will show on the display 4 Rotate the Tuning control until PRUNE appears on the display Press and release the Tuning control 5 Rotate the Tuning control to select Y Press and release the Tuning control to cause the stations list to be pruned el...

Page 14: ...nt strength 5 After a few seconds the display will update The display will show the frequency of the signal found If the signal is strong enough and there is RDS data present then the radio may display the station name 6 To find other stations press and hold the Tuning control as before 7 Rotate the Tuning control anti clockwise and then press and hold the Tuning control for 2 3 seconds to cause y...

Page 15: ...epeatedly press and hold the Mode button until the FM mode is selected 4 Rotate the Tuning control to tune to a station The frequency will change in steps of 50kHz If the radio is tuned to a station of sufficient signal strength with RDS information present then the display may change to show the station name 5 When the waveband end is reached the radio will recommence tuning from the opposite wav...

Page 16: ...splay will revert to the clock display after about 10 seconds a Time and day Displays the current time and day b Date Displays current date c Station name Displaysthenameoftheradiostationbeing listened to d Scrolling text Displays scrolling text messages such as artist track name phone in number etc e Programme type Displaystypeofstationbeinglistenedto e g Pop Classic News etc f Frequency Displays...

Page 17: ... selected 3 Press and release the Menu button The advanced FM menu will show on the display 4 Rotate the Tuning control until SCAN shows on the display Press and release the Tuning control 5 Rotate the Tuning control to switch between LOCAL and DISTANT options on the display The Distant option will allow the radio to find weaker signals when scanning 6 Press and release the Tuning control to confi...

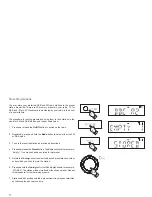
Page 18: ...peatedly press and hold the Mode button to select either the FM or DAB mode 3 Tune to the required station as previously described 4 PressandreleasethePresetbutton Thedisplaywillshow forexample Empty 1 if no station has been stored to that preset 5 Rotate the Tuning control to select the desired preset station number under which you wish to store the station 6 PressandholdtheTuningcontroluntilthed...

Page 19: ...de 3 PressandreleasethePresetbutton Thedisplaywillshow forexample Empty 1 if no station has been stored to that preset If a preset has been stored then the display will show either the station name for DAB stations or the frequency for FM stations 4 Rotate the Tuning control to select the desired preset station 5 Press and release the Tuning control Your radio will tune to the chosen preset statio...

Page 20: ...man bodies brick and concrete walls heavy furniture or bookcases will all reduce the operational range of your Bluetooth devices to a greater or lesser extent Glass dry wall or wood paneled walls and office partitions may have a less severe but noticeable effect Metal pipes foil lined plasterboard metal window frames and domestic wiring can also have an effect You should position your Bluetooth de...

Page 21: ...sing the Bluetooth settings of your phone tablet or PC direct it to search for discoverable devices After a few seconds you should see a device named Blutune 40 5 Select Blutune 40 to cause your phone tablet or PC to pair with your radio and to establish a connection 6 Once the connection is established the Bluetooth indicator on the radio display will remain lit You can now begin playing music fr...

Page 22: ...t the radio s volume control is used as the means of adjusting the audio volume You will then need to set the volume on the connected Bluetooth device to a higher level The purposehereistopreventunexpectedlyloudnoisesintheheadphones when changing modes in the radio or when switching on and off 3 The audio player in your phone tablet or PC may be able to respond to the Play Pause Next track and Pre...

Page 23: ...will sound a double beep provided that your radio s volume is set to a suitable listening level 3 The radio will disconnect device and then will become discoverable foraperiodofapproximately60seconds TheBluetoothindicatorwill flash on the screen You may then pair your radio with a new device Some Bluetooth devices will automatically connect while others may need you to confirm the connection If no...

Page 24: ...se the On Off button to switch off your radio 2 Press and hold the Alarm 1 or Alarm 2 button 3 Alarm 1 or Alarm 2 will show on the display and the alarm indicator will flash on the display 4 Press and release the Tuning control to enter the alarm setting menu 5 Rotate the Tuning control to select ON or OFF If OFF is selected any current setting for that alarm will be cancelled 6 With ON selected p...

Page 25: ...re to set either AM or PM 11 Rotate the Tuning control to choose the desired alarm day option Once Will sound at one time only Weekends Will sound only on weekends Weekdays Will sound only on weekdays Daily Will sound everyday Ifsettingthealarmtoonceonly continuewithstep12below Otherwise skip to step 18 on the following page 12 Press and release the Tuning control to enter the setting The alarm da...

Page 26: ... choose either LAST to wake up to the last listened radio station or from a preset on the display Note That you can only set the alarm to use a preset which has already been stored Please see Presetting stations page 17 20 Press and release the Tuning control The volume setting will show on the display 21 Rotate the Tuning control to choose the desired alarm volume The radio uses the saved volume ...

Page 27: ... alarm setting procedure When your radio is set to wake by the radio alarm your radio will switch to the selected radio station If the radio cannot connect to the specified radio station the buzzer will be used instead Note If the radio is switched on because of a radio alarm you can control basic functions such as the volume control When the buzzer alarm activates it will start softly and gradual...

Page 28: ...rm You may use the Tuning control to modify any particular setting if desired using the Tuning control to enter the modification 3 2 Snooze function 1 Whentheradioorbuzzeralarmsounds pressandreleasetheSnooze button This will silence the alarm for 5 minutes WhentheSnoozebuttonhasbeenpressedduringanalarm thedisplay will show the Snooze symbol This sequence can be repeated during the 60 minute alarm ...

Page 29: ...e in increments from 15 minutes up to 90 minutes A further increment will cause the sleep timer to be set to OFF which will cancel the sleep function 3 Press and release the Tuning control The display will exit the sleep options 4 Your radio will switch off after the preset sleep time has elapsed 5 To view the remaining sleep time press and hold the Sleep button and then release the button The rem...

Page 30: ...e the Tuning control until SYSTEM appears on the display Press and release the Tuning control 4 Rotate the Tuning control until TIME appears on the display Press and release the Tuning control 5 Rotate the Tuning control until 12 24 HR appears on the display Press and release the Tuning control 6 Rotate the Tuning control to display either 12 or 24 hour format 7 Press and release the Tuning contro...

Page 31: ...ws on the display 3 Rotate the Tuning control until SYSTEM appears on the display Press and release the Tuning control 4 Rotate the Tuning control until TIME appears on the display Press and release the Tuning control 5 Rotate the Tuning control until SET TIME appears on the display 6 Press and release the Tuning control to enter the manual setting procedure The hour digits will then flash on the ...

Page 32: ...o select the current day 12 Press and release the Tuning control to enter the day setting The month will then flash on the display 13 Rotate the Tuning control to select the current month 14 Press and release the Tuning control to enter the month setting The year will then flash on the display 15 Rotate the Tuning control to select the current year 16 Press and release the Tuning control to confir...

Page 33: ...SYSTEM appears on the display Press and release the Tuning control 4 Rotate the Tuning control until TIME appears on the display Press and release the Tuning control 5 Rotate the Tuning control until UPDATE appears on the display Press and release the Tuning control 6 Rotate the Tuning control to choose an update option from ANY DAB FM or NONE 7 Press and release the Tuning control to confirm your...

Page 34: ...and release the Menu button until the advanced menu shows on the display 3 Rotate the Tuning control until SYSTEM appears on the display Press and release the Tuning control 4 Rotate the Tuning control until DIMMER appears on the display Press and release the Tuning control 5 Rotate the Tuning control to choose between LOW MEDIUM HIGH or to OFF 6 Press and release the Tuning control to confirm you...

Page 35: ...tton to switch on your radio 2 Press and release the Menu button The advanced menu will show on the display 3 Rotate the Tuning control until SYSTEM shows on the display 4 Press and release the Tuning control 5 Rotate the Tuning control until SW VER shows on the display 6 Press and release the Tuning control The display shows the software information 7 Press and release the Menu button to exit the...

Page 36: ...e display 3 Rotate the Tuning control until SYSTEM shows on the display 4 Press and release the Tuning control 5 Rotate the Tuning control until LANGUAGE appears on the display 6 PressandreleasetheTuningcontroltoenterthelanguageadjustment menu 7 Rotate the Tuning control until your desired language appears on the display 8 Press and release the Tuning control to confirm your choice The display wil...

Page 37: ...t N and then press and release the Tuning control The display will revert to the previous display 5 With Y displayed press and release the Tuning control A full reset will be performed The station list and presets will be erased Alarms will be cancelled and settings will be set to their default values The display will show WELCOME and after a short time the current time and day will appear on the ...

Page 38: ...ono audio source i e CD player MP3 player etc to the Auxiliary input socket 2 Press and release the On Off button to switch on the radio 3 Repeatedly press and hold the Mode button until the display shows AUX IN 4 AdjusttheVolumecontrolonyourplayerandontheradioforcomfortable listening 5 Remove the cable from the Auxiliary input socket or press and hold the Mode button to cancel Auxiliary Input mod...

Page 39: ...smart phone and similar devices Charge time may vary and in some cases may take longer to charge than whenusingthemanufacturerschargingunitsuppliedwiththesmartphone 1 Ensure your radio is plugged in 2 Connect your smart phone to the USB charging socket at the rear of your radio 3 Your iPhone or smart phone will begin to charge 4 Once your iPhone or smart phone has charged remove the USB lead 2 ...

Page 40: ...Software upgrades In the event that any software update is made available for your radio information on how to update your radio will be made available via our website at http www robertsradio co uk 39 ...

Page 41: ...cated on the rear of the unit Your radio should not be exposed to dripping or splashing and that no objects filled with liquids such as vases shall be placed on the radio It is recommended to operate the product such that there is a minimum distance 10cm recommended to adjacent objects in order to ensure good ventilation The ventilation of the product should not be restricted by covering it or its...

Page 42: ...it Features Loudspeaker 78 mm Output Power 5 Watt Headphone socket 3 5mm dia Auxiliary input socket 3 5mm dia Aerial System FM Wire aerial DAB Wire aerial Specifications Power Requirements Mains AC 230V 50 60 Hz Adaptor Frequency Coverage FM 87 5 108MHz DAB 174 928 239 200MHz 41 ...

Page 43: ...2 Consequential damage 3 Receivers with removed or defaced serial numbers Procedure Any claim under this guarantee should be made through the dealer from whom the instrument was purchased It is likely that your Roberts dealer will be able to attend to any defect quickly and efficiently but should it be necessary the dealer will return the instrument to the Company s service department for attentio...

Page 44: ...RTS RADIO TECHNICAL SERVICES 97 99 Worton Road Isleworth Middlesex TW7 6EG Technical Helpline 020 8758 0338 Mon Fri during office hours Website http www robertsradio co uk 2013 Roberts Radio Limited Issue 1 ...

Reviews: