background image

If you need any further advice, please call our Technical Helpline on :-

020 8758 0338 (Mon-Fri)

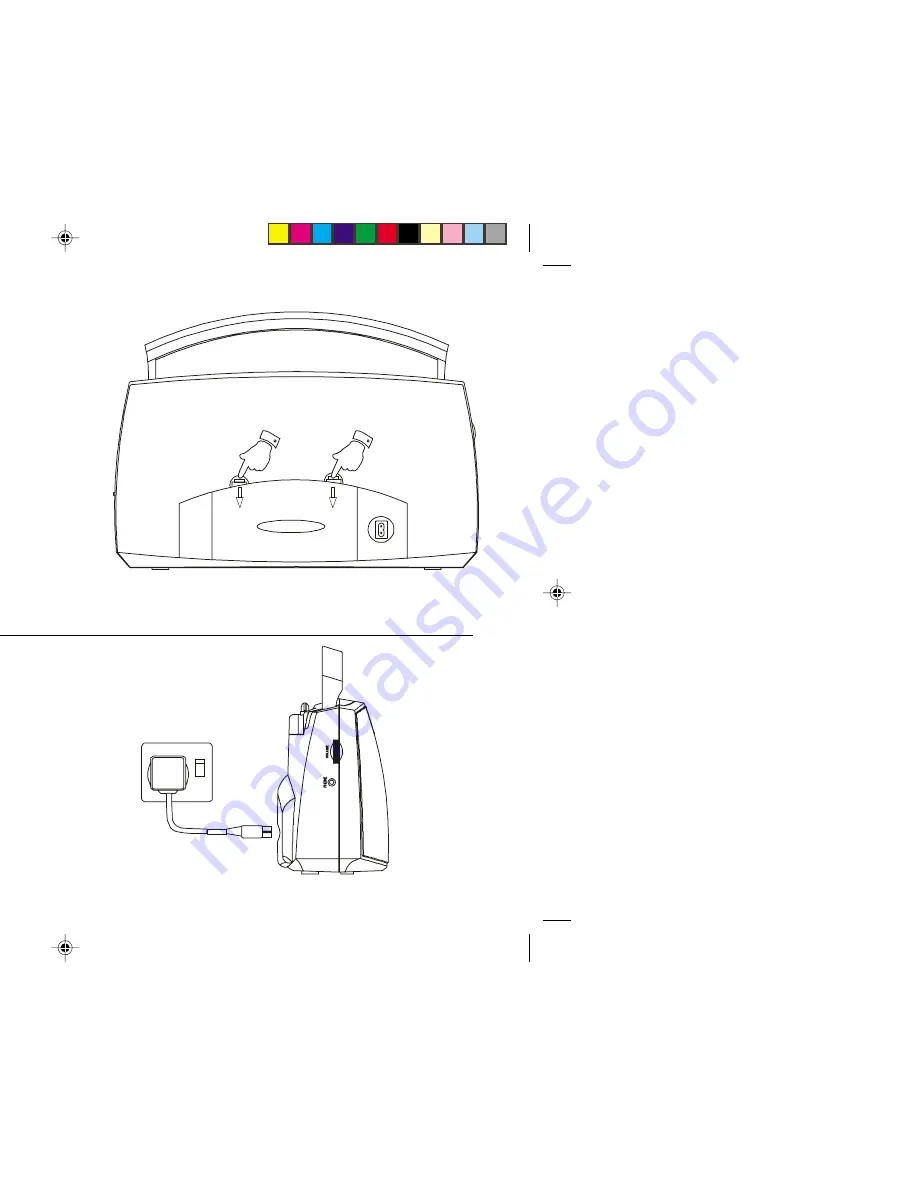
Mains operation

1.

Place your radio on a flat surface.

2.

Plug the mains lead into the 

Mains socket

 located on the rear of your

radio ensuring that the plug is pushed fully into the socket.

3.

Plug the other end into a wall socket and switch on. The

 Mains

indicator

 will light up indicating that the radio is connected to the

mains supply.

ON

Battery operation

1.

Remove the 

Battery cover

 on the rear of your radio by pushing the

catches in the direction of the arrows.

2.

Insert two LR03 (AAA size) batteries into the small spaces in the
battery compartment. Insert four LR14 (C size) batteries into the
remaining spaces in the compartment. Take care to ensure all
batteries are inserted with the correct polarity as shown inside the
battery compartment. Replace the battery cover.

note : the two LR03 batteries provide power for the clock/
memory backup and must be fitted at all times.

3.

Reduced power, distortion, and a ‘stuttering’ sound are all signs that
the batteries may need replacing. If the radio is not to be used for any
extended period of time it is recommended that the batteries are
removed from the radio.

We would recommend for economy, that the  R9905 is used on the
mains whenever possible with battery operation for occasional or
stand-by use only.

2

R9905 Instruction Book.pm6

24/10/99, 14:21

3

Summary of Contents for R9905

Page 1: ...ead this manual before use M a in s L ig h t S n o o z e T u n in g M e m o P L L D ig ita l 3 B a n d R e c e iv e r R 9 9 0 5 1 2 3 4 5 U p D o w n M e m o A la rm M o d e DIGITAL F M 8 7 5 1 0 8 M H z M W 5 2 0 1 7 1 0 k H z L W 1 4 4 2 9 0 M H z 24 10 99 14 21 ...

Page 2: ... 2 2 3 4 5 6 6 7 7 8 9 9 10 10 11 11 11 11 12 12 13 13 14 24 10 99 14 21 ...

Page 3: ...on ear of your he Mains ted to the O N ushing the ces in the s into the ensure all inside the he clock signs that ed for any teries are sed on the asional or 2 24 10 99 14 21 ...

Page 4: ... 2 3 4 5 U p D o w n M e m o A la rm M o d e DIGITAL F M 8 7 5 1 0 8 M H z M W 5 2 0 1 7 1 0 k H z L W 1 4 4 2 9 0 M H z 2 4 12 3 5 6 7 8 9 10 11 13 14 15 n tton utton 9 Alarm button 10 Alarm mode button 11 Powerbutton 12 Modebutton 13 Memory button 14 Preset buttons 15 Memory up button 1 24 10 99 14 21 ...

Page 5: ...on 4 Right side 19 olume control eadphonesocket Mains socket elescopicaerial Wavebandswitch ey lock switch on underside 20 F M M W L W 21 24 10 99 14 21 ...

Page 6: ...5 Wavebandindicators 6 Preset indicator 7 Frequency units 8 Frequency time digits 6 2 3 4 5 7 8 24 10 99 14 21 ...

Page 7: ...on how 0 00 ash e button n as 14 00 ime and a flashes in e button T u n in g T u n in g M o d e M o d e M o d e M o d e M o d e 6 24 10 99 14 21 ...

Page 8: ...waveband elescopic n s until the he button imeitfinds rol to the re Search ning or F M M W L W T u n in g waveband elescopic n hange the MW9kHz level F M M W L W T u n in g 24 10 99 14 21 ...

Page 9: ...on avebands methods pear in the nder which The preset isflashing F M M W L W M e m o T u n in g 1 2 3 4 5 M e m o 8 24 10 99 14 21 ...

Page 10: ...m o ction This radio was P o w e r L ig h t S n o o z e T u n in g M e m o P L L D ig ita l3 B a n d R e c e iv e r R 9 9 0 5 1 2 3 4 5 U p D o w n M e m o A la rm M o d e DIGITAL F M 8 7 5 1 0 8 M H z M W 5 2 0 1 7 1 0 k H z L W 1 4 4 2 9 0 M H z 24 10 99 14 21 ...

Page 11: ...on o the level symbol the down switch off or24hours elease the isplay A la rm symbol p position l switch off or24hours elease the isplay A la rm A la rm A la rm 10 24 10 99 14 21 ...

Page 12: ...y pressing ing the 90 S n o o z e d isreached choffafter red press splay L ig h t to prevent the buttons will he radio is e switch to e removed 24 10 99 14 21 ...

Page 13: ...on o not leave n a parked he outside e FM band uality and MW or LW nd of your earpiece ernal loud V o lu m e 12 24 10 99 14 21 ...

Page 14: ...50 mW into 4ohms Headphonesocket 3 5mm dia Aerial System FM Telescopicaerial MW Built in Ferrite aerial LW Built in Ferrite aerial ROBERTSRADIOLIMITED PO BOX 130 MEXBOROUGH SOUTH YORKSHIRE S64 8YT s the right to amend the specification without notice 24 10 99 14 21 ...

Page 15: ...amage with removed or defaced serial numbers d under guarantee ealer from whom the instrument was purchased It is likely that your Roberts dealer will it be necessary the dealer will return the instrument to the company s service department ument to the Roberts dealer from whom it was purchased please contact Roberts Radio fore taking further action o not affect the statutory rights of a consumer ...

Page 16: ...CHNICAL SERVICES DEPARTMENT 97 99 Worton Road IsleworthMiddlesex TW7 6EG elpline 020 8758 0338 Mon Fri Issue 1 24 10 99 14 21 ...

Reviews: