104598 Issue F
ECN: 06 180
I N S T A L L A T I O N I N S T R U C T I O N
CANOPY RANGEHOOD
All dimensions are in millimeters
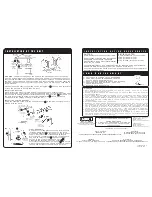
P R O D U C T D I M E N S I O N S
225
Min 555
Max 885
170
500
597 (600 Model)
897 (900 Model)
1216 (1201 Model)
230-250
Note: Generic model is shown.
Actual product may differ.
C A N O P Y O P E R A T I O N
I N S T A L L A T I O N O F U N I T
Thank you for purchasing a quality stainless steel canopy rangehood. We have a
high standard of quality control and each rangehood is tested and approved before
it leaves the factory.
IMPORTANT: Please read prior to installation or operation
• Always switch power off prior to installing, servicing or cleaning the appliance.
• Never use the appliance without filters.
• Please read the notes on general cleaning, especially the filters.
• Exhaust air must not be discharged into a heating flue or wall cavity, unless the
cavity is designed for that purpose.
• Areas where the rangehood is installed that also have gas, oil or coal fired
heaters, must be well ventilated to prevent a partial vacuum in the room. This
includes gas hobs. (A partial vacuum in the room could result in too high a
concentration of gas in the atmosphere).
• The appliance is supplied with an approved power cable which must not be
changed. If the supply cord of this equipment is damaged, it must only be
replaced by the manufacturer or its service agent or similarly qualified person in
order to avoid hazard.
The unit is designed for 2.4 to 2.7 metre high ceiling. The decorative chimney cover
is telescopic and is designed for 550 to 850mm adjustment.
Note: Ducting accessories are not supplied. Please refer to the optional ducting kits.
The air outlet from the motor requires 150mm round ducting which requires 160mm
diameter round hole in the ceiling. This hole will be covered by the decorative
chimney. Care should be taken to align canopy with decorative chimney allowing
sufficient clearance to accommodate the ducting.
Before starting assembly, read the instructions carefully and remove the filters from
canopy to allow access to wall mounting holes. To remove the filters, pull the
relative catch and tilting it downwards until it disengages from the supports.
Reverse these instructions when refitting the filters.
NOTE: Stainless steel is very easily damaged during installation if abraded or knocked
by tools.
M A I N T E N A N C E
Particular care must be taken with grease filters which must be periodically cleaned
(at least every two months). Remove the grease filters and wash them either by
hand or in the dishwasher using mild detergent. CAUTION: Never use products
containing abrasives (e.g. scouring pads, steel wool, abrasive liquid cleaner etc.)
Use lukewarm water and mild detergent to clean stainless steel components. In high
humidity and coastal environments, cleaning should be carried out frequently.
Care and attention should always be taken when cooking with oils, alcohol, etc;
which give off flammable vapours.
Pre-used oil is especially dangerous in this respect. Do not use uncovered electrical
grill.
To avoid possible risks of fire always comply with the maintenance instruction below.
ATTENTION: This appliance must be earthed
When making the electrical connection, check that the socket has an earth
connection and that the voltage values correspond to those indicated on the rating
plate inside the appliance. The power socket connection is to be easily accessible
after installation.
CONTROL PANEL
Left Push Button (01)
= Fan On/Off Speed 1
Second Push Button (2) = Fan Speed 2
Third Push Button (3)
= Fan Speed 3
Fourth Push Button (T)
= Fan/Light Timer - 5 Mins
Fifth Push Button (L)
= Light On/Off
PLEASE READ THE ENTIRE INSTRUCTION BEFORE INSTALLING THE CANOPY
01
2
3
T
L


