
Fig. 13
- 6 -
- 3 -
104574 Issue D
ECN: 07 007
For easy installation, proceed as follows:
Fix the wall brackets
Fix the canopy
Electrical connection and working test
Ducting or Recirculation fitting
Fix the telescopic chimney
Fitting the wall brackets
Please refer to (fig.2):
Ensure the
correct vertical alignment of the
various parts.
Fixing the wall brackets item
2
:
a) Place one of the brackets
2
against the
wall approximately 1 or 2mm from the
ceiling or from the top limit, aligning its
centre (slot) with the vertical line.
b) Mark the centres of two slots in the
bracket on the wall.
c) Rest the other bracket
2
against the
wall,
aligning it with the vertical line, with
the centres of the holes 180mm apart.
d) Mark the centres of the slot in the
bracket
on the wall.
Drilling fixing holes item
1
:
a) Mark a point on the vertical line at a
distance of 982mm (min) from the
cooking appliances.
b) At the point marked, draw a horizontal
line parallel to the cooking appliances.
c) Drill two holes in the wall
1
using an 8 mm
drill bit (fig.2), and insert the rawl plugs and
screws
into the holes (4.2 x 44.4 screws).
Fix the screws, leaving a space of 5-6mm
required
to hook up the canopy. Small
adjustments can be made using the hood
adjustment screws(see Fitting the canopy).
The hood should have a maximum excursion
of 20mm.
(Note: it may be neccesary to change the type
fixing elements depending on wall construction)
Active carbon filter
Operation
The activated charcoal filter when fitted
will retain odours until it becomes saturated.
It cannot be washed or regenerated and
must be replaced when the Intensive Speed
LED
T5
starts to flash,or at least once every
four months of use.
WARNING: In recirculation type hoods the
T2
Motor LED may start to flash as well as the
T5
LED. This indicates that as well as
replacing the activated charcoal filter,it is
also necessary to perform maintenance
operations on the metal grease filters
(see paragraph Metal grease Filter ).
Replacing
Take off the metal grease filters (fig.11) and
remove the activated charcoal filter from its
housing by turning the clips provided ( fig.12). Fit
the new activated charcoal filter and replace the
metal grease filters.
Enabling the alarm signal In recirculation type hoods
the saturated filters alarm must be enabled as indicated
below:
Turn off the lights
T1
and the Suction Motor
T2
;
Press and hold the button
T4
for at least 10 seconds,
until the Leds start to flash.Note the number of flashes:
Two flashes of the LED Activated charcoal filter
saturation alarm ENABLED
One flash of the LED Activated charcoal filter
saturation alarm DISABLED
Resetting the alarm signal To turn the alarm signal off,
proceed as follows:
Press the button
T4
and hold for at least 3 seconds,
until the Led flashes to confirm. Note: the saturated
filters alarm will only come into operation when the
suction motor is turned on.
WARNING - There could be a possible fire hazard if the filters are not
replaced according to these instructions.
Fig. 12
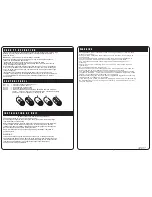
Lighting
Halogen spotlights:
two 20w halogen spotlights.
To replace (fig.13)
Remove the two screws fixing the metal ring, extract
the spotlight from the lamp holder by pulling gently.
When replacing the spotlight, make sure that the two
pins are correctly inserted in the housing on the lamp
holder.
Cleaning
When cleaning the hood:
Never use a wet cloth or sponge, or running water.
Never use thinners or products containing alcohol,
as they might damage any printing.
Never use abrasive cleaning materials, in particular
when cleaning stainless steel surfaces.
It is recommended to use a damp cloth and mild
liquid household cleaner.
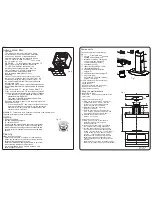
Components
The hood comprises the following
(fig.1):
1 canopy
C
complete with controls,
lighting and ventilator unit
1 telescopic chimney, comprising:
1 upper chimney element
S
1 lower chimney element
I
2 directional grills
G
1 reduction flange Ø150-120
A
1 recirculation spigot
R
2 additional side recirculation
spigots
P1
1 additional recirculation spigot
P
1 bag containing:
2 brackets
2
to fix the chimney,
screws, rawl plugs.
Fig. 1
2
A
R
P1
D
G
V
S
I
C
P
Fig. 2
232
260
1
1
2
260
1
1
232
260
1
1
2
260
1
1
20
X
d = 982 min
180


